- REVIEWS
Camera Reviews 
More Reviews Mobile Reviews Photography Reviews - GALLERIES
- VIDEOS
- BUYER'S GUIDES
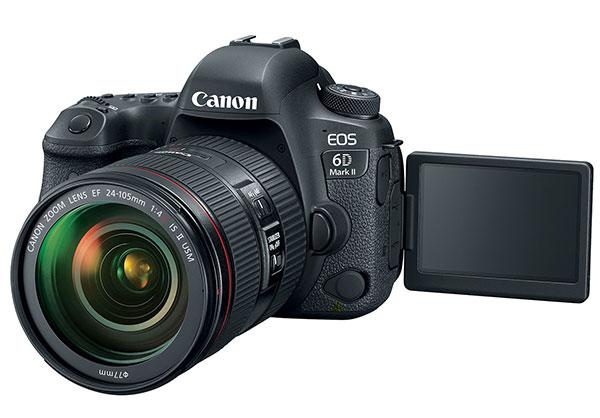
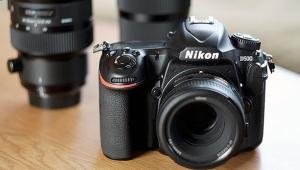
Canon EOS 6D Mark II DSLR Review
(Editor's Note: You can see 10 full resolution images we shot with the Canon EOS 6D Mark II in our hands-on preview when the camera launched.)
When I checked Canon’s website to verify the specs on the EOS 6D Mark II ($1,999, body only; $3,099, for the test camera supplied with the EF 24-105mm f/4L IS USM “kit” lens) I was a bit surprised to see it termed a “gateway” for enthusiasts to step up to a full-frame DSLR. That’s a new one to me, but that indeed is what this camera is.
Packed with pro and enthusiast features alike, the Canon 6D Mark II is a thoroughly modern DSLR that incorporates the latest technology and a navigational setup that makes moving through and selecting from its many options a breeze. Read what I thought of the Canon 6D II in this review.
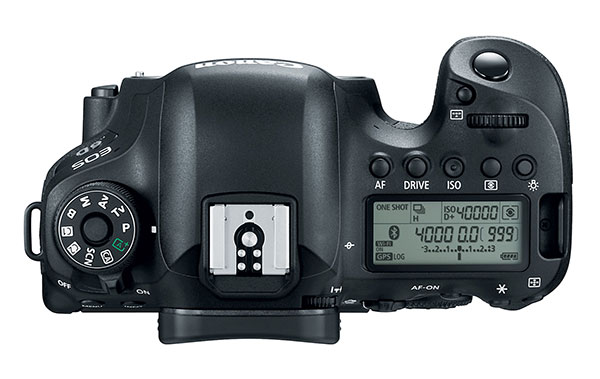
Handling & Layout
The Canon 6D Mark II’s layout will be familiar to most who have worked with a DSLR. But if you haven’t swapped models in a while, or haven’t handled the company’s EOS 80D, one of the 6D Mark II’s hallmarks is a touch command setup. This mimics settings you might make with the still included and numerous buttons, multi-controller ring, and command dial, but with touch control you simply press your finger on the option on the LCD and “touch” the desired setting.

You can even pinpoint focus on the subject and release the Canon 6D II’s shutter by pressing via the touch method. You can slide, too: for example, for exposure compensation, or ISO and other controls, evoke the scale and then slide your finger along it to make a change.
You can use the Canon 6D II’s touch controls for camera setup (formatting, Image Quality settings, Custom Functions, etc.) via the Menu, or with the “Q” button, which sits right above the multi-controller, for quickly selecting exposure setups, white balance, exposure compensation, etc. settings in the field. If you’re not hip to that scene, you can still use the labeled buttons on the body (ISO, drive, etc.) or push the Menu button and make changes via the multi-controller in typical style. In other words, redundancy prevails. More on this in the field test to follow.
Design & Features
The Canon EOS 6D Mark II contains a 26.2MP full-frame CMOS sensor that can deliver an ISO range of 100 to 40,000 with a push (gain) available to EI 102,400. (Some effects, like HDR, panning, and scene modes, limit the high end to 12,800 or less: Bulb shooting is limited to ISO 400.) ]
A number of admittedly higher-end full-frame cameras deliver higher resolution, but Canon has, in my opinion, opted to make the 6D Mark II more accessible (and affordable) to their intended audience. The AF system is versatile and responsive, with 45-point all cross-type AF sensors and five area selection modes, so you can match and track with your AF options for virtually any subject or scene.
Added to that is Canon’s Dual Pixel CMOS AF setup for Live View shooting. In Live View the max framing rate is 4.5 frames per second (fps) while viewfinder shooting goes to a moderate but still rapid enough 6.5 fps. Nevertheless, Live View is easy to evoke and a pleasure to use, and does provide exposure simulation and 100 percent coverage. (Note: You need to press the Live View button to get it going—there is no auto on or off when viewing through the eyepiece with Live View on: it simply stays on until you push the Live View button again.) It’s great for video recording, which, by the way, is Full HD (1080/60p) and not 4K.
There are some other items that point to the Canon EOS 6D Mark II being an enthusiast rather than a pro model: the shutter speed tops out at 1/4000 second; it has a low-pass filter; and while the viewfinder is bright and super-clear and delivers more information than a glimpse can handle (it’s customizable and you can leave it all in there or select just those parameters you consider vital), it covers 98 percent, not 100 percent, of the field of view.
Given those specs one might expect a built-in flash, but one would be wrong. Other features of note are an articulating LCD and built-in GPS, and of course the requisite Wi-Fi with NFC and Bluetooth.

Performance
I had a few short weeks to work with the Canon EOS 6D Mark II and used it as a companion along with the EF 24-105mm f/4L IS USM lens; all in all not particularly lightweight but certainly not onerous. I began using the standard push-button controls and multi-controller, but as I shot more I switched to the touch controls.
At first this was a bit awkward for me, but I became a convert; that is, until I worked in bright sunlight and had to contend with the usual LCD glare. So, having both options, and using the viewfinder and LED, when necessary, I could easily adapt to the ambient conditions. It takes some time to get the right touch controls for more “complex” operations such as autoexposure bracketing, but for typical and basic parameters it was actually quite easy and habit forming.
I shot JPEG+Raw file formats, and noted while reviewing the files in Adobe Bridge that the JPEGs were always a bit lighter (and necessarily lower res) than the Raw files. Raw is 16-bit and immediately “processable” in Photoshop, something I cannot always say about other makers when their new models come out. Both formats are compressed, but the Raw is lossless. Suffice it to say that the Raw output is more than sufficient for 13x19-inch prints and larger. One other note about the Raw files (and why you should always shoot them with a camera like this): when processing the Raw files I chose a very contrasty scene that I exposed with highlight bias.
Without processing, the shadows were deep and seemingly impenetrable. But when I used the Curves control in Photoshop, I was able to open them to reveal texture and detail without mottling. Very impressive. I cannot say this about the JPEG file.
I tried out a few special effects modes such as HDR Backlight Control. This takes three shots in rapid succession (maintain a steady hand!) and combines them in camera. Using the IS-capable lens I had for the test surely helped.
I then did an auto-bracket with a two-step interval, thus +/- 2 stops from the recommended reading, and combined them in Photoshop’s HDR setup. Now, there’s no question that Photoshop HDR has more nuanced controls than the camera’s HDR mode provides, and using Photoshop you can go from straight up to grunge, but all in all the camera’s HDR Backlight did a credible job, as long as you bias toward the highlights.
As to exposure controls, the camera has all the standard modes and patterns, and locking on highlights, applying exposure compensation, and moving through ISO, aperture, and shutter speed settings is no problem. You can use the LCD for exposure simulation, but I prefer to check in the LCD after exposure and then compensate or change my readings as needed.
There are innumerable focusing patterns and many ways to pinpoint a specific area (critical for close-up shots) but there are also somewhat broader patterns that come in handy for tracking and landscape imagery. You can also touch focus and shoot (called Touch Shutter in the manual): here you frame, touch where you want focus and the shutter will release. Overall, focus confirmation is very fast and in my tests it never failed me, even in fairly low light.
Speaking of low light, I have gotten into the habit of using Auto ISO and setting an upper limit on the ISO (here, ISO 3200) and a lower limit on the shutter speed (here, 1/60 second) and the camera figures out the best combo for the shot. Having a full-frame sensor with moderate resolution means very good low-light performance, at least within my parameters, although going to the upper limits and especially higher with the “push” settings is a case, to me, of rushing in where angels fear to tread. I made a variety of ISO tests with the “Standard” noise-reduction filtration turned on: you can go to a higher setting but NR filtration necessarily softens the image.
Noise came up at about ISO 4000 and at that setting is acceptable to good; at 12,800 it increased and was noticeable upon big enlargement; and at 25,600 and beyond I found it increasingly unacceptable the higher I went. If you can utilize IS or even a tripod and shoot at reasonable ISO settings when photographing low-light scenes, you will be better off. In general, with every sensor and camera, being able to get good results in low light or when you inadvertently underexpose means maintaining reasonable ISO speeds: in this camera, going too far over the limit is a path toward diminishing returns.
Conclusion
Canon’s bet with the 6D Mark II is that there are enough enthusiast shooters who are eager to get going on the full-frame train to justify buying this (relatively) affordable camera. One problem, though, is that Canon users who are “stepping up” from APS-C systems and have a gear bag filled with EF-S (and EF-M) optics won’t be able to directly mount those optics on this camera—indeed, it can damage the internals. Like many “upgrades” these days, opting in can mean replacing considerable infrastructure around the latest thing, which isn’t always a viable option.
That aside, the introduction of the Canon EOS 6D Mark II might just signal a time when full-frame will become more standard fare in affordable DSLRs, and although pros and super-enthusiasts (with budgets to match) are unlikely to use this as a “second body,” there’s enough here to satisfy the intended audience in terms of flexibility, speed, and refined functionality. In short, the EOS 6D Mark II might just fill a “niche,” in marketing terms, for photographers who desire a very serviceable full-frame camera that delivers both pro-style and enthusiast options. There are many nuances and customizable features, and, especially in Raw mode, results that are highly malleable and yield very good quality images.


![]()
Get the Latest Photo Tips, News & Reviews from Shutterbug!
| Camera Reviews Other Reviews | Mobile Reviews Photography Reviews Columns | News | Features | How-To | Resources |
 © 2026 Shutterbug
AVTech Media Americas Inc., USA
All rights reserved