- REVIEWS
Camera Reviews 
More Reviews Mobile Reviews Photography Reviews - GALLERIES
- VIDEOS
- BUYER'S GUIDES
Nik Software Silver Efex Pro 2: This Monochrome Conversion Software Just Got Better
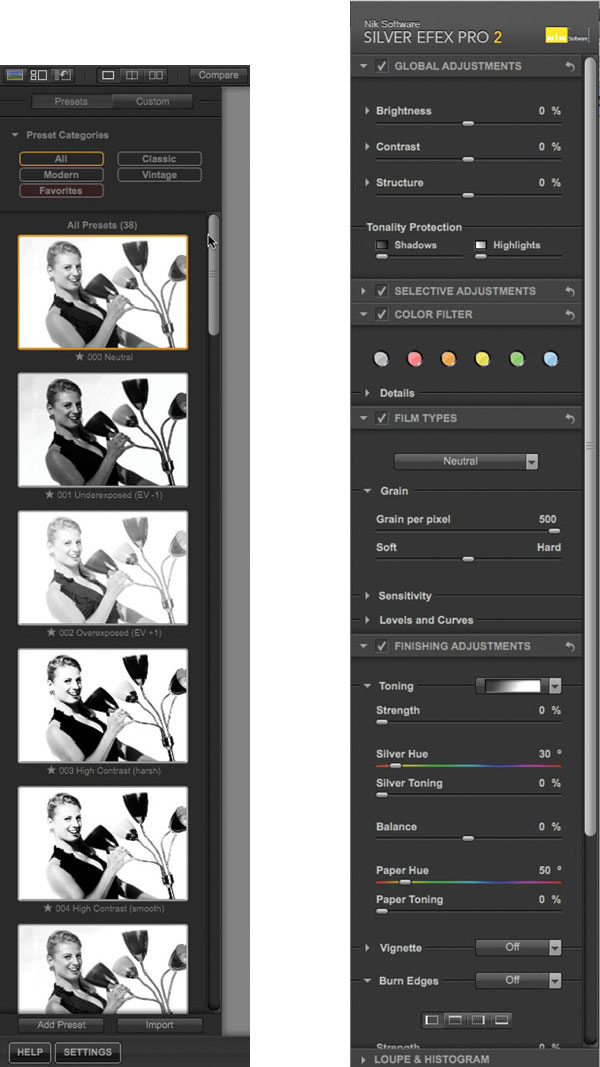
Nik Software’s Silver Efex Pro 2 is a major upgrade to an already great product and introduces many new features that offer you even more control over an image’s detail, contrast, and tonality, making it easy to transform color files into stunning black-and-white photographs. Silver Efex Pro 2 now includes controls for Dynamic Brightness, Amplify Blacks, Amplify Whites, Soft Contrast, Fine Structure, Image Borders, Selective Colorization, as well as a History Browser and many speed and quality improvements. All of Silver Efex Pro 2’s new features also play nice with Nik’s U Point technology, giving you selective control over an image instead of globally applying an effect, although that option is available, too.
Within Silver Efex Pro 2 you can stylize your converted images by choosingclassic darkroom-inspired tints and toners from “Finishing Adjustments,” including the obvious sepia and split-toning effects, along with the not-so-obvious selenium or copper—my favorites—as well as cyanotype, ambrotype, and others. You can also create user-defined tints and toners to produce your own unique look and even adjust the digital equivalent of silver and paper hues. When accessed from within Lightroom or Aperture, Silver Efex Pro 2 lets you load multiple images, saving time and increasing productivity when enhancing a series of images. When more than one image is opened, “Previous” and “Next” buttons appear that allow you to easily copy and paste settings between images to maintain consistency, something that wedding and portrait photographers will appreciate.
All Photos © Joe Farace
More Than Monochrome Conversion
The interface for Silver Efex Pro 2 is both familiar and different. Experienced users will revel in the new additions but newbies won’t get lost obtaining the maximum advantage from the software. New users may be tempted to just apply the presets and while that’s a great way to get started, it’s tweaking the settings by using the sliders and controls on the right side of the screen that enable you to achieve the kinds of results that you really want. There appears to be nearly twice as many presets as before; so many that they are collected into thematic groups and provide single-click starting points that can be edited and shared with others.

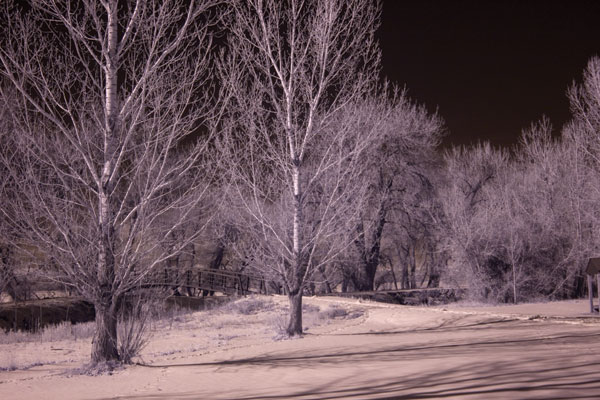
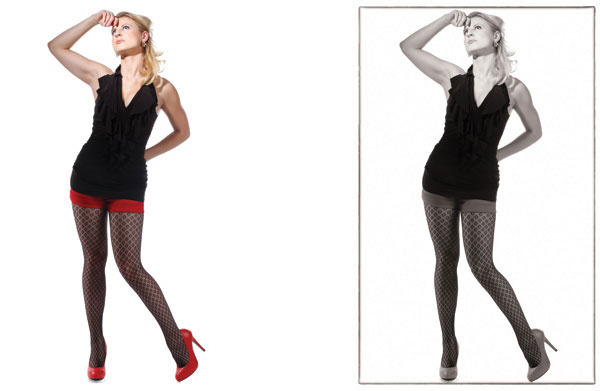
Peter Lekish is a Shutterbug reader who e-mailed asking if I had ever written anything about using Nik Silver Efex Pro to process digital infrared images, so one of the first things I did with this new version was give it a try with some recent IR images shot in the snow while testing Tamron’s 18-270mm F/3.5-6.3 Di II lens. As you can see from the “before” photograph, the Raw file exhibits the heavy magenta tint characteristic of Raw infrared files, but when moving it into Silver Efex Pro 2 all of the presets show it as a black-and-white photograph. At that point it was just a matter of choosing a preset I liked, pushing some sliders around, and I couldn’t resist adding a rough-edged frame. It’s that easy, Peter.

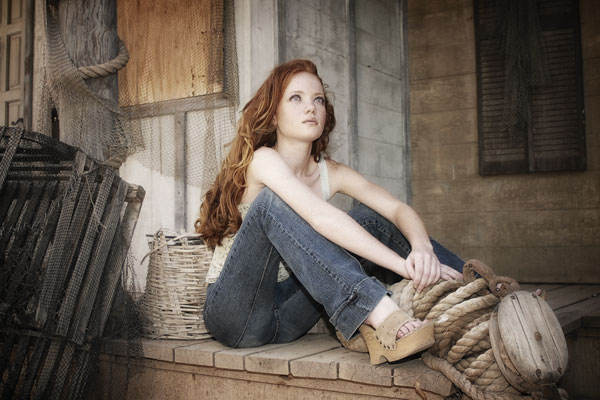
Silver Efex Pro 2 adds Selective Colorization by using Nik’s way-cool U Point technology to select objects and add color elements back into an image. I personally feel this easy-to-accomplish technique is already a cliché but if your clients like it and it’s a salable style in your market, Silver Efex Pro 2 makes applying this technique even easier. You can add other color tricks by applying the monochrome conversion as a separate (top) layer and then use the Opacity slider in Photoshop’s Layers palette to allow some of the bottom (color) layer to show through, producing a handcolored look. Play with the Opacity slider until you get a look that you like, save it as a layered .PSD file, then Flatten (Layer>Flatten Image) the image and save it again as a TIFF or JPEG file, depending on your usage.

The software works fast, too. Nik worked with NVIDIA Corporation and incorporated GPU-based image rendering in Silver Efex Pro 2 to work with systems equipped with dedicated GPU (Graphics Processing Unit) processors found on many of today’s display adapters to turn what was already a fast and smooth process into something that’s even faster and smoother. What didn’t I like about Silver Efex Pro 2? Nothing.
The suggested retail price of Silver Efex Pro 2 is $199.95 with upgrades from the first version costing $99.95. Customers who purchased Silver Efex Pro or a Nik Complete Collection bundle after December 6, 2010 are eligible for a free upgrade. Silver Efex Pro 2 is more than just monochrome conversion. It lets you restructure your color images combining the best aspects of Nik Software’s awesome Viveza and HDR Efex Pro products into a monochrome powerhouse that is a must-have power tool for anyone who wants to create monochrome photographs.
What’s New In 2?
• New History Browser provides an easy comparison of previous edits.
• New Dynamic Brightness control enables adaptive brightening adjustments for different areas within the image.
• New Amplify Blacks and Amplify Whites adaptively increase the presence of highlights and shadows throughout an image.
• New Soft Contrast applies contrast intelligently, based on image details, creating less harsh contrast.
• New Fine Structure brings out small details and textures and produces more visible image detail without creating that dreaded, over-sharpened look.
• New Image Borders use organic elements to produce borders with classic darkroom-style edges with a modern look that offers infinite variables.

System Requirements
Mac
• Mac OS 10.5.8 through 10.6 or later
• Intel processor
• 2GB of RAM (4GB or more recommended)
• Adobe Photoshop CS3 through CS5; Adobe Photoshop Elements 6 through 9; Adobe Photoshop Lightroom 2.6 through 3.0 or later; Apple Aperture 2.1.4 through 3.0 or later• 32-bit and 64-bit compatible
Windows
• Windows XP, Vista, and 7
• AMD or Intel processor
• 2GB of RAM (4GB or more recommended)
• Adobe Photoshop CS3 through CS5; Adobe Photoshop Elements 6 through 9; Adobe Photoshop Lightroom 2.6 through 3.0 or later
• 32-bit and 64-bit compatible

Author’s note: All of the illustrations and screenshots in the story were created within Adobe Photoshop, using Silver Efex Pro 2 as a plug-in.
For more information, contact Nik Software at: www.niksoftware.com.


![]()
Get the Latest Photo Tips, News & Reviews from Shutterbug!
| Camera Reviews Other Reviews | Mobile Reviews Photography Reviews Columns | News | Features | How-To | Resources |
 © 2026 Shutterbug
AVTech Media Americas Inc., USA
All rights reserved