Master Class
Montes Digital Conversions

Master Class

In all the years that I've been a professional portrait photographer I've never been as excited as I am now...now that I'm totally digital! Yes, you have to be prepared to spend a lot of time at the computer if you're going to take full advantage of the digital era. But if you have the time and if you have a good photographic background, you've got the opportunity to expand your horizons farther than you ever dreamed.

One can't expect, however, to get the most out of digital without prior photographic experience. Having had many years of experience behind the camera and in the darkroom really prepared me beautifully to take advantage of many of the things that digital has to offer. The secret, of course, is to know what you want to do. With that knowledge it's much easier to find out how you can do it digitally. You just don't wave a magic wand and everything becomes beautiful for you. Or can you? Sometimes, it seems that you can.

What I learned throughout the years was a wonderful prolog to what I'm doing now. What I'm learning now has excited me so much, I've started once again not only to publish my latest works, but also to enter some of my photographs into competition again. Gosh, I haven't done that in almost 25 years! So, now I'd like to show off a little and share with you a few of those pictures of which I'm particularly tickled that I sent to WPPI for their annual print competition. In particular I'd like to discuss some of the techniques that I used to work the photographs up to how they appear now.

Photos © 2002, Monte Zucker, All Rights Reserved

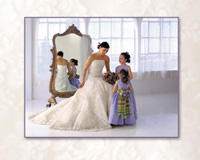
Creating Backgrounds From Within The Original Pictures

This simple photograph was sort of fun to create. First of all, I had professional models and all the time in the world to make the image. It was made during a shoot to create an ad for the Canon D30 when it first appeared on the scene. The entire photograph was exposed using only the daylight through the windows. When setting up the scene I had to be careful about what reflected in the mirror behind the bride. I moved two plain white room dividers to reflect in the mirror. I knew that I could eventually eliminate the seam between them in Photoshop.

The real fun of this picture, however, was when I prepared it for its final presentation. I needed to make all the photographs for the competition fit on 16x20 mounts. The composition of the photographs themselves, however, didn't always work in those dimensions, so I had to "frame" the photographs with mattes that were appropriate--mattes that added to the overall effect rather than distracted from it. For this photograph I selected a portion of the bride's gown and stretched it across the entire 16x20 outline by using Free Transform in Photoshop. Then, I floated the picture on top of that with a drop shadow for a three-dimensional feeling. Pretty neat, huh?
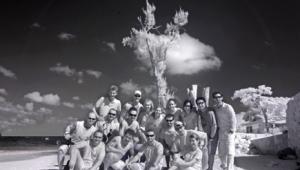
For the picture of the family in the pool I selected a part of the water and stretched it out to create a harmonious background for that picture, too.

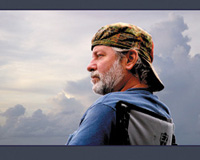
The exposure (by previous experience) was done by balancing the flash on my Canon D60 with the exposure for the bright sunlight on the background. That's how I got such saturated color in both the faces and the water behind them.

What I needed to be careful about was that I didn't get carried away with this simple digital technique. But sometimes you just have to do it. Look at how I took a small portion of the writing on the Torah in this picture to provide the background for the entire image.

See, too, how I photographed from the shadowed side of their hands into the light--a practice that I've been using for years in all my photographs. Nothing new here, but it's certainly borrowing on old, proven photographic techniques and bringing them into the digital era.

What You See Isn't Necessarily What You Get Anymore...
Just as we used to know that we could burn in and dodge our photographs in the darkroom, we develop "digital eyes" after a while. When I saw one of my friends casually sitting on the dock at our vacation retreat I already knew that from a low angle I could position him against a plain sky and then later drop in any kind of sky I wanted behind him. As a matter of fact I now have a collection of skies that I keep just for this purpose. I try to always have a camera handy whenever I'm outside--even driving to the store. One never knows when you're going to run into a sky that needs to be a part of the collection.

In a matter of just two or three clicks of my mouse I selected the whole sky behind him (select: color range), dropped it out of the picture and moved him onto the peaceful sky that you see here now. Then, on the cloud layer I was able to adjust the sky until I felt that it suited and matched the soft light that was on his face.

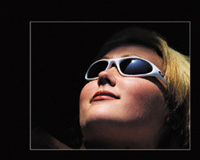
Red In A Picture? Oh, No!
When color first came into being for photographs it was a given that you wanted to pack as much color into a photograph as you could find. Soon afterward, however, it became obvious that you had to be a lot subtler if you wanted to call attention to the subject of the picture rather than the color itself. So, bright colors became verboten! Backgrounds became deep, dark, and cavernous.

Now, digitally you can put a subject against a red background, pick a piece of that background as a frame to the picture and voila: You've got a little blonde boy who just jumps out of the picture into your arms!

Using the same technique again, see how I surrounded this little boy's picture with a stretched-out portion of the sidewalk around him.

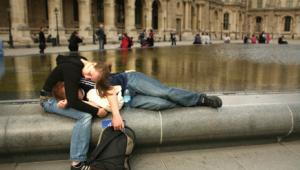
Using just a little bit of digital magic in this picture, too, I cloned away the lines in the sidewalk and all the little pieces of shmutz that were all around him. But what I really want you to see in this picture is the scale of the full-length little boy within the framework of the 16x20. This is something that I learned way before digital.

Imagine the entire framework of the photograph is a doorway. How large would that child be if he were to stand up? Would he go from top to bottom of the doorway, or would he be less than halfway up? So, when you're doing a full-length of a small child and you want him to appear as that small child you need to allow plenty of space around him. Digital can very easily help you fill in that space around the child, if you haven't already done that when creating the picture.

Of course, if you're doing this for a client you'd better explain at the time you're taking the picture exactly why the child will be so small in the picture. Otherwise, the customer will ask you to blow up the picture so that the child can be seen more clearly.

Building A Framework Within The Mount
Of course, sometimes your image is so simple you don't want anything to distract from it, as in this picture that I made in the Caribbean. The mother and daughter were completely unaware that they were being photographed. I was pretty far away from them at the time. I had a 28-135mm image stabilized lens on my Canon D60 when they appeared at the edge of the deck that was leading to the beach. They stopped for a moment and that's all she wrote. I had it! I looked at the back of my camera and never even made a second exposure. That's one of the great things about digital cameras. You can see what you've got and know that it's there. Or you have to make a few changes and do it again.

This time it was there and I didn't want to change a thing. So, when I mounted the picture on the 16x20 board for competition I simply selected a color from the sky and underlaid the picture with it. That's one more of the great things in the digital world. It's so easy to find a good color for the matte. You just select a color from the photograph itself and then manipulate it in any number of ways to come up with the perfect backdrop for your photograph. In the case of this seaside image I added a little texture to the matte by adding "noise" to that area.

Painless Surgical Procedures That Last A Lifetime!
Photoshop 7 brought still more magic into my repertoire. Tummy tucks, chin tucks, and even Adam's apple tucks became as easy as 1-2-3! Using the Liquefy tool all I had to do was freeze that part of the father's neck that I didn't want to disturb and then push in the part of his neck that was so prominent in the picture with the finger-pointer part of the Liquefy tool. The same technique was used with the fullness beneath the mother's chin. No way I could have done that so easily and so effectively before 7.0!

They were posed under the cover of a porch with daylight coming in that wrapped around them from side to side. I added a bare-bulb flash close to the camera that was two f/stops under the exposure for the ambient light. It warmed up the skin tones and froze the moment for posterity. I got only one shot of the three of them, but who cares? I saw it on the back of the camera and quit!

Getting Out Of My Box!
The last picture in this series is definitely one that I hope is really going to cause the print judges to think. It's been a controversial print of mine since I first made it a year ago. I saw my model lying on her back, taking in the day's last rays. The sun was highlighting her face so dramatically it caused me to stop what I was doing and grab this shot. I was photographing up her nose. "Wrong!" Her nose was cutting into the frame of her glasses. "Wrong!" By all my previous "rules" I couldn't take the picture. But I did and I'm glad! I was mesmerized by the sight and captured it.

Later, when I was studying the image I was distracted by everything else in the picture other than her face. All the talk about "base" to the portrait and all those other things that I've always been aware of didn't matter anymore. I had to get rid of them.

I did it digitally by "multiplying" layer after layer and erasing the area of her face. It simply deepened the background until it was nonexistent. And now her face is just floating in the picture, and I don't care. "Definitely not a Monte portrait!" you might say. But, then, what is a Monte portrait now?

All of these pictures were made with my Canon digital cameras. All the latest images were created on a Delkin Digital Memory Card. I don't leave home without either one of them. North American Photo prints all my digital images, of course.

Want to see all the pictures that I entered into the WPPI competition? Take a look at my new portrait-based web site www.montezucker.com. And, of course, Zuga.net is up and running as the absolute leader in streaming technology with live video right on the site.

X