- REVIEWS
Camera Reviews 
More Reviews Mobile Reviews Photography Reviews - GALLERIES
- VIDEOS
- BUYER'S GUIDES
Portrait And Wedding Photography In England & Ireland; Unique Locations And Period Costumes
The Society of Wedding and Portrait Photographers (SWPP) invited me to come
to England and Ireland to do a series of lectures and classes. The SWPP is fast
becoming one of the world's leading groups dedicated to advancing the
professionalism of portrait and wedding photographers throughout Europe. Not
only were the photographers receptive to my instruction, but they were also
anxious to be my models.
Classic Locations
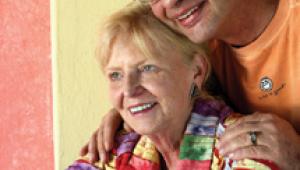
Two photographers in particular, Patricia Fernandez-Li and one of her employees,
Patrick, added immeasurably to the classes by providing magnificent costumes
that they use daily in their business. Patricia's studio, Castle Photography,
is located in an historic district, almost adjacent to Windsor Castle. They
have an incredible collection of period costumes for dressing up tourists and
photographing them either in their studio or on location.
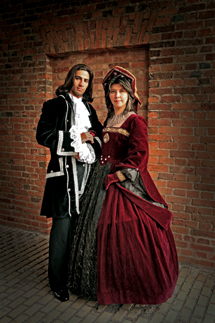
We had the benefit of Patricia and Patrick with their costumes both in England
and Ireland. The areas abounded in great locations. At an old church I posed
them underneath a carriage pass-through, covering them from overhead. I kept
them closer to one side of the openings so that I could have a natural main
light. Later in Photoshop I burned-in the edges of the picture and opened up
the detail in their clothing by using Image>Adjust>Shadow/Highlight.
 |
 |
|
|
||
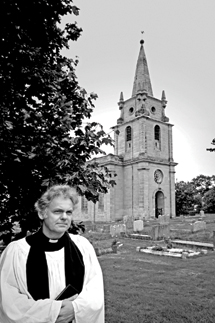
At the same location I posed the local vicar in front of his church. The light
was overcast, as can be seen on the church. A black and white rendition of the
picture looked much better than the original color. A 16-35mm Canon wide angle
lens allowed me to keep the vicar close to the camera and as the most important
part of the picture, while keeping his church a secondary interest--far
in the background.
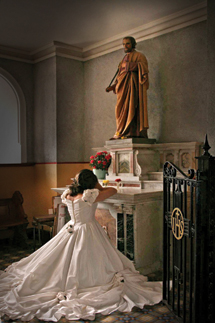
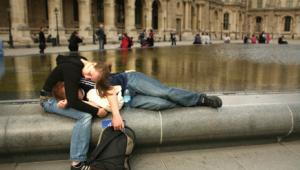
Inside another church in Ireland Patricia and Patrick posed as our bride and
groom. Just within the entrance to the church Patricia kneeled at an altar in
a small side room. Natural light coming through the window was all that I needed.
With the ISO set to 1000 I was able to hand hold the camera. I toned down the
window and sides of the picture (focusing attention on the central theme of
the picture) by adding an adjustment later in Curves and painting out the center
to create the darkened edges.
 |
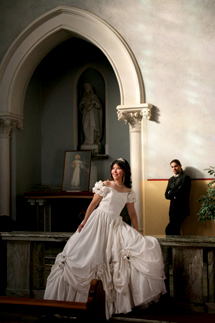 |
Within the main sanctuary I took advantage of the natural light coming in
through a high window, placing the bride and groom strategically so that I could
show both of them as well as some of the architecture of the church. I explained
to all the photographers how important it is to observe the natural light and
use it whenever and wherever possible to maintain the integrity of the church
interior.
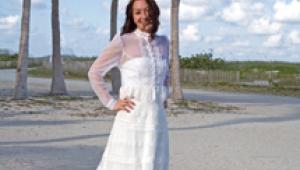
Dressing Up
On another day Patricia and Patrick posed in the same costumes...this time
on the front lawn of the hotel where the class was being held in Ireland. I
took advantage of the early morning sunlight, using it as the main light. Again,
a wide angle lens allowed me to keep the couple up close to the camera and still
show a lot of background detail. The fence happened to catch the light more
than I wanted it to. To darken the fence behind them I changed the mode of the
picture to Lab mode, selected the Brightness Channel, darkened the fence with
the Burn tool, and then converted the photograph back to RGB.
 |
Outdoor Options
One thing that I can almost always count on when teaching my classes is that
photographers pretty much don't know how to create portrait lighting outdoors.
They go outside because there's light everywhere. You don't have
to look for it. There is, however, one tried and true technique that will always
work--look for cover overhead and a directional light coming in from one
side. Nothing could be easier than going to a covered area where the light is
blocked from one side.
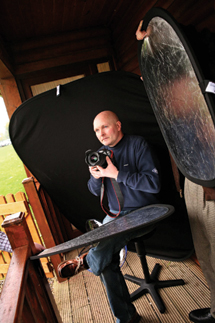
A nearby cabin with a small porch provided exactly what we needed. I used the
black side of a Westcott black/white background behind the photographer who
posed for me and two silver reflectors--one below him to open up detail
in his eyes and the second one to his left to open up some of the shadowed area
on the left side of his face.
The finished portrait shows that I tilted the top of my Canon EOS 5D to his
higher left shoulder, achieving a strong diagonal composition of his head and
shoulders. I toned down his hand below the camera with an adjustment layer as
noted earlier. I toned down the writing on the camera in the Brightness Channel
of the Lab mode.
 |
 |
Group Posing
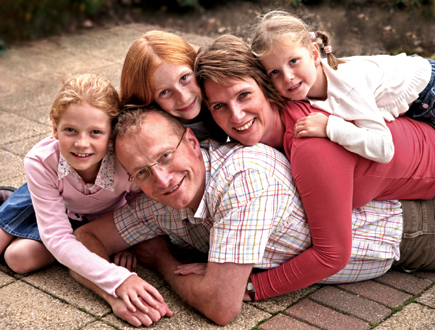
A similar technique with just a slightly different twist is this family group
picture that was created just outside the edge of a covered porch. I was under
cover. The light was coming from behind them and to their left. A high camera
position simplified the background to the area just behind them. My use of an
ExpoDisc made custom white balance quick and easy.
The portrait was made with all available light. One of the things that I constantly
point out to photographers is the need to physically connect each of the family
members. Look and see how the arms and hands help to bring the family feeling
close together.
 |


![]()
Get the Latest Photo Tips, News & Reviews from Shutterbug!
| Camera Reviews Other Reviews | Mobile Reviews Photography Reviews Columns | News | Features | How-To | Resources |
 © 2026 Shutterbug
AVTech Media Americas Inc., USA
All rights reserved