- REVIEWS
Camera Reviews 
More Reviews Mobile Reviews Photography Reviews - GALLERIES
- VIDEOS
- BUYER'S GUIDES
Master Class
Monte On Stage At New York’s PhotoPlus Show; Improvisation, Agility, And Going With What You Know
Photos © 2004, Monte Zucker, All Rights Reserved
Picture this: You're in the golden era of your life. You're at the top of your professional career. Your reputation as a significant portrait photographer and teacher is as solid as ever, even after being in the profession for over 50 years. You're appearing in New York City for Canon at one of the year's biggest trade shows, PhotoPlus Expo. In your hands is one of Canon's latest and best new digital cameras--their EOS 20D. You have two gorgeous models ready and waiting to pose for you...and there are literally hundreds of people sitting and standing around you. They're all hanging on your every word and watching each of the images that you're creating appear on a myriad of screens surrounding the stage on which you're appearing. How good is that?
 |
 |
Of course, you need to perform. You need to come up with images that knock
the socks off the audience. You need to hold their attention. This is where
technique, experience, and creativity all come into practice. You have five
lights mounted on ceiling tracks, keeping all the cords off the floor. Sounds
great, but the ceiling area is so small that when you move one light they all
move. Not good when you're trying to create precision portraits, but it's
not an impossible situation. You just need to have help holding some of the
lights in place when you're moving the others into position. Improvise.
That's what you have to do as there is no room on stage for a lot of props.
A bar stool turned with the back of the chair facing me was the base for this
picture. My first model, Allison Doss, faced me, straddled the back of the chair,
and leaned her elbows on top of the chair's back. Before she sat down
I positioned the chair at a 45Þ angle to my camera to keep her shoulders
at a slight angle to my lens. I used Canon's 24-70mm lens because I knew
that with it I could come in as close or as wide as I wanted. The camera was
set on manual, exposing for the main light. An ExpoDisc was used to white balance
the images quickly and efficiently. Focus was on automatic. The camera performed
beautifully on automatic, even under the low-light conditions that we had on
stage.
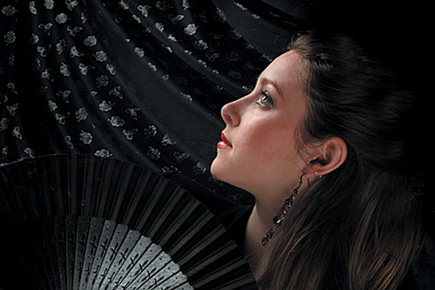
I had her bring both hands up to her face, keeping them off the front of her
face so that they wouldn't be an obstruction. She turned her face to the
2/3Þ angle. The main light was moved to approximately a 90Þ angle
to the camera so that I could achieve my traditional, modified loop lighting
that you see in almost all of my portraits. A fill light was low, aimed toward
her knees. Only a small portion drifted up toward her face, but it gave me a
glow from below that does wondrous things under a subject's eyes, nose,
and chin. The stronger catchlight came from my main light, but the low fill
light brightened the lower portion of her pupils beautifully.
 |
 |
An Elinchrom wind machine blew her hair up and out, creating a contemporary
flair to my classic posing and lighting. To keep all the attention on her face
I darkened the bottom of the portrait by creating an extra layer in Photoshop,
Image/Adjust/Curves--pulling the highlight end of the curve all the way
down to darken the upper layer. Then I erased the upper portion of the layer
and adjusted the opacity of the second layer to allow her arms to darken gradually.
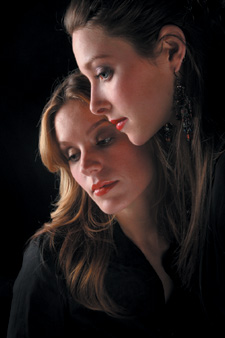
My second model, Kate Gorney, came out with lipstick matching a brightly colored
boa and headdress. I kept the lighting as it was and brought the feathery boa
up to frame her face. You can really see the lower catchlights in her eyes here.
Until I began working with other Canon Explorers of Light on stage I'd
never heard of a fill light coming from below. Douglas Kirkland, one of the
world's greatest glamour photographers, first showed me what a great effect
the low fill could be. He also got me into the excitement that can be generated
with the aid of a wind machine and even a fog machine. Now, when I look at all
the magazine covers in the grocery stores I can see that the commercial portrait
photographers have been using these tricks for ages.
All my photographs, by the way, are cropped in the camera exactly as I want
them to appear in the final print. Certainly, many of them could be cropped
to more traditional sizes, but I prefer to keep them in their original format.
As you might have figured out by now, I tip my camera quite often to enhance
the composition. Most of the time I tip the camera toward the high shoulder,
creating a 45Þ angle to many of my compositions. I create the high shoulder
by keeping my subjects' bodies at an angle to the camera and leaning them
forward at the waist. Quite often when I turn a woman's head toward one
of her shoulders, I lean her body in the opposite direction. This also enables
me to achieve high/low shoulders.
 |
 |
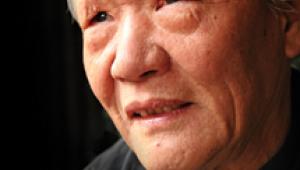
For this portrait I wrapped the model's head in a piece of fabric; another
fabric wrapped around her shoulders. I cropped the portrait to include only
a small portion of the golden fabric, so that the color would not detract from
her face. I added a kicker light from behind to highlight the left side of her
head and bring out some of the texture of the fabric.
|
| |||||||||


![]()
Get the Latest Photo Tips, News & Reviews from Shutterbug!
| Camera Reviews Other Reviews | Mobile Reviews Photography Reviews Columns | News | Features | How-To | Resources |
 © 2026 Shutterbug
AVTech Media Americas Inc., USA
All rights reserved