Light Your Way To Online Product Photos; The Samigon Internet Photo Studio Puts Your Online Auctionables In A Better Light

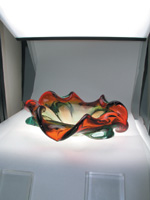
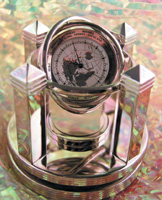
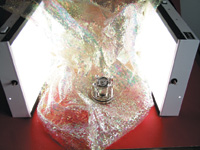
With the immense popularity of online sales and auctions, the need to show off those goods to advantage becomes increasingly important. In fact, eBay (ebay.com), the most popular site for such activities, provides some basic tips, which focus on proper lighting and suitable backgrounds. While eBay provides generic guidelines, the website still leaves the methodology to you. And nothing is said against making the item sparkle as a means of showing it in its best light. (For additional assistance on using pictures on eBay, do a search on the site, under "adding pictures," to bring up the Step by Step Photo Tutorial.)

The glass dish was resting on a sweeping vellum backdrop, hence the gradation. Under lighting this colorful dish came first. That left key areas in shadow, so I had to turn on the overhead light as well. I added white cards along the sides more as a means to prevent the glass from picking up reflections than for fill. By the way, I opted not to sharpen the image, since that would only highlight the myriad glass bubbles and surface imperfections. Some of the more obvious imperfections may remain noticeable as is. When making a contrast or level adjustment, it's important to make sure the base of the dish doesn't wash out. Direct flash (or any hard light) would have produced any number of glaring specular reflections in the glass.
Photos © 2003, Jack Neubart, All Rights Reserved

For Every Challenge, A Solution...
With today's popular compact digital cameras, the use of an external flash is rarely an option. And using the built-in flash results in a largely flat light that often leads to hot spots, made glaringly apparent on shiny plastic, polished metal, and glass, accompanied by hard and intrusive shadows. From experience, avoiding these problems involved considerable effort and way too many exposures to get one that worked. It was not always a pretty picture.

And in those instances where I had a camera that would accept an external flash, I had to contend with finding an optimum placement of that one light (not to mention, something to support it), while trying to balance the light so part of the subject doesn't end up on the dark side. This also involved lots of exposures to get something usable. Like you, I could really use something to make life simpler.

Then one day, the Samigon Internet Photo Studio showed up on my doorstep, courtesy of Argraph (argraph.com). Here was a self-contained shooting stage with lights already built in. And it was small enough so that I could squeeze it into practically any available space and just leave it there. And, because it was so lightweight, I could easily move it from place to place. And with a list price of $200, it would prove its value time and again, since it could also serve as a slide viewing table when I returned to organize my old slides.

Daylight-Balanced Illumination
What makes the Internet Photo Studio unique? Practically everything about it. For starters, it employs a 5000K fluorescent light source. And not just one, but two. The unit consists of an overhead light source and a stage, or base, which also has the same 5000K light. That translates into full wraparound lighting, top and bottom. And for all practical purposes, it is a continuous light source, which means you can adjust the illumination as you view it on the digital camera's preview monitor.

What's more, there's no need to play with white balance settings. I could simply use the auto or daylight white balance setting on the camera and be assured of good results. True, the perfectionists among us will first test several white balance settings, and I still might tweak color balance in Photoshop--but at this point, it's not a major issue (Auto Color seems to work fine). And if your camera has a custom white balance setting (some cameras refer to it as "preset"), aim the camera at the white base (top light on, bottom light off) and go from there. (Your camera may require an exposure adjustment for the brightness before an accurate white balance reading can be made.) Obviously, flash should be turned off on the camera at this point. Later on, you can play around with flash fill.

The highly polished silver-toned surfaces on this miniature ornamental clock created one problem after another, and then there was also the clock crystal and clock face to contend with. Lighting from top or bottom didn't work, so I disassembled the Internet Photo Studio and positioned the lights along the sides of the clock. Then I bunched up Mylar as a backdrop, and draped the lights with the same Mylar material, so it would be reflected on practically every surface. I digitally retouched out the promotional logo at the base, intending to sell the print, not the clock itself. Because I intended to sell the clock as is, I had to leave the promotional logo on the base (below). And from what I understand, such premium items (translation: promotional giveaways) have market value. (For clarity, the set shot shows the lights before the Mylar was draped entirely over them.)

The Stage Is Set
The shooting surface on the Photo Studio is 81/2x11", with the upper component being the same dimensions. In fact, viewed on the whole, it's practically cube-shaped, except that it's open all around.

The top component has clips at the back to hold background paper or fabric. Allow the background material to sweep upward at the back, draping over the front lip (secured there with a weight, if necessary). (I've recommended to Argraph that they add clips at the front, precisely for this purpose.) You can use practically anything. I've found vellum works best as a white backdrop. Three layers of the stuff is enough to hide the black plastic at the rear. If you use opaque material, such as black velvet, that will preclude lighting from below. Vellum lets you light from top and bottom. Laying down a sweeping backdrop will also protect the Plexiglas.

You'll have considerable success working with the unit as we've described. But if you want to go the distance, then read on for some more creative lighting tips with this system.

Working With The Lights
The upper light can be moved vertically along the side rails, which are fitted with screws. The upper stage tilts to the back or front, for better lighting control, with additional movement possible around the lower axis (at the stage).

Now that you've got the top component in place, it's time to decide whether to light from the bottom. The bottom light tends to overpower the top one, because the subject is situated on the bright base. As a rule, you should strive to make the upper light the stronger light, unless balanced lighting is called for. To reduce light from below, lay diffusion material really, really thick over this surface--say by using several of those white foam packing sheets or numerous layers of white wrapping tissue, or both in combination. The sweep paper or fabric needs to go above this, and a bit of careful scrutiny is required to ensure that the subject lies flat on the lower surface. (You can always correct the tilt digitally afterward.)

New Sides To This Lighting Issue
As you work with different objects you'll realize that not everything can be entirely lit from the top, or top and bottom. You may need to add some side or frontal light. Try a white bounce card, or take two cards and tape them together into an L-shape and position the cards so that they reflect light back onto the needed areas. Sometimes just the opposite is required: a black card to absorb light and add contour, shape, and dimensionality by removing light from various areas, especially shiny surfaces.

Still, some subjects will stubbornly resist your best efforts with light coming from top and bottom. It's time to take the unit apart. It can be easily put back together, but as a precaution, shoot detailed shots of the entire assembly with your digital camera.

Once the unit is separated into two lighting components, the next step is to place the two lights on either side of the subject. They should be propped up from the back, or they may fall at the slightest opportunity. The units tilt back just a bit and can be more vertically aligned by wedging something underneath, again making sure not to throw them off balance. Depending on the subject, you can place one or more white or black cards above and/or around the subject.

I've actually found it best with some subjects to position one light farther to the back on one side, with the second light paralleling it, meaning, on the other side but farther to the front. You can also use a light tent. Whatever you use, make sure it's not too large, since falloff will reduce light intensity to a mere trickle inside a large diffusion dome or tent. It may be necessary to use a larger diffusion device with larger subjects.

Final Thoughts
Where extensive depth of field is necessary, use aperture-priority mode on the camera and set the smallest lens aperture, usually f/8 or thereabouts on most popular digicams. It may also be necessary to switch to manual focus or to employ macro mode, or both. You may want to work in a darkened room, so that extraneous light doesn't contaminate the scene. While the Samigon bulbs are bright, ensure crisp images by using a tripod or tabletop pod.

In today's Internet world, where practically anything you have around the house is for sale, the Samigon Internet Photo Studio proves to be a practical and inexpensive way to picture these items for the web. Use it for straightforward product shots or be creative and sell not the product but the fruit of your labors, the picture itself.

Maximize Sales Potential
The way you light a tabletop subject can maximize its sales potential, by highlighting features on the item while minimizing any surface defects. Of course, you can't lie about the defects. But if they don't affect the usability of the product no one says you can't minimize their appearance through deft photographic skills, meaning suitable lighting. Besides, your written description will have to be accurate to avoid problems later on.

Obviously, before taking pictures, you want to properly clean whatever it is you're selling, to make sure it's free of dust, smudges, and fingerprints. Consult your photo retailer, or specialty store for the most appropriate cleaning methods for the object in question. Note: While you can legitimately retouch out dust and fingerprints, doing any additional retouching to increase the value is questionable and may not be legal.

Finally, when shooting digital, shoot at lower resolutions. That makes dust less apparent and retouching less necessary. What's more, you really don't need anything more online. Shoot high resolution for your personal records, in case a detailed image is later required. And because dust will always find its way to whatever is being photographed, periodically blow dust off with an air-bulb blower.


X