- REVIEWS
Camera Reviews 
More Reviews Mobile Reviews Photography Reviews - GALLERIES
- VIDEOS
- BUYER'S GUIDES
Macro & Flash Close-Up Lighting Techniques
Capturing the details in nature requires getting close to small subjects and sometimes you will want to use flash. Shooting close-ups with flash is very different than using flash as you normally do.
The biggest problem we face when using the built-in flash or even a small hotshoe mounted accessory flash for macro work is that a flash sits no more than 6 or 7” above the lens. This means it will illuminate the top of a subject, leaving the middle and bottom portions in shadow. There’s no way the light can be dispersed over the insect, small flower, feather or whatever you might be shooting because it doesn’t have enough distance to do that.
Using a flash bracket that rotates the flash around the lens isn’t the solution. This is fine for wedding photography but not for macro work. Some brackets hold the flash right above the lens so the flash head actually touches the top of the lens barrel. This places the artificial light in a good position for close-up work, but it’s not the ultimate solution because the bottom portion of the subject may still not get enough light.
Ring Flash
In my opinion, the best flash setup for macro work is the ring flash. I use the Canon MR-14EX (www.usa.canon.com), and there are several other brands available that are less expensive. When used close to the subject (within a few inches), the lighting is very soft and it simulates the flattering type of light you get from shade or from an overcast sky. You can see an example of this in (#1). The Canon system puts out enough power so that even at ISO 100 or 200, I can use f/32.

All Photos © Jim Zuckerman
It’s important to note, though, that if you move back from the small subject, the ring flash becomes more of a point source of light. From 3 ft away, the light doesn’t envelope the subject as it did when it was 6” away. It becomes harsher and more contrasty. Therefore, my preference for shooting with a ring flash is to use a 50mm macro lens on a full frame sensor camera. The short focal length forces you to shoot close to the subject, and this is required to get the diffused type of light I feel is best for macro photography.
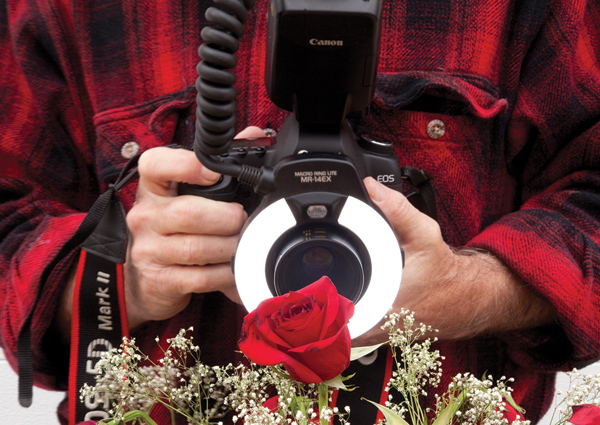
Image (#2) shows the Canon ring flash being used a couple of inches away from a rose. Although a tripod is always a good idea when shooting close-ups, it’s less important when you use flash. The brief flash duration replaces the shutter speed as the determinant of how sharp the subject will be.
Twin Flash Setup
Another option you have is the twin macro flash setup such as the Canon MT-24EX. There are two small flash units on a plastic ring that fit onto the macro lens, and the flashes can be rotated to any position for different lighting purposes. In addition, you can set up a flash ratio so that one side of the subject receives more light than the other (just like with studio lighting). With Canon’s ring flash, you can also create a light ratio, but it’s not as delineated or effective as the light ratio you can create using the MT-24EX. In addition, you can turn off one of the flash units for dramatic, high contrast side light. Image (#3) shows the twin macro flash setup in use.

Portable Flash Units
Can you use a typical flash unit like the Nikon SB-900 (www.nikonusa.com) or the Canon 430EX II for macro work? Yes you can, but only if the camera-to-subject distance is greater than a few inches. If the camera is at least 2 ft away from the subject (typical when using a telephoto macro lens), you can use the portable flash as it sits in the camera’s hotshoe. The light will be more contrasty and harsh than a ring flash used close to the small subject, but it still works. I used this type of light to photograph an orchid in a greenhouse, (#4), when I didn’t have a tripod with me.

Exposure
Flash intimidates a lot of people, particularly in the area of exposure. In macro work, photographers are even more insecure about it. However, it’s truly an easy thing to manage. Here is how I get perfect exposures with either the ring flash or the twin macro flash setup:
1. I set the camera on Manual Exposure mode (M).
2. I set the flash on ETTL mode (iTTL for Nikon). This is the Automatic Exposure mode.
3. I set the lens aperture for a small f/stop to get the most depth of field possible. I usually choose f/32, although the Automatic Flash mode will provide an accurate exposure for any lens aperture you may choose as long as the unit is used relatively close to the subject.
In 90 percent of my macro flash work, the exposures are correct using this procedure. However, I always check the LCD monitor on the back of the camera to make sure I’m happy with what the camera/flash combination is giving me. If I want to tweak the exposures a little lighter or a little darker, I use the flash compensation feature that will make an adjustment in 1/3 f/stop increments.


![]()
Get the Latest Photo Tips, News & Reviews from Shutterbug!
| Camera Reviews Other Reviews | Mobile Reviews Photography Reviews Columns | News | Features | How-To | Resources |
 © 2026 Shutterbug
AVTech Media Americas Inc., USA
All rights reserved