- REVIEWS
Camera Reviews 
More Reviews Mobile Reviews Photography Reviews - GALLERIES
- VIDEOS
- BUYER'S GUIDES
Low Light Exposure Techniques: Light Readings, Image Review, “B” Exposures And Noise Suppression
For example, I photographed the spectacular new hotel in Singapore, the Marina Bay Sands (#1), after dark from the 42nd floor of an adjacent hotel. The night environment is challenging because it contains all of the above conditions. If I used normal metering practices the dominant dark sky would look gray, not black, and the image would look terrible; it would be overexposed. To show you what I’m talking about, in (#2) I used Photoshop to lighten the image so the background environment became gray, and you can see that this not only looks ridiculous, it’s not what we want at all because it is the unique color and contrast plus the dark shadows and dark sky that make night photography dramatic.

All Photos © Jim Zuckerman

How, then, should we approach metering in various low light situations?
Method One: Spot Metering
If you want to be critical in your exposure technique, use spot metering—either in-camera or with a hand held meter—to read a middle toned area (a value that is neither the darkest or lightest part of the scene). In many types of compositions, you can find an area in the frame that is middle toned. For example, in (#3), a shot of a hunting leopard in Kenya, I’ve circled in red some middle toned areas, and by taking a reading on any of these spots you could determine the correct shutter speed and f/stop combination. This is what I did for 25 years when I shot film. Because I couldn’t see the results until the film was developed, I had to be right-on with the exposure. I used a hand held Sekonic light meter (www.sekonic.com) with a 1-degree spot capability because it could read a very small area of the composition, and this meant that the reading would not be affected by adjacent areas that were either lighter or darker than the middle toned area.

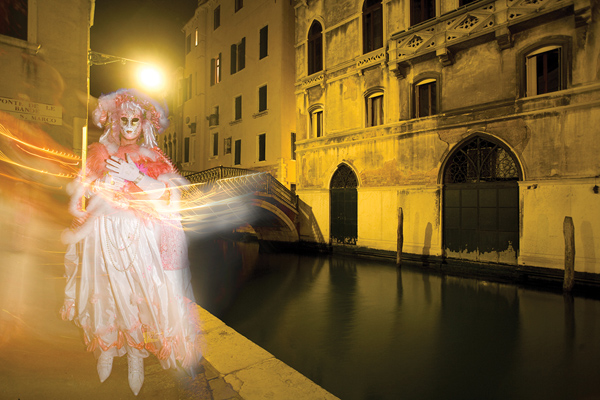
With the Spot mode metering capability built into our cameras, the meter reads the center 3- 5 percent of the viewfinder. This is less precise than the 1-degree capability of a hand held meter, but in situations where the middle toned area is large enough—such as the side of a building or a person’s shirt—it works just fine. In the cityscape photo in Singapore (#4), I’ve circled 2 areas in red that represent middle gray from which the Spot Meter mode in a digital camera could read the light with accuracy. Even in a contrasty night shot such as the beautiful Christmas decorations in front of the Opryland Hotel in Nashville, Tennessee (#5), I was able to find middle toned areas as indicated by the red circles.


Here’s how it works. First you switch to Spot Metering mode and point the camera toward the middle toned area of the subject so the center of the viewfinder, which is where the meter takes its information, is placed over the middle toned color. Ideally, adjacent areas that are lighter or darker than the middle tone should not be included. You take a reading by pushing the shutter button halfway down and then you lock that reading in place using the AE Lock button. You then recompose the picture and take the shot.
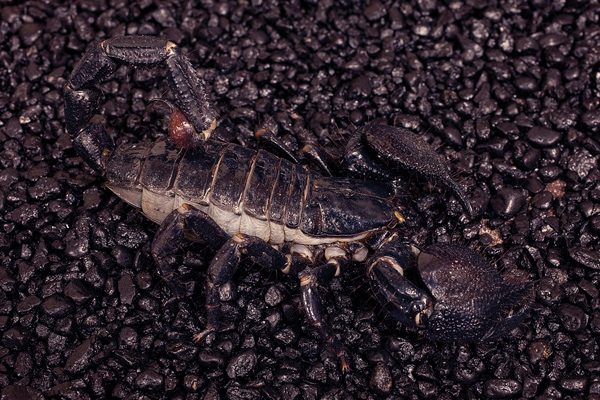
What happens if there are no middle toned areas in the composition? For example, in (#6) the Christmas light composition consisted of light bulbs and the black sky, and in (#7) Mt. Arenal in Costa Rica was spewing molten boulders at night, and again there was no middle tone at all. Contrast was at a maximum. The glow in the night sky looks fairly bright and approximately middle toned, but that only happened because of the 30-second exposure I used. The light accumulated on the sensor, but to my eyes the sky was quite dark. The black scorpion I photographed on black gravel (#8), also presented no middle tone. Even though this exposure looks good and the black elements of the image seem to be middle gray, this only occurred because I used flash to brighten up all the tones. To my eye everything looked black with no middle gray for the meter to accurately determine a correct exposure.


If a light meter can’t be used to determine the exposure, then the only other way to obtain the correct exposure is bracketing in 1-f/stop increments until all bases are covered. Or you can use Method Two.
Method Two: The LCD Monitor
When we all shot film, we didn’t have the advantage of the immediate feedback of the LCD on the back of the camera. To deal with complex or challenging exposure situations we used Polaroid —i.e. test prints—to aid us in determining the best exposure. Many photographers preferred black and white Polaroid film to color because they felt the shadows and highlights could be studied more effectively when color wasn’t present as in (#9). Polaroid film developed in roughly 60 seconds, and this technique was an invaluable help with exposure.

The digital revolution made it even easier to assess the exposure because you don’t have to wait 60 seconds, and even though the image on the LCD monitor is a JPEG, there is enough detail in the 2 1/2 or 3” screen to see clearly what you’ve captured. It is easy to determine if the exposure is too light or too dark, and if you turn the “blinkies” on (i.e. the highlight alert), areas in the picture that have lost texture and detail are clearly indicated by flashing lights. (However, this is one feature I never use because I find the flashing parts of an image terribly distracting, but other photographers rely on it.)
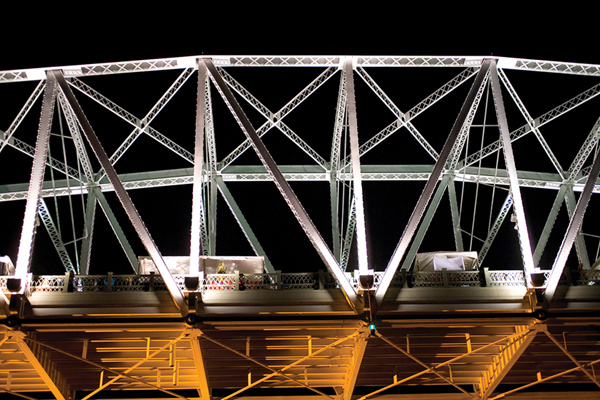
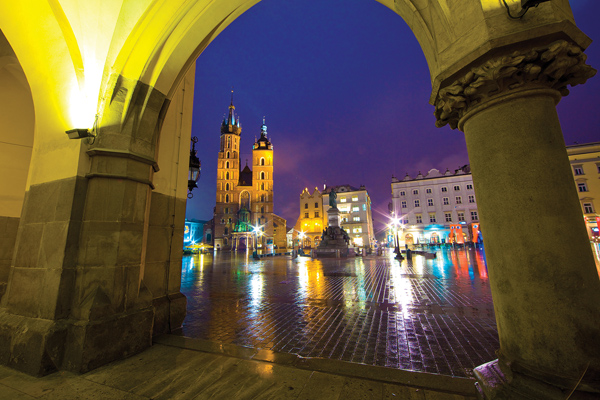
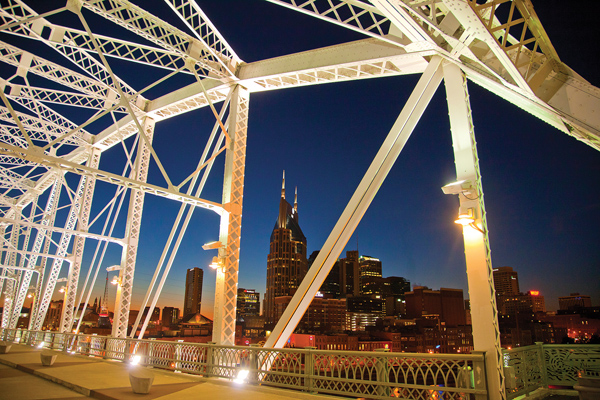
If your exposure is too light or too dark, you can adjust it in 1/3-f/stop increments using the exposure compensation feature built into every digital camera. If you don’t know where the exposure compensation function is or how to use it for your particular camera, consult the manual. In my opinion, this is one of the most important functions on the camera. It solves the exposure challenge in low light situations—and in every situation—easily and quickly. All of the guesswork is taken out of the equation except for the first test shot. You can see how image review and compensation helps in these difficult exposures. You can see this in the twilight shot I took in Krakow, Poland (#10), as well as in the bridge detail I took in Nashville, Tennessee (#11).

The procedure is to take an initial photograph on Program mode, Aperture Priority or Shutter Priority and then, using the LCD monitor as a guide, adjust the exposure until it’s exactly what you want.
Understanding The Limits
When you examine your exposures on the screen on the back of the camera, it’s important to remember what I explained in Part One regarding the limitations of a digital sensor compared to our eye/brain combination. You can’t expect the sensor to capture the same dynamic range that we can see.
For example, if you are shooting a scene with extreme contrast, such as the stained glass window in the Cathedral of Roscommon, Ireland (#12), you can’t expect the digital sensor to capture all of the detail in the shadows as well as render the highlights with a perfect exposure. If you look closely at this picture, you can see that portions of the stained glass are too light while the shadows are very dark. This has nothing to do with the type of metering technique I used, and it is not a failure in terms of exposure. It’s just the nature of the medium. Therefore, you have to adjust your expectations of what a digital sensor can do when you study your exposures on the LCD monitor.

The only way to render a very high contrast composition in which we can see complete detail in the dark shadows and very bright highlights with our eyes, but that would challenge a sensor, is to use the HDR technique, as I did in (#13). The courtyard open to the sky was 7 f/stops brighter than the dark shadows in the corridor in the background, and yet all of the detail throughout the image is seen clearly. I discuss digital remedies like this later in this issue.

Long Time Exposures
Unlike our brain, light can accumulate on a digital sensor over a long exposure. This makes it possible to render very dim subjects with an exposure that actually allows us to record much more detail than we can with our eyes. An extreme example of this is deep sky photography done through telescopes where the astrophotographer makes an exposure of 8 hours or more to reveal distant galaxies and nebulae. When photographers are forced to use long exposures, we think in terms of several minutes rather than several hours. The 45 second exposure of Telluride, Colorado (#14), is an example of where the scene looked very dark to my eyes—I could see very little detail in the snow-covered roofs of the houses as well as the distant mountain—but the long exposure accumulated enough light in the land and the sky to make this look much brighter than it really was.

Let’s look at the issues involved in taking long exposures and the best way to deal with the technical challenges you face.
1. You should not be using one of the Automatic Exposure modes such as Program mode, Aperture Priority or Shutter Priority. Long time exposures must be done on Manual Exposure mode. Since most digital cameras only permit a maximum exposure time of 30 seconds as a setting on the shutter speed dial, you have to use the Bulb setting (indicated by “B”). At the same time, you need a locking cable release to lock the Bulb setting open. This allows you to make the exposure time as long as you want assuming you have enough life in the battery to keep the shutter open.
2. Make sure your battery is fully charged because more than likely you will be taking many long exposures as you experiment. This requires a lot of the battery, and you don’t want the camera to shut down at an inopportune time.
3. Use the lowest ISO possible. This will increase your exposure time, of course, but it will also mean that the digital noise will be minimized. Noise shows up most readily in low light photographs with very long exposures. Therefore, I would stick to ISO 100 or 200 if possible. Keep in mind, that the difference between a 1-hour exposure and a 2-hour exposure is only 1 f/stop. Said another way, increasing the ISO from 100 to 200, or from 200 to 400, allows you to reduce the exposure time by half.
4. Use a tripod. You can’t do long exposures without a tripod unless you are only interested in creating abstracts such as the amusement park ride (#15), or the abstraction of a street in Varanasi, India I shot from a taxi at .4 seconds (#16), with the obvious intention of capturing a painting-like impression of the street scene.


5. Lens aperture. To shorten the exposure time in dark environments, open the lens aperture to allow more light to enter. This is logical. However, one of the interesting effects you can achieve when shooting point sources of light (like street lamps) is that the lights become stars when you use a narrow aperture. Photo (#17) of the main square in Krakow, Poland is an example. Note that the star effect is also most pronounced when you use a wide angle lens. You will see a star when shooting with a telephoto and a small aperture, but the star itself won’t be as sharply defined.
6. Cable release or wireless trigger. Photographers use these devices to take the picture so they can avoid pushing the shutter button with their finger. The self-timer in the camera can also be used to accomplish the same thing. This minimizes any vibration that might occur. Even the smallest amount of camera movement will cause the picture to be blurred when a long shutter speed is used.
However, if you are using a very long exposure, such as 30 seconds or longer, and you use your finger to trip the shutter, any vibration in the camera introduced by that action will last such a small percentage of the total exposure that it will be irrelevant. In the 25-second exposure I used for the night shot of an Italian village on the Cinque Terra coast (#18) a cable release or a wireless trigger wasn’t necessary because 1 or 2 seconds of vibration wouldn’t record enough movement to blur the parts of the image that had to be sharp. Having said that, out of habit I do use the self-timer and mirror lockup feature anyway. Why not? I like to do everything possible to make my pictures sharp even if what I’m doing isn’t required.

Multiple Exposures
When the shutter is open for a relatively long time, this opens the possibility of recording more than 1 image on the digital sensor. This is a very creative and intriguing technique, and the sky’s the limit with what you can do with it. For example, when shooting fireworks it’s fun to leave the shutter open for a long time so you can include multiple bursts in a single frame as I did in (#19), (more about photographing fireworks later in the issue). A few years ago I shot a candle flame in a dark room (#20). I covered and uncovered the lens with cardboard between the exposures, and I also moved the wax candle a couple of inches so the flame was not completely superimposed over itself.


Since most digital cameras can’t create double exposures like film cameras could in the past, using a low light environment is a way to revisit this popular technique. With any moving illuminated subject at night, a long exposure will produce a series of intriguing images caught on a single frame. For example, I recorded an ambulance racing past me in a small town in Tennessee (#21), the flashing red and yellow lights recorded as a dashed abstract path of color. In essence, this is a multiple exposure based on the flashing lights.

In a very different scenario, I used a long exposure in order to trigger a flash from the side when shooting a model posing for me just before dawn in Venice, Italy (#22). I used the 10-second self-timer to give me enough time to walk over to her and position myself correctly, and then when I heard the shutter open I pushed the test button on the flash. I wanted to side light the model to give her some dimension, and during the 1-second exposure the camera recorded the light from the flash as well as the ambient light consisting of the artificial lights on the architecture plus the cobalt blue dawn sky.

Flash With Long Time Exposures
Photographing moving subjects in low light environments is often an exercise in frustration if you want everything sharp and you don’t have a flash. No one wants to raise the ISO high, and yet along with a large lens aperture, that’s really the only option. If you have flash, this can create other problems like dark backgrounds, flat lighting and too much contrast.
A solution to these issues is to use a long exposure in conjunction with the flash. This can produce some unexpected (and wild) images like the abstraction of Carnival in Rio de Janeiro (#23). This was taken with film in the 90s, and I shot this from the crowd of spectators as the procession passed us. I was close enough for my flash to reach the dancers and I captured a sense of the Carnival atmosphere because the blur of color and light blends with the faces of the girls. My shutter speed was 1/2 sec.

From an elevated perspective I took (#24). I used the same technique although I was much farther away. At the time I took this (1993) I carried a very powerful portable flash (a Metz 60 CT-4, www.bogenimaging.us) that I used with a medium format film camera, and it was able to illuminate the dancers from a distance of about 70 feet (without a Better Beamer). The exposure time was 1/2 sec.

Dancers make great subjects in low light circumstances because they are moving and they are almost always dressed in great costumes with a lot of color. In China, I photographed a dancer on stage at 1/4 sec (#25). You can vary the length of the shutter depending on how much abstraction you want in the image.

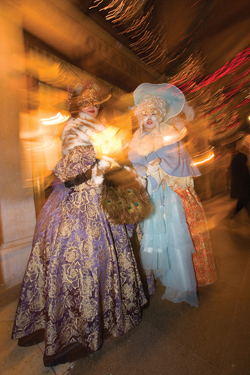
Using flash with a long exposure time is essentially making a double exposure. One image is made from the flash while the second comes from the long exposure. The subjects don’t have to be moving to make this work; you can move the camera instead. For example, in photos (#26 and #27), the costumed models in Venice were standing still while I moved the camera during a 1/2 and 1 full sec exposure, respectively. You have to give yourself enough time to react to the open shutter and move the camera for this technique to work. If the shutter speed is too brief (like 1/8 sec), you won’t have enough time to create the abstraction.
Noise “Suppression”
All photographers agree that noise is undesirable. In the old days when we all shot film, large grain was often considered an artistic effect and some photographers specifically used high speed film to create images that had a grain texture. Indeed, even in the darkroom, photographers like myself would sandwich a slide or negative with a black and white textured image to simulate grain.
In the digital realm, noise isn’t attractive and no one likes it. That’s why camera manufacturers and software companies try to minimize it. With modern digital cameras, most users would agree that noise becomes an issue at 1250 and higher (and with some models at ISO 800). I’ve taken pictures at ISO 1600 and 2000 in which the noise was acceptable, but the quality of the image isn’t as good as with ISO settings of 100 and 200. With some compact point and shoot cameras with a fixed lens, noise can be a problem with ISO settings as low as 400.
Digital noise is most noticeable in solid or similar toned areas of a scene, particularly if they are mid-toned or dark. Photo (#28) is a good example. I photographed the Nashville, Tennessee skyline at ISO 1250, and in the detail of the sky and the bridge (this is a screen capture at 100 percent, #29), you can see the pronounced noise in the sky. The bridge supports are very light and they hardly show any noise at all.

Underexposure also increases digital noise. Some photographers intentionally overexpose their images as a way to reduce noise, but the problem with that is that highlights can become blown out (highly overexposed) with a complete loss of detail. In my opinion, losing highlight detail is much worse than increased digital noise.
There are 2 ways to attack the problem of noise. You can use the noise reduction feature built into some cameras or you can use software designed to minimize the noise after-the-fact in post-processing.
Types Of Digital Noise
There are 2 kinds of high ISO digital noise.
1. Luminance noise is the gray or black noise that is visible when magnifying a photo on your monitor or when examining a large print. The tiny specs that comprise luminance noise also are a component of subject detail. You have to be careful about removing this noise (blurring it) because you could be degrading the image quality significantly.
2. Chrominance noise is the pastel-colored specs you see in the mid-tones and the shadows when the image is magnified to 100 percent or more. It shows up as blotchy, discolored areas of unwanted colors. This noise doesn’t affect the fine details of your subjects, and therefore it can be minimized or eliminated altogether without blurring the image or areas in it, which is what most noise reduction processing does.
My favorite Photoshop plug-in that addresses the issue of noise in digital images is Dfine 2.0 by Nik Software (www.niksoftware.com). It does a brilliant job at balancing the elimination of noise without sacrificing sharpness. Compare the screen captures, (#30 and #31), taken at 200 percent of another section of the Nashville skyline shot. These are unmanipulated—I even left in the chromatic aberration. Image (#30) is the original without any noise reduction software, and (#31) shows the same portion of the photo after Dfine 2.0 was applied. The noise has been eliminated completely. I let the software automatically analyze the noise structure and color, and it did such a good job that no further tweaking was necessary. This allows photographers to use high ISO settings with the knowledge that their images can be corrected after-the-fact so they look like they were originally taken with a tripod and a low ISO. Wow!


In-Camera Noise Suppression
Some cameras have built-in noise suppression algorithms to help minimize unwanted noise when high ISO settings are used. They are designed to attack the chrominance noise, leaving the luminance noise untouched to preserve the sharpness and detail. In many cameras this processing occurs anytime a higher ISO is chosen, although you can sometimes either turn it off or choose varying degrees of noise reduction. In some cases the standard setting attacks the chrominance noise and has a small effect on luminance noise. It’s best to test your own camera to see how it performs at the various levels of suppression.
In my own work I leave these settings turned off. They can have an impact on the sharpness of your images and in addition you may see a slight color shift in pictures taken with high ISO noise reduction turned on. It is also possible you will see the burst rate reduced when shooting fast moving subjects. So, instead of getting 6.5 frames per second you may only be shooting at 3 fps.
Having said that, if you are going to use one of the ultra-high ISO settings—6400 and above—the built-in noise suppression function should be used. You should do everything technically possible to reduce the noise in these situations.


![]()
Get the Latest Photo Tips, News & Reviews from Shutterbug!
| Camera Reviews Other Reviews | Mobile Reviews Photography Reviews Columns | News | Features | How-To | Resources |
 © 2026 Shutterbug
AVTech Media Americas Inc., USA
All rights reserved