- REVIEWS
Camera Reviews 
More Reviews Mobile Reviews Photography Reviews - GALLERIES
- VIDEOS
- BUYER'S GUIDES
Lesson Of The Month
Using Soft Light For Dramatic Results
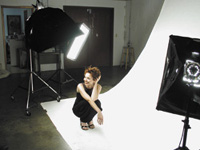
For many fashion and portrait shots, it is necessary to use several different light sources to get good results. It is not uncommon to have a main light, a fill light, a hairlight, and one or two background lights. However, sometimes a great shot can be created using just one diffused light source. This lesson outlines the basics for lighting full-length fashion shots, and illustrates how to drop out the background naturally using lighting ratios. When the stylist and the model arrived on the morning of the shoot, we set up a makeshift dressing room in the studio's office and adjoining bathroom. During the time it took for the stylist to apply makeup, fix hair, and select the right clothing for the shot, we went about building the set. First, we suspended a 9-foot roll of white seamless paper, secured it to the pole with an A-clamp, and taped the front edge to the floor using gaffer's tape. For lighting, we started with a medium Photoflex Starlite Kit and mounted it to a Boom Stand. We then positioned it over the center of the paper, where our model would be crouching. Since the model was nearly ready, we had her come out to the set so that we could frame up the shot (#1). |
|||
I mounted an Olympus E-10 to a tripod, positioned it to a vertical frame, and zoomed all the way out to keep lens distortion to a minimum. Looking through the viewfinder, the shot already looked great. I set the aperture to f/4 to keep the background soft, set the shutter speed to 1/125 sec, and took several shots as the model gave various crouching poses (#2). Reviewing the images on the back of the camera's LCD, I was particularly drawn to this image. Not only was the model's pose captivating, the lighting was elegantly simple. The softbox overhead did a wonderful job of lighting the model's hair, face, and body while creating a subtle, soft shadow on a background that transitioned from light to dark gray. All from one light! |
|||
Side Note: With minor Photoshop edits to the model's outfit, this image made its way to the cover of the Photoflex 2002 catalog (#3). Knocking Out The Background To make the foreground and the model 2/3 of a stop brighter, I opened the aperture to f/3.2 and kept the shutter speed at 1/125 sec. After the stylist touched up the model's hair, we took a few more shots in different poses. |
|||
In this Final Image, notice how the background and foreground are now white, while the light levels on the model have been maintained. As you can see, the setup for creating high quality fashion/portrait shots can be relatively simple. This lesson will be posted in the free public section of the Web Photo School at: www.webphotoschool.com. You will be able to enlarge the photos from thumbnails. If you would like to continue your digital step by step education lessons on editing, printing, and e-mailing your photos it will be on the private section of the Web Photo School. To enroll for WPS just go to www.shutterbug.net and click on WPS Free Lessons. |
|||
Technical Equipment |


![]()
Get the Latest Photo Tips, News & Reviews from Shutterbug!
| Camera Reviews Other Reviews | Mobile Reviews Photography Reviews Columns | News | Features | How-To | Resources |
 © 2026 Shutterbug
AVTech Media Americas Inc., USA
All rights reserved