- REVIEWS
Camera Reviews 
More Reviews Mobile Reviews Photography Reviews - GALLERIES
- VIDEOS
- BUYER'S GUIDES
Lesson Of The Month
Shooting Jewelry Simply And Elegantly
When it comes to photographing
jewelry, there are different approaches to consider with regards to
how each particular piece will come across. If you are deadline driven
and have many pieces to photograph, you may prefer to place each piece
on a plain white background set, photograph it, and then replace it
with the following one. |
|||
The Basic Approach |
|||
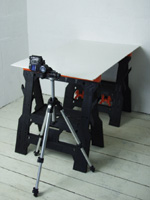
Illustrated is a classic example of built-in flash lighting (#3). Since the light illuminating the bracelet is very small and traveling in the same direction as the point of view of the lens, it can't help but render the bracelet relatively flat and dimensionless. There are small sections of the bracelet that are illuminated and reflected back into the lens, but it is the center of the foamcore that is most noticeably reflected back, making the bracelet appear relatively dark and making the lighting look uneven and unnatural. |
|||
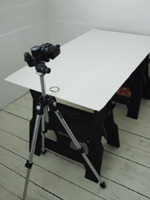
To demonstrate the effects of softbox lighting, we brought in a Photoflex Medium Starlite Kit and positioned it to the left of the set so that the diffused light passing through it would rake softly across the bracelet to create a more natural sense of dimension. Then we made some adjustments to the camera. We disabled the flash, changed the shooting mode from Program to Manual and created a custom white balance setting to match the color temperature of the Starlite Kit (3200ÞK). For the manual exposure settings, we set the aperture to f/8 (its smallest aperture setting) to achieve maximum depth of field, set the shutter speed to 1/30 sec to render a good exposure, and took a shot (#4). |
|||
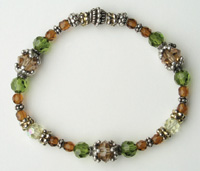
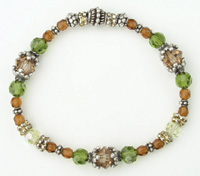
Notice how much better the result looks (#5). The lighting is soft and even, and the crystal and sterling sections of the bracelet are bright, colorful, and dimensional. If you wanted to eliminate
the soft shadow cast onto the foamcore and make the bracelet appear as
though it was resting on a pure white background, you could simply position
a silver reflector on the other side of the bracelet to fill in the shadows
and brighten the overall shot. Here, we attached a Photoflex 12"
Silver/White LiteDisc (silver side facing the bracelet) to a Photoflex
LiteDisc Holder and LiteStand and positioned it to the right of the bracelet,
just out of the frame of the camera, and took shots (#6 and #7). |
|||
Remember that once you have
your lighting setup in place, you are ready to drop in any other pieces
you may need to photograph. |
|||
Technical Equipment |


![]()
Get the Latest Photo Tips, News & Reviews from Shutterbug!
| Camera Reviews Other Reviews | Mobile Reviews Photography Reviews Columns | News | Features | How-To | Resources |
 © 2025 Shutterbug
AVTech Media Americas Inc., USA
All rights reserved