- REVIEWS
Camera Reviews 
More Reviews Mobile Reviews Photography Reviews - GALLERIES
- VIDEOS
- BUYER'S GUIDES
Lesson Of The Month
Product Photography For Business And The Web
|
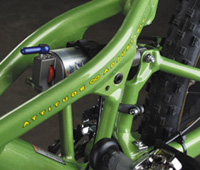
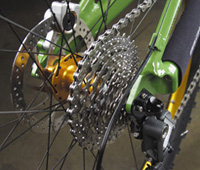
Taking professional-looking pictures for posters, catalogs, or web sites can be broken down to a few key elements: lighting equipment and technique, camera quality, subject matter, and an adventurous spirit. As with everything, the more you practice, the better you get. But thanks to improved and more affordable camera and lighting equipment, there has never been a better time to learn how to take professional photographs. This lesson outlines the following: Lighting To illustrate, we decided to photograph this state of the art mountain bike. Because of its size and reflective qualities, the bike presents some photographic challenges. Since we wanted the bike to be on a white background for greater layout flexibility, we set up a 9-foot white seamless paper background and taped the front edges to the floor with gaffer's tape. We propped the bike up by positioning the end of a Photoflex Litedisc Holder under the saddle of the bike. In order to create the necessary tension to keep the bike upright, we put a weight bag on the opposite end of the Litedisc Holder (#1 below). Next, we lowered an extra-large Photoflex SilverDome softbox that we keep suspended by ropes from the ceiling (the ropes run through eyehooks in the ceiling and are tied off to nautical cleats mounted on the walls). We then set up two large SilverDomes and positioned them on either side of the bike. Each softbox was lit up by a Photoflex Starlite lamp (continuous, tungsten-balanced) with a 1000w bulb (#2). We attached an Olympus E-10 digital camera to a tripod, set the White Balance to match the color temperature of the lights, and took a few shots until the exposure was just right. Although the exposure of the bicycle is good, the background, because it is not lit separately from the bike, is too dark. Also, the left-hand softbox needs to be inched out of the shot (#3). To brighten the background, we set up two more SilverDomes and positioned them behind the first two. We angled the direction of light so that each softbox would throw light on the background but not on the bike (#4). Once the lights were positioned, we checked through the viewfinder to make sure the softboxes were out of the frame. Before we took another shot, we reviewed the previous shot in the Playback mode and noticed that the foreground area of the seamless paper was not quite white--more of a light gray. We opened up my aperture half a stop and took another shot. The result was much better. The background and foreground were now white except for the shadows under the tires, and the bike was still at a good exposure. The only thing to do now was to digitally remove the Litedisc Holder from the shot. We removed the SmartMedia card from the camera and transferred the images to a computer. Using Adobe Photoshop 6.0, we zoomed in on the area where the saddle and Litedisc Holder met. Since the background was all white and not textured, we opted to use the Paintbrush tool instead of the Rubber Stamp tool to paint over the Litedisc Holder. The foreground color was set to white. We used a hard-edged brush and painted over the Litedisc Holder (#5). The overall shot of the bike was now ready to be printed, posted to a web page, or e-mailed. Because the background of the shot is completely white, it makes it easier and cleaner to drop into a white page for layout (#6). Commercial Tip Unless you had seen this bike in person, it would be pretty tough to make out all of these details from just this one image. If you were in the business of selling items like this on the web or in catalogs, it would obviously make sense to include some detail shots. Simply put, the more visual information you supply, the more value you will convey to a potential customer. The Details By using diffused lighting to highlight each detail, we were better able to convey the superior quality of the bike. Technical Equipment This lesson will be posted in the free public section of the Web Photo School at: www.webphotoschool.com. You will be able to enlarge the photos from thumbnails. If you would like to continue your digital step by step education lessons on editing, printing, and e-mailing your photos it will be on the private section of the Web Photo School. |
|||
|


![]()
Get the Latest Photo Tips, News & Reviews from Shutterbug!
| Camera Reviews Other Reviews | Mobile Reviews Photography Reviews Columns | News | Features | How-To | Resources |
 © 2026 Shutterbug
AVTech Media Americas Inc., USA
All rights reserved