- REVIEWS
Camera Reviews 
More Reviews Mobile Reviews Photography Reviews - GALLERIES
- VIDEOS
- BUYER'S GUIDES
Lesson Of The Month
Controlling Impossible Reflections
Lighting Techniques To Get You Out Of A "Hot Spot"
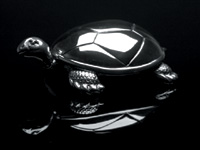
Most studio photographers
would agree that lighting and photographing highly reflective objects
can be extremely challenging, particularly curved objects like this
turtle that mirror everything in the room. Since your lights will show
up in objects like this, you need to be able to control their reflections
so as not to draw attention to them in the shot. Here, we'll look
at a few lighting techniques that will help you tackle such lighting
challenges. |
|||
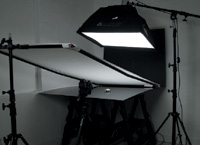
Easy Setup |
|||
I set the aperture to f/8
to get an adequate depth of field, set the shutter speed to 1/40 sec,
focused and took a shot (#1). |
|||
Get Closer With Your
Light The result (#4), although greatly improved over the previous shot, was very dramatic in that it consisted mainly of black and white shapes, almost like an illustration. While images such as this can be visually arresting, they can also be a little too stark for those who want to see a more lifelike rendering. |
|||
Double Diffusing |
|||
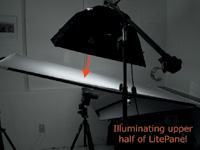
Since the LitePanel frame
cut about a stop of light, I slowed the shutter speed down to 1/30 sec
and took another shot (#7). |
|||
The only part of the shot
that was still too dark was the underside of the turtle. Rather than adding
a second light to the shot, I chose simply to place the softbox over the
front end of the LitePanel in order to throw some light underneath the
turtle (#8 and #9). |
|||
The final result reveals more
detail in the underside of the turtle and overall the shot is tonally
well balanced. The background has darkened somewhat due to the repositioning
of the overhead softbox, but this only helps to make the turtle stand
out from the background. Also, notice that the gradation of light in the
LitePanel fabric is reflected nicely into the shell of the turtle, giving
it a better sense of dimension. |
|||
Manual Exposure And
Image Preview |
|||
Technical Equipment If you would like to continue your digital step by step education lessons on editing, printing, and e-mailing your photos it will be on the private section of the Web Photo School. To enroll for WPS just go to www.webphoto school.com. |


![]()
Get the Latest Photo Tips, News & Reviews from Shutterbug!
| Camera Reviews Other Reviews | Mobile Reviews Photography Reviews Columns | News | Features | How-To | Resources |
 © 2026 Shutterbug
AVTech Media Americas Inc., USA
All rights reserved