- REVIEWS
Camera Reviews 
More Reviews Mobile Reviews Photography Reviews - GALLERIES
- VIDEOS
- BUYER'S GUIDES
Lesson Of The Month
Contrasting Color For Vivid Results
|
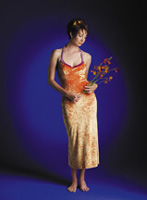
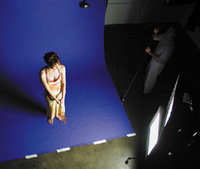
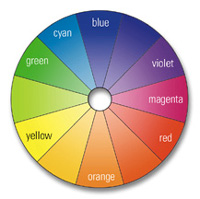
Of the many factors that go into making a great studio photograph (subject matter, lighting, props, composition, camera lenses/settings, etc.), choices of color are often overlooked by photographers. Determining what colors to use, how they interact with other colors, and how to control color saturation are all important issues to consider when creating an image. To demonstrate, we brought in a local model and makeup artist to our studio to illustrate these techniques. When our model and stylist arrived at the studio, we told them both how we wanted the shot to look. Specifically, we wanted to capture a full-length, impromptu pose on a high color-contrast set. We reviewed the clothing the stylist brought and finally decided on an orange crushed velvet dress. Fortunately, the stylist happened to bring some orange and yellow flowers for the model to hold and to set in her hair. While they got ready in the dressing room (#1 below), we worked on building the set. To create color contrast from the dress and flowers, we decided to shoot on blue, the color opposite from orange on a color wheel (#2). We hung a 9-foot roll of blue seamless paper from a 12-foot steel pole suspended by ropes, and taped the front edge to the floor with gaffer's tape. Then we set up two medium Photoflex Starlite kits and positioned one over the other to create an even, full-length light source (#3). When the model was ready, we had her stand on the seamless paper while we fine-tuned the position of the lights. We mounted an Olympus E-10 digital camera to a tripod vertically, zoomed all the way out to reduce lens distortion, and set the aperture to f/4 to keep the background soft. We set the shutter speed to 1/125 of a sec, and took a shot (#4). Looking at the image on the back of the camera, we were pleased with the overall positioning of our main softboxes. Notice that the light on the model is even in tone from head to toe, and that it gradually falls off the shadow side of the model. This, as well as the soft shadow cast on the background paper, is due to the wraparound effect of diffused lighting. The light on the background was well lit, but we wanted to add a blue-gelled spotlight in the center to boost the color and create a stage-like look to the shot. We slid a blue gel (a gel is a filter for lights) into the front holder of a Dedolight Fresnel (focusing) light, secured it to a Photoflex Boom and Boom Stand, and positioned it over the model facing the background (#5). In order for the spot to be highly saturated in color, we needed to prevent the main lights from hitting the background. Otherwise, the blue-gelled spot would get washed out. We affixed two sets of Photoflex Louvers to the main softboxes to direct the light off the background, and as expected, the light on the model was unaffected (#6). Note: Louvers are softbox modifiers that help minimize the spread of light by training it forward. Lastly, we rolled in a Photoflex 39x72" soft gold/white Litedisc on a Litedisc Holder and Litestand to the left to serve as a subtle fill. We asked the model for some additional poses, and we took a shot as soon as we saw something interesting (#7 and #8). The result showed a big improvement. The quality of light on our model had remained the same, while the background had darkened around the edges of the frame. Although the gelled Dedolight had increased the brightness and saturation in the center of blue background, we wanted to increase its effect a little more. While the stylist made some last minute adjustments to the model, we increased the power of the Dedolight to its maximum setting and slid another blue gel over the light to increase saturation. Again, we asked the model to strike poses in a freeform way to prevent the shot from feeling too composed. We made several shots at this final lighting setup, and later found this image to be the most compelling of the bunch (#9). Here, the model's pose is simple and balanced, and the intensity of the blue spotlight is vividly contrasted against the orange flowers and dress. Technical Equipment |
|||
|


![]()
Get the Latest Photo Tips, News & Reviews from Shutterbug!
| Camera Reviews Other Reviews | Mobile Reviews Photography Reviews Columns | News | Features | How-To | Resources |
 © 2026 Shutterbug
AVTech Media Americas Inc., USA
All rights reserved