- REVIEWS
Camera Reviews 
More Reviews Mobile Reviews Photography Reviews - GALLERIES
- VIDEOS
- BUYER'S GUIDES
Lesson Of The Month
Commercial Images On A Shoestring Budget
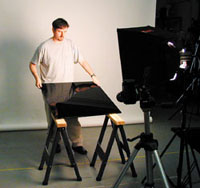
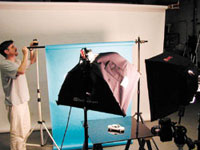
The amount of money required for a single day in a commercial car photo shoot is staggering. It is a major production that requires a good location, very large light sources, and a large team of skilled people. As a result, most photographers don't get the chance to work on such productions. So when we came across this highly detailed miniature replica of a BMW, I thought, "Here's our chance!" The design of this lesson, however, was not to try to sell a car, but rather to illustrate the advantages of using reflective surfaces for special effects. First, I set up a pair of collapsible sawhorses and placed a 30x30" sheet of black Plexiglas on top of them. This black surface allows many different lighting options because of its ability to absorb and reflect light (Figure 1). |
||||||
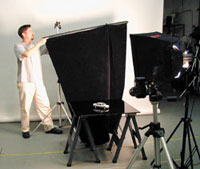
Behind the tabletop, I set up two light stands with clamps attached and affixed a sheet of black cloth to them. With the cloth reflecting into Plexiglas, I now had a black foreground and background with no gradation in tone. I angled the miniature BMW on the glass, turned the working steering wheel all the way to the left, and left the driver's side door open (Figure 2).
|
||||||
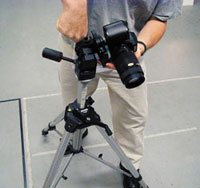
I mounted the camera to the tripod, and keeping in mind that the final image would be a mock magazine ad, I tilted the tripod head 90° to secure a vertical frame. To allow room for type, I zoomed out a bit so that the foreground and background had some room to play with (Figure 3). Since I wasn't using a Polaroid back I decided to use continuous tungsten lights to be able to see better what the results would be. With flash, unless you have a Polaroid back or digital camera, you must rely solely on the numbers from your light meter for the correct exposure. And under these conditions, it can be difficult visualizing what your final outcome will be, particularly when you are using more than one light. With tungsten lights, what you see through the viewfinder is very close to what you get on film. |
||||||
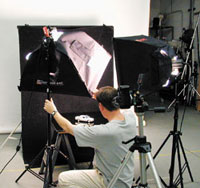
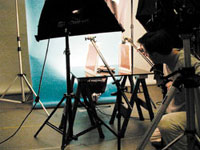
I set up a medium softbox and positioned it until the right side of the car and its reflection were where I wanted. Facing the light meter toward the light from the car, I got a reading of f/11.5 at 1/15 of a sec (Figure 4). |
||||||
I loaded Kodak EPY 64T tungsten film into the camera, adjusted the camera settings accordingly, and took three shots--bracketing in half stops, both sides of f/11.5 (Figure 5). |
||||||
I set up another medium softbox and positioned it to the left. With my head directly in front of the camera lens, I angled the softbox until there was a partial reflection in the rear passenger door window. The reflection of the car in the Plexiglas was now nicely defined. I took a second meter reading from this softbox and got f/11.8 at 1/15 of a sec (Figure 6). |
||||||
|
||||||
Bracketing at the same stops as before, I took three more exposures (Figure 7). The car looked great on the set, but through the viewfinder it looked as though the car and its reflection were floating through space. And there's nothing wrong with cars in space I suppose, but I decided to add some color and a horizon line for a sense of dimension. I removed the black cloth and replaced it with a 4 foot roll of light blue seamless paper (Figure 8). To create a distinct horizon line, I placed an extra small softbox with the diffusion face removed on a background stand, and positioned it upward. I moved it as close as I could to the paper to render a slight texture on the paper (Figure 9). |
||||||
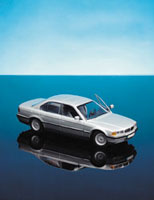
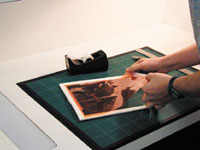
Looking through the viewfinder, the car now appeared to be parked on top of an inch-deep body of motionless water. And above the horizon line, the background now resembled a slightly hazy sky. Again, another three exposures were taken (Figure 10). For a sunset effect and to balance the overall color of the shot, I decided to place colored gels next to the car. Using foamcore, I cut out two 12x14" frames with a ruler and matte knife and taped 1/3 stop CTO (Color Temperature Orange) gels to them (Figures 11 and 12). |
||||||
|
||||||
|
||||||
Using two Litedisc Holders attached to background stands, I placed the gel frames on either side of the car. I took another meter reading facing the camera from the car and got f/11.5 at 1/15 of a sec (Figure 13). Through the viewfinder, the car now had a warm tone that contrasted nicely against the blue. I opened up a 1/4 stop and took another three exposures (Figure 14). When I got the film back, I noticed that the color in the reflection of the car was more saturated than in the car itself. This was due to the inverted bounce of reflected light thrown from the left-hand softbox through the CTO. So as an added effect, I decided to edit the color of the reflection digitally. (I find it hard to resist this sort of temptation.) After scanning in the image, I opened it up in Photoshop, clicked on the Eyedropper tool, and selected from the blue area next to the car's reflection. I then chose the Paintbrush tool from the toolbar and in the Paintbrush Options I switched from Normal brush to Color brush and set the opacity to 75 percent. Under Brushes I created a soft-edged brush that was 390 pixels in diameter. I then carefully painted in the shadow to give it a blue-watery feel (Figure 15). |
||||||
In this final image (Figure 16) the car now draws the central focus, and it is now ready to be used as the starting point for an upcoming digital lesson which will involve masking in a live subject. This lesson will be posted in the free public section of the Web Photo School at: www.webphotoschool.com. You will be able to enlarge the photos from thumbnails. If you would like to continue your digital step by step education lessons on editing, printing, and e-mailing your photos it will be on the private section of the Web Photo School. Shutterbug has negotiated with WPS to offer our readers a special 33 percent discount rate of $30 per year. To enroll at this discount just go to: http://shutter bug.webphotoschool.com and fill out the Shutterbug questionnaire which will help us to publish lessons for you in the future. Technical Equipment Cameras: Nikon N8008s
w/70-210 zoom lens; Olympus C-2020 Z (for setup shots) |


![]()
Get the Latest Photo Tips, News & Reviews from Shutterbug!
| Camera Reviews Other Reviews | Mobile Reviews Photography Reviews Columns | News | Features | How-To | Resources |
 © 2026 Shutterbug
AVTech Media Americas Inc., USA
All rights reserved