- REVIEWS
Camera Reviews 
More Reviews Mobile Reviews Photography Reviews - GALLERIES
- VIDEOS
- BUYER'S GUIDES
Lesson Of The Month
Add A Stylist To Your Shoot Team
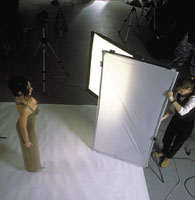
Our objective for this shot
was to illustrate how to shoot with a large softbox for the Photoflex
product catalog. In this photo shoot we used an inexperienced local
model. |
||||||
We have been working with our
stylist for five years. We met her by placing an ad in the local newspaper
and explaining exactly what we were doing and what we wanted. She is a
professional makeup and hair stylist. She works for local TV stations
on commercials, for national networks when they are in the area, for professional
photographers on commercial shoots, and does makeup for brides and attendants
at weddings (Figure 1). |
||||||
Hair Salons. These
people are obviously trained to work with hair, but many of them also
do makeup and are available for weddings. This is a great place to look.
Take your portfolio and show them what you have done and explain what
it is that you want to do. Chances are they can use the before and after
shots for their salon, and their portfolio if they are looking for wedding
work. You may be able to do a trade if you supply them the photos. |
||||||
Theater Groups.
Community theater, high school, and university. These groups always have
makeup and wardrobe people, and oftentimes they are the same person. They
have a good sense of style, can adapt to sudden or unexpected changes
without getting stressed, and know how to work fast. |
||||||
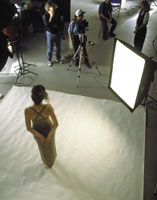
While the model was
getting literally transformed with hair and makeup, we set up a roll of
textured seamless paper. Where do you get this fantastic stuff? Well,
we are based in Santa Cruz, California, where it's foggy during
part of the year. We took a plain roll of seamless paper to a house on
the beach and put it in the garage with the side door open. We unrolled
it, then rolled it back up loosely so that the foggy air could get inside
the roll evenly. After a few days the paper had developed a wavy texture,
as you can see here. Photographers are always trying something new (Figure
6). |
||||||
Next, we positioned
a LiteDisc off to the right to bounce light from the main light onto the
model. In most cases a white reflector would work well, but we planned
to double-diffuse the main light, and this might make the white too weak
(Figure 8). |
||||||
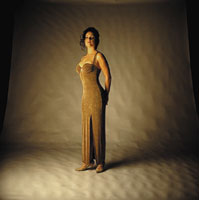
When working with a
team, it is important to show the results as they develop, and nothing
helps more than to take test shots, or Polaroids, that everyone can pass
around and discuss. Looking at the results at this point in the shoot,
nobody on the team felt that it was fully working. The stylist offered
that the brown dress just wasn't right for the model. She thought
that she had another one that would work much better. Everyone agreed
that we should give it a try. |
||||||
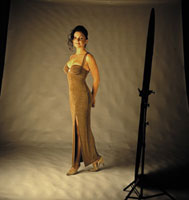
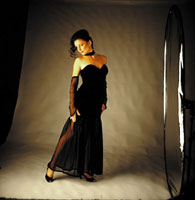
We put the film magazine on
the camera and exposed a roll of film. Since we were all setup, we decided
to shoot another roll without the silver reflector for a more dramatic
look. It's always good to shoot different variations of the same
set (Figure 13). Once we got the film back, it was a tossup as to which
version people liked best. But the good thing was that we had a choice,
and depending on where it ended up, one shot might work better than the
other. |
||||||
This lesson will be posted in the free public section of the Web Photo School at: www.webphotoschool.com You will be able to enlarge the photos from thumbnails. If you would like to continue your digital step by step education lessons on editing, printing, and e-mailing your photos it will be on the private section of the Web Photo School. Shutterbug has negotiated with WPS to offer our readers a special 33 percent discount rate of $30 per year. To enroll at this discount just go to: http://shutterbug.webphotoschool.com and fill out the Shutterbug questionnaire which will help us to publish lessons for you in the future. |
||||||
Technical Equipment |
||||||
|
||||||
|


![]()
Get the Latest Photo Tips, News & Reviews from Shutterbug!
| Camera Reviews Other Reviews | Mobile Reviews Photography Reviews Columns | News | Features | How-To | Resources |
 © 2026 Shutterbug
AVTech Media Americas Inc., USA
All rights reserved