- REVIEWS
Camera Reviews 
More Reviews Mobile Reviews Photography Reviews - GALLERIES
- VIDEOS
- BUYER'S GUIDES
Books from Blogs with Blurb Software Review
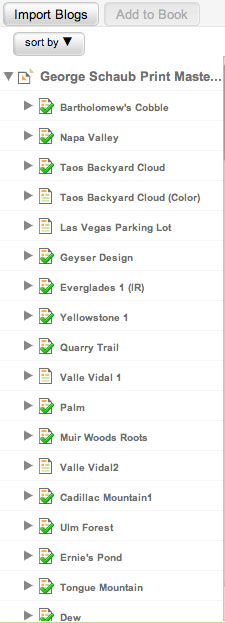
For the past few months I have been slowly cataloging prints I’ve made over the past years. This entails signing, dating and numbering the prints and then making an Index. I decided the easiest way to maintain and expand the list as I continued cataloging would be a blog. That was only the beginning of the project, it turns out.
I transformed the blog into a dedicated web site that I could use to continue adding prints when time allowed. (http://www.georgeschaubprints.com). All well and good, but not everyone I wanted to share the prints with, from friends to prospective show sites and galleries, had the disposition or ability to look at the site, and I always feel that having a real live “leave behind” or even available print catalog at a show is a good idea. Showing prints with an iPad could always work, but I wanted something that I could eventually leave at exhibition venues for their reference. That’s when I “discovered” Blurb’s Blog to Book service and their somewhat oddly named “Slurp” capability.

Blurb is one of numerous companies that offer customized book making services, and they have products that range from functional to very fancy, with a new lineup of pro papers and bindings just made available. They have established a good rep among photographers who do fine art style books and have numerous templates as well as the capability to host the creation of very refined and highly custom designed books. They are, to me, less a go-to source for wedding and brag books and more for what I would call legacy and fine art photography books.
I originally checked out the Blurb site and features to start work on a larger “fine art” book of prints, and using their instructions in the free BookSmart software. I started on what I knew would be a long process…but then I looked at a list of options and noted something called “Blog to Book.”
Blog to Book eventually settles into the standard Blurb bookmaking software routine, where you can move content, swap around images, play with facing pages, choose numerous layout and text combinations, etc., but the beauty of this process is that the upfront work, and perhaps the final product, is created with an automated process that gets what you need where you need it in good order. The basis of this is what they dub “Slurp”, a set of actions that literally takes content you indicate right from your blog into the book layout. Later on I’ll point you to a short video that gives you a good rundown of mechanics, which saves me and you a lot of time and space, but for now I’d like to share some of my observations from lessons learned along the way.
*Before you get involved in exploring this keep in mind that not every blogger can use it—it depends on the framework. This might change over time but right now you can use Typepad, Blogger, WordPress and LiveJournal. I worked directly from a Google blogspot (which again I transferred to a web site address.)
*There are numerous book styles to choose from and you can go “deep” into high-end styles and options—I chose a standard Portrait style, 80 pages, to keep the price reasonable for me and anyone who might want to purchase the book. One problem with Blurb is that, unlike book print on demand services like Lulu, there is no in-house way to get an ISBN number, thus you have to work harder to get one and place it in the book. While you can sell the book through the Blurb bookstore, lacking an ISBN number pretty much eliminates the possibility of placing the book on Amazon, etc.
*If you use hyperlinks in your pages they are “extracted” and placed as footnotes at the base of each flow of text or blog chapter. This probably requires you to go in and make sure the formatting etc. is right.
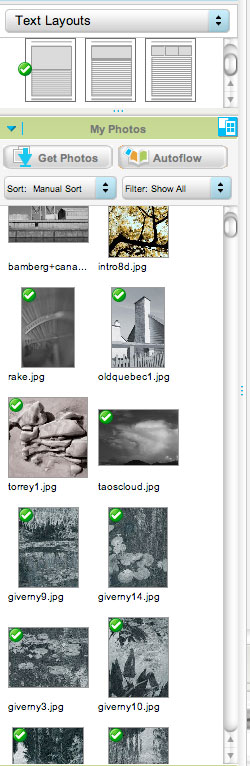
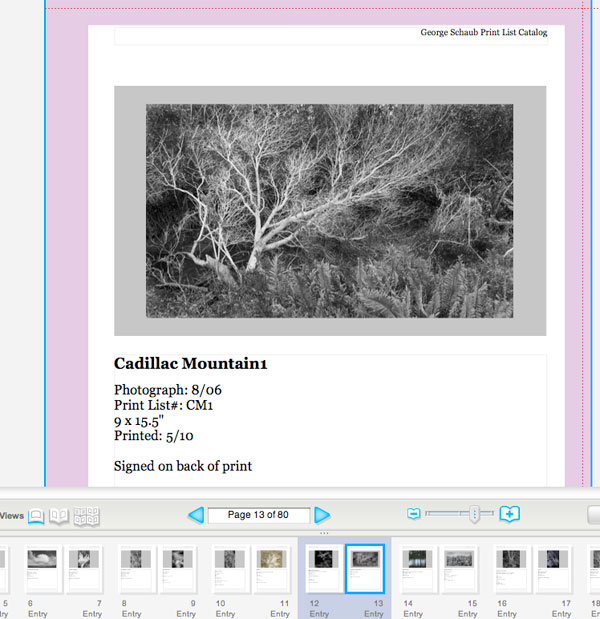
*Because your blog images probably are JPEGs for a blog anyway you will not have to be concerned about converting them for use in the Blog to Book feature. But you may have to resize anyway because you might not have the kind of resolution needed, so have the image folder handy. If images are too low res for decent repro you’ll get a yellow caution flag next to the image. You can then go in and resize or adjust the image, or upload as a separate file and replace it on the page.
*There are 15 (and counting) themes for you to use for Blog to Book, somewhat limited compared to the general offerings of the company. Perhaps if more folks use this option they’ll start designing more themes.
*The process of getting the blog material “slurped” is easy. Essentially you give the software the password etc., choose the blog entries you want to transport and hit OK. The video shows this process quite well. You do need to proof, however, as I found that some blog entries spilled into others, but that may have been because of the style of the blog and subsequent book I chose. If you feel confident in proofing on screen have at it, but you can also print out a copy and sit with it for a bit, possibly a better course as others can usually spot what we all, even editors, miss in our own work.
*Once the blogs are loaded they show up in a tree directory on the left side of the workspace. As I said I chose “auto populate” since this is the quickest way to get pages going that can be easily edited and changed later.
That’s about it from my point of view. For me, this project become much more meaningful and viable because of Blurb’s Blog to Book setup. It was a surprise find for me (I had not heard of it prior to “stumbling” on it on their web site.) I wanted to share it with you because I have always felt that certain creative endeavors, like blogs, need not stop at the digital door, and can go on to have other manifestations. And the process was quick and painless.
If you want a preview of the blog to book I created just go to the Blurb site and type my name into the Search box.
And here’s a recommended video on the process from Blurb:


![]()
Get the Latest Photo Tips, News & Reviews from Shutterbug!
| Camera Reviews Other Reviews | Mobile Reviews Photography Reviews Columns | News | Features | How-To | Resources |
 © 2026 Shutterbug
AVTech Media Americas Inc., USA
All rights reserved