- REVIEWS
Camera Reviews 
More Reviews Mobile Reviews Photography Reviews - GALLERIES
- VIDEOS
- BUYER'S GUIDES
Why I Absolutely Love Photo Filters—and Why You Might, Too

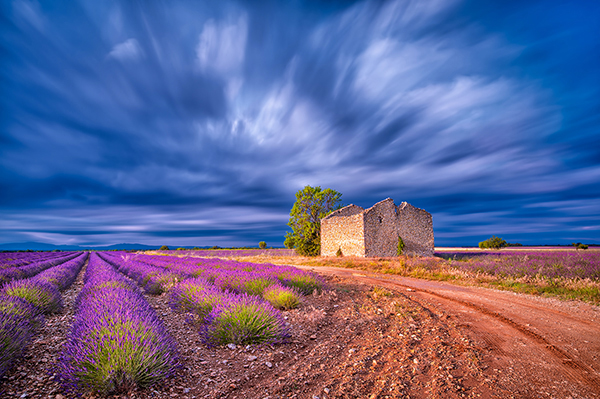
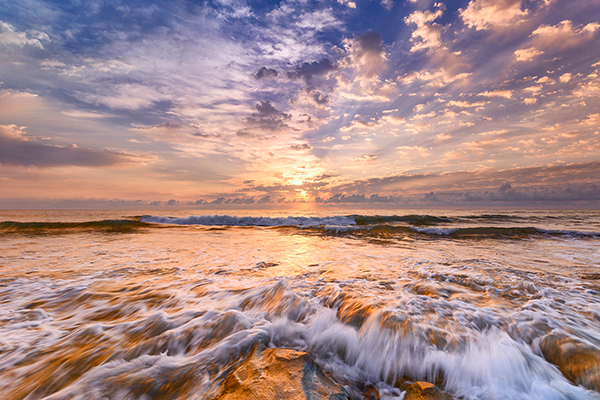
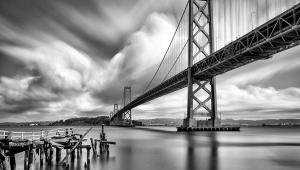
On a clear, blue-sky day in Florida not long ago I was out testing neutral density (ND) filters when it occurred to me that the fact that I do that routinely was an indication of how important filters are to the kind of pictures I like to take.
How important? Well, none of the photos you see included in this story could have been taken without the use of filters.
I keep a small pack of corrective and creative filters with me always: four neutral density (3-stop, 6-stop, 10-stop, 15-stop); two graduated neutral density (a 2-stop regular and a 2-stop reverse); a gold-and-blue polarizer; a color-enhancing polarizer; and a night filter. My filter holder, the neutral density filters, the night filter, and the color enhancer are from NiSi; the gold-and-blue is a Singh-Ray.

Control Light and Color
The ND filters allow one of my favorite techniques: exposures over time to show not only motion, but the results of motion. Long exposures allow a lot of a light to enter the camera, and most often closing down the aperture and cutting back on the ISO will not hold back the light to the degree I need it held. But ND filters will, and they make possible creative images that capture light streaks, the motion of clouds, water and waves, and the change of colors in sunset or sunrise skies.
The graduated neutral density filters are, as the name states, graduated in their density—strong at the top, decreasing toward the middle, gone at the lower half. The reverse grad is clear at the bottom, offers the strongest light blocking at the center of the frame and fades out toward the top.

The other two filters I carry are pure fun-factors. The gold-and-blue polarizer will punch up the color in a scene. It's my secret weapon for a more exciting image when color is scarce or just plain dull. The NiSi Natural Night Filter will balance different types of light, tame a variety of light-pollution sources, and supply a nice, normal looking, slightly blue hue to a scene.
Numbers Game
Knowing that I have to use an ND filter is pretty much the easy part. In a typical situation I've narrowed my aperture as far as it will go—let's say to f/16 or f/22—and the ISO is 64 or the lowest setting, and I've extended the shutter speed as much as I can—say to 1/15 second—and there's still too much light coming in. At that point an ND filter is the only way to go, but which one? The 3-, 6-, 10-, or 15-stop?
The truth is that experience is the best teacher; practice the technique and you'll get to know what works in most situations.
Here's how my thinking would go at the start: for a 1/15-second exposure, I'll start with the 3-stop ND. I'll step up to the 6-stop if I really want to extend things but still keep the exposure under 30 seconds. I'd use the 10-stop mostly when I want to get to 40 seconds or a minute at the end of the day or in really low light. For full-on, challenging daytime shots, I'll always use the 15-stop, and when I do, there's a bit of math involved because of the length of the exposure I'll need.
First, I meter the scene and take a test shot at the f/stop that'll give me the depth of field I want—typically it's f/11 to f/22. Then comes the math, which is easily handled by an iPhone app called ND Timer. In the app I scroll to the shutter speed I used for the test shot and to the strength of the ND filter I'll be using—in this case the 15-stop. The app handles the calculation, counts down the time for the exposure and sounds an alarm when the time's up.
The only drawback is that despite experience, it's likely there will be some lost long-exposure photos along the way. As the shutter stays open, things change—that's what you want, after all—but you can't always predict what changes in light, wind, tide, weather or bus schedules will do to your hopes and intentions.
So, while none of this is exactly "photography made easy," it's certainly "photography made creative" and "photography under our control." I think you'll find the proof of that, and the worth of the effort, in the photographs.

Deborah Sandidge's website, deborahsandidge.com, offers a collection of her photographs as well as photo tips and a schedule of upcoming workshops, photo tours, and seminars.


![]()
Get the Latest Photo Tips, News & Reviews from Shutterbug!
| Camera Reviews Other Reviews | Mobile Reviews Photography Reviews Columns | News | Features | How-To | Resources |
 © 2026 Shutterbug
AVTech Media Americas Inc., USA
All rights reserved