- REVIEWS
Camera Reviews 
More Reviews Mobile Reviews Photography Reviews - GALLERIES
- VIDEOS
- BUYER'S GUIDES
When Auto Fix Works…and When It Doesn’t
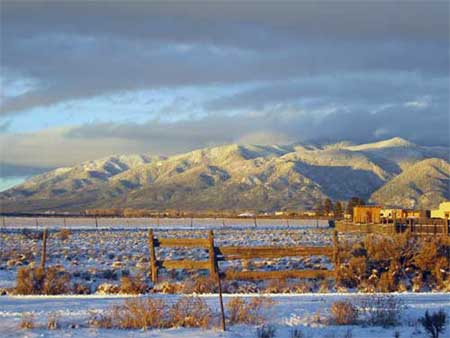
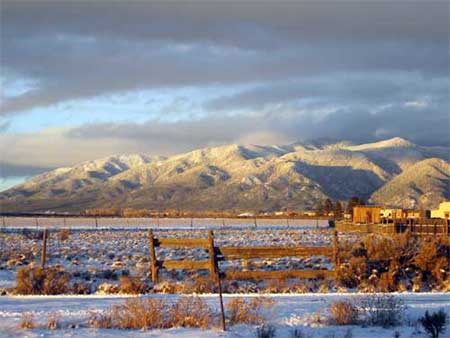
To check out how auto fix works we made a photograph of a snow-covered mountain at sunset. Aside from the nice view the mood of the photo is really in how the sunset creates a golden light on the scene, and the wonder of that time of day. We also chose it to illustrate how an "auto" approach to image enhancement and correction can in fact null out the emotional content of the scene. While there are times when we want to get a more neutral color balance in scenes, those that have a definite mood are not one of those times. Using this photo also shows how these different auto fixes actually change the image.
Here's our scene, made at sunset.

Our first auto fix is, in Photoshop Elements 3, something Adobe calls SmartFix Enhance>SmartFix). I moved the slider to 100%.
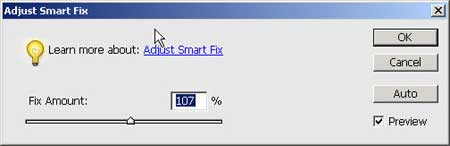
It's not bad. While it removes some of the warm color cast on the snow
in the foreground and fields it maintains some of the golden glow on the mountain.
You might admit, though, that it kind of misses the point of the picture.

The next auto approach we tried is Remove Color Cast, found in Enhance>Adjust Color>Remove Color Cast. Here's the dialog box:
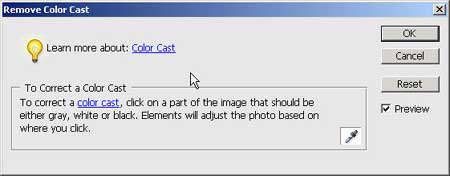
This auto program must have thought that the warm color cast was too dominant
in the scene and went, to my eyes, a bit overboard in correcting the blue. It
looks nice and cold, which it was, temperature wise, but the emotional warmth
of the scene is almost completely removed.

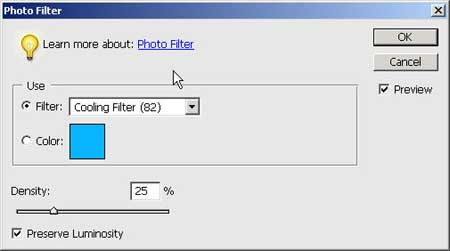
The next one we tried was a color "photo filter". This emulates
what the image would look like if you had placed a color filter over the lens.
Keeping with our color balancing theme, the instinct here would be to put a
"cool" blue filter over the lens. Here's the dialog box, evoked
via Filter>Adjustments>Photo Filter:
And here's the predictable result:
Not bad, actually, as it actually adds some blue to the snow...a nice effect.
Here's another approach, using Photoshop Elements 3's QuickFix option, this time working with Auto Levels. This does a nice job of what's called "filling the gamut", which adds some contrast and snap and does not denigrate the warm coloration too badly.
But sharpening is another matter. Again, working in the QuickFix menu, I chose auto levels and auto sharpening. You might not see it on the screen, but this oversharpened, to my eye, and brought unwanted edge effects into the picture.

So, which one works best? It's really a matter of taste. But to me, the shot right out of the camera, perhaps with a slight levels adjustment to perk up the image, is more like what I wanted to get out of the picture. Yes, those auto adjustments can do the trick, but keep in mind that they are the software's "opinion" of how to adjust the image, which may or may not match your own.


![]()
Get the Latest Photo Tips, News & Reviews from Shutterbug!
| Camera Reviews Other Reviews | Mobile Reviews Photography Reviews Columns | News | Features | How-To | Resources |
 © 2026 Shutterbug
AVTech Media Americas Inc., USA
All rights reserved