- REVIEWS
Camera Reviews 
More Reviews Mobile Reviews Photography Reviews - GALLERIES
- VIDEOS
- BUYER'S GUIDES
Pop-Up Flash: A Convenient “Taste Of Light”
Pros And Cons
First off, I’ll make the case for and against using a pop-up flash. The advantages of a pop-up flash are many. It adds virtually no weight to the camera; it’s always available for use; it doesn’t add any bulk; it doesn’t cost anything extra; and it’s extremely convenient. You can push a button and it’s ready.
On the other side of the ledger, a flash that is built into a camera is limited in terms of power simply because of its small size. That means that subjects beyond 10-15 ft won’t be affected very much by the additional light. Assuming that you are already using a large lens aperture, only if you raise the ISO can you extend the effective distance of the flash. The down side of that, of course, is that you increase the digital noise. Therefore, shoot close to your subjects. When I took image (#1) using a pop-up flash, I was only about 5 ft away from the boys.

All Photos © Jim Zuckerman
Small built-in flashes are always positioned right next to the viewfinder (#2). This can cause red-eye, an undesirable red color seen in the retina of a subject’s eyes (#3). It occurs because the light emanates from a position right next to the lens axis, and when it reflects from the back of the eyes into the camera lens, the blood-filled capillaries make the color of the pupils look red. In animals, this is usually pale green. To help prevent this, some cameras emit a series of pre-flashes designed to minimize red-eye by causing the pupil to constrict before the main flash fires and the picture is taken, thus making the area of red smaller. This can be effective, but it’s distracting to the subject and often confusing for kids (and adults).
Another disadvantage is that a pop-up flash can’t be pointed in any direction other than straight ahead. On-camera flash is quite harsh and many people find it to be unflattering for portraits. All in all, built-in flash limits your ability to be creative with flash and to control how shadows fall on and behind the subject.


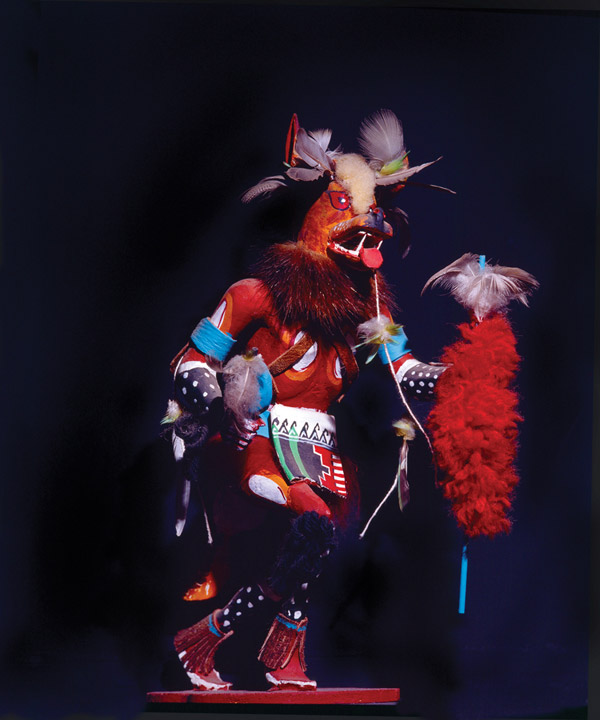
The news, however, is not all bad, and in fact many pros will resort to the built-in flash when just a “taste of light” is required. If you are shooting fairly close to a subject in a dark environment the built-in flash can be a lifesaver. Without the flash, the shutter speed would be too slow to hand hold the camera, thus the pictures would turn out to be blurred. An example is the Kachina doll I photographed in a museum (#4). Fortunately, the doll was displayed against black, and in the dim interior lighting I never could have taken a sharp picture without a flash. Similarly, the ginger on the jungle floor in Papua New Guinea (#5) was hopelessly dark, and it was impossible to get a sharp picture unless either a flash or a tripod was used.

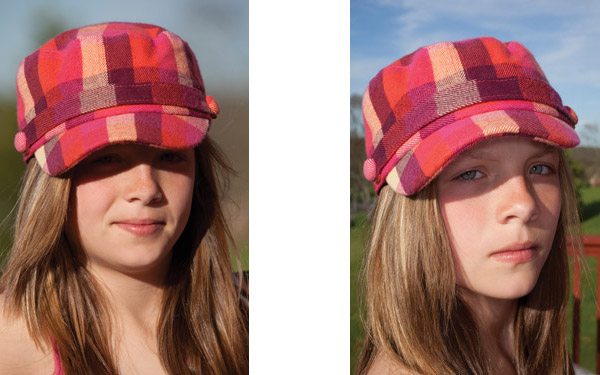
Second, the extra light can fill in dark areas of a picture so the effect of unattractive shadows is less obvious. This helps to preserve some of the detail in those shadow areas. In the comparison photos of (#6 and #7), you can see that the late afternoon sunlight created a black shadow under the brim of the hat, but with the additional light from the flash the eyes of Grayci, my young model, were revealed. Notice that the highlights on her skin weren’t affected as much as the shadows. Grayci was only a few feet away from me when I photographed her.
Improving Your Flash Pictures
Even though you don’t have a lot of control with a pop-up flash, there are steps you can take that will improve the quality of your images. For example, being aware that shiny surfaces and glass reflect light, you can change the shooting angle so you don’t get a blinding reflection. When I photographed a framed weaving I bought in Burma (#8), I stood right in front of the artwork and took the shot. The resulting reflection is obviously unacceptable. I then shot from a much lower position (#9), so the flash bounced off the glass and away from the lens. This solved the problem. This solution is straight out of a science book: the angle of incidence equals the angle of reflectance. This means that the angle the light strikes the object is the same angle that it reflects off the object. Lesson? When using a built-in flash, think angles, not straight ahead.


Another issue is the harsh light that is created with direct on-camera flash. With more sophisticated portable flashes, there are several options to soften the light that I’ll discuss later. For the built-in flash, however, there is only one way to reduce the harsh, glaring quality of the light. And the good news is, it’s free. You can put a small piece of white paper or translucent fabric in front of the flash (#10), and that will soften the light to a certain degree. The African mask in (#11 and #12) shows the subtle effect of using a softening cloth or tissue. Notice the glare from the flash between the nose and the mouth in (#11), but in the comparison picture it has been mostly removed by using the paper over the flash. Admittedly, the difference is subtle, but even the smallest of differences in light, color, and contrast can improve your pictures.


You can use this same technique when shooting people as well. The difference will be subtle, but the quality of the light will definitely be improved.
Another problem is that a built-in flash can create an unattractive shadow behind the subject. This is especially noticeable when you turn the camera to take a vertical composition (#13). This can be eliminated by shooting against a black background, moving the subject away from a wall or near background, shooting at night where the background is very dark, or changing the angle of the camera and flash relative to the background so the shadow either disappears or it becomes insignificant.
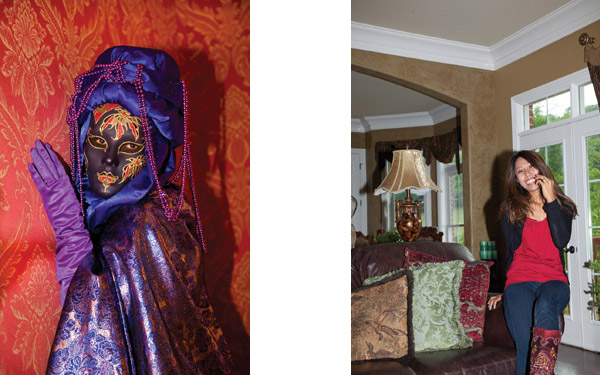
You can see the same problem in (#14), a typical indoor snapshot taken with an on-camera flash. The shadow behind my wife is distracting and undesirable. If the built-in flash is situated on the camera body such that it is to the side of the lens axis, you will get a defined shadow behind the subject. The further the flash is from the axis, the wider the shadow will be. The Javanese dolls in (#15) show another example of an unwanted shadow on the wall. By placing a piece of black fabric behind them (I used black velvet in this case), the shadows disappeared (#16).


![]()
Get the Latest Photo Tips, News & Reviews from Shutterbug!
| Camera Reviews Other Reviews | Mobile Reviews Photography Reviews Columns | News | Features | How-To | Resources |
 © 2026 Shutterbug
AVTech Media Americas Inc., USA
All rights reserved