- REVIEWS
Camera Reviews 
More Reviews Mobile Reviews Photography Reviews - GALLERIES
- VIDEOS
- BUYER'S GUIDES
Phase One Capture One Pro 6; A Top-Level Image Handler
For serious photographers, the software you choose for a photographic workflow falls into good, better, and best buckets. The “good” bucket includes fairly mundane tools for basic image management, while “better” goes the extra step of providing image correction options and filters. The “best” tools provide tethered-shot features and robust metadata editing functions. At these upper ranks, the best software seems to predict your every move, mostly because the software developers are photo enthusiasts and understand real photographic needs.
Phase One’s Capture One Pro 6 falls into this “best” category. In many ways, it even beats out Adobe Photoshop CS5 in that there seems to be a professional-grade feature under every drop-down menu and in every dialog box. The editing functions pale in comparison to Photoshop, but as we’ve all learned, if you set up the shot perfectly on location you might not need to do a lot of editing later.
As a professional-level management and workflow suite, Capture One helps you take photos directly from a tethered camera, import images from a card reader, fill in metadata, view and edit images, and export or upload the final results. It also excels greatly at basic Raw file conversion into a more portable format.
At $400, it’s not an impulse purchase by any means. Yet, in testing Capture One Pro 6 for an entire month, in tethered mode and with a variety of cameras (including the Phase One 645 AF which is intended for use with the software and the Canon EOS-1D Mark IV that also works for simple tethered mode), I can say that this particular photographic software is one of the best packages I’ve ever tested.
© Hannah Brandon
© Jamie Allen Larson
Import Made Easy
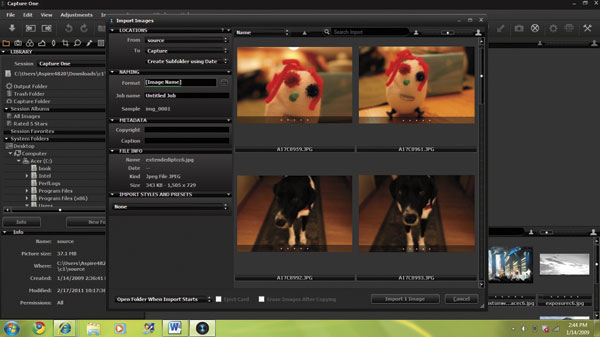
Like Adobe Lightroom 3, Capture One’s import options do not compare to the robust import features found in Apple Aperture 3, which includes options for tweaking IPTC data and even making an immediate backup after import. Instead, Capture One’s import is designed for simplicity and speed. There are options to add a copyright, and you can customize the subfolder and naming conventions for your import. There’s a curious sense of accomplishment even at this phase in the workflow as the software reports any errors and each thumbnail shows a “processing” icon.
In fact, if you set up the import the way you want, add the naming convention (such as “Rockfest2010” with sequentially numbered images), and inspect your images, Capture One lets you skip the superfluous steps and just move right into export or upload. So, if your main goal is just to read images off your camera and process them quickly, Capture One removes a lot of the typical clutter.
Another important note: Phase One positions this software as a Raw converter in addition to a workflow tool. In my tests, subtle quality accents revealed themselves over time. After an entire day of shooting photos at a rock festival, I loaded images into Capture One by connecting the Phase One 645 AF to my PC using FireWire. After import, I inspected images for Raw conversion and the shots retained a high degree of fidelity—even as exported JPEGs, the photos had a vibrancy and clarity that I’m not used to with the Canon import utility I’ve normally used.
© John Brandon
© Jamie Allen Larson
© Jamie Allen Larson
Adjusting Images
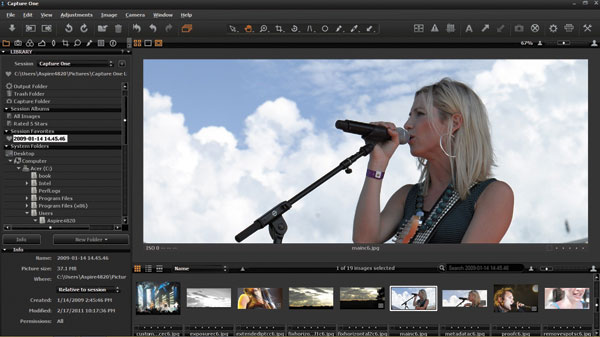
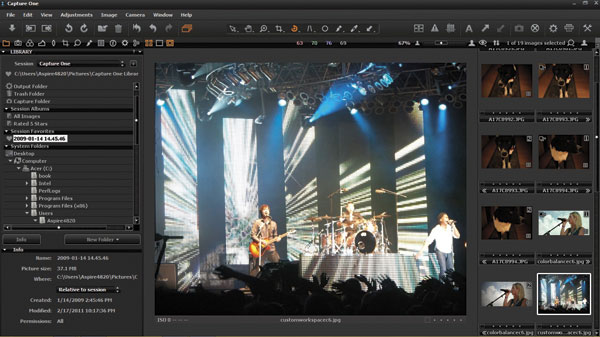
After import, Capture One served me well as a photo management tool. One of the key features is that the workspace is highly customizable, and you can save these workspaces and reuse them for other photo management chores. (I did not see a way to export the workspace file and send it to another user, though.) So, you can decide to have the thumbnail views on the left or right, or add a focus panel to the left of your main viewing angle—a boon for those who like to zoom in on a particular part of an image and see the full-size image at the same time.
Even the basic layout of the program can be customized. For example, by default there is a row of tabs on the upper left for managing your library, adjusting color, cropping, and many other functions. You just click on the tab you want. But if you customize the workspace, you can remove these tabs entirely. There’s also a full-screen mode, although it lacks the elegant dimming options of Lightroom.
Once you have the workspace you want, you can dive into the image manipulation features. Once again, these are designed for pros and not the casual photographer. This adds some initial complexity, but actually the program is fairly easy to use because of how it organizes the functions into the aforementioned tabs. Once you get into the workflow process, there is rarely that moment when you wonder what you should do next—the tools are shown in easy-to-navigate drop-down menus.
Here are a few more examples of the smooth workflow. Say you want to apply some new effects to an image—you can quickly right-click on an image and create a variant and then show both images on the screen at the same time. Or, once you start making adjustments, you can easily check your history to see all the steps you went through and even save this “recipe” and reuse it. The way this works: you can copy the recipe to a clipboard, and then reapply the adjustments to other images. You can just click radio check boxes for the adjustments you want.
Another workflow example has to do with styles. Phase One has provided a quick drop-down menu under the Adjustments menu to access styles—a way to turn a color image into a black-and-white photo or add vibrancy. Capture One Pro 6 adds some helpful new tools for converting to black and white, including a new split toning feature that made a schoolhouse picture look archaic. One minor complaint is that these menus use a dark gray color and it can be hard to see that there is another submenu available—once you find it, however, you know it is available.
New Adjustment Options
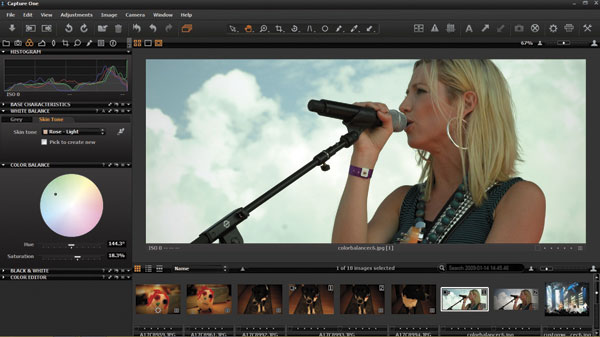
Capture One Pro 6 adds several new enhancement options. One that I found useful, especially for the rock festival shots, is a new skin tone enhancement tool. It’s very simple to use: you can select a stock skin tone color or save your own colors and apply them to an image. You can use a standard skin tone color for a series of images (such as a wedding shoot) and maintain consistent color.
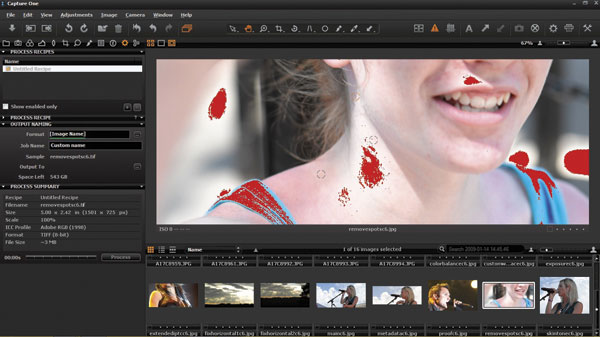
Capture One also adds a new spot removal tool that worked amazingly well. To use it, you just select the spot you want to remove and the app works its magic.
I will say that a low point in testing Capture One was in trying to correct noise in several low-light images from the rock festival shoot. Now, for the most part, the settings worked well, adding a smooth luminance that removed a pixilated effect on a performer’s arm and along the side of her face. As a sanity check, I loaded the same Raw file into Lightroom and noticed that the Adobe product actually created a smoother look on this particular image. That’s not to say Capture One has a poorly implemented noise reduction filter, but for my tests, Lightroom worked better.
Capture One adds a new focus mask tool that is quite helpful as well. In this mode, you can see a mask for all areas wi
th the same or similar focus, and then apply adjustments (such as add sharpness) just to those areas.
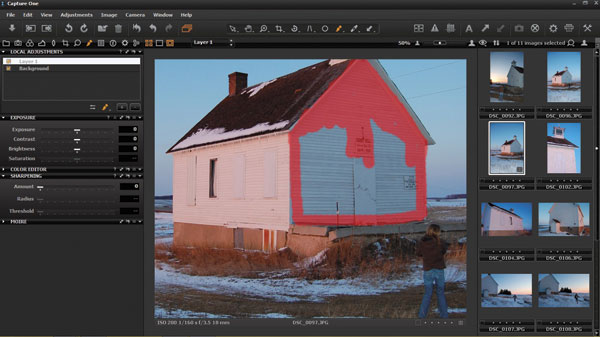
I found the new local adjustment options to be especially useful. Using a brush tool, you can select a portion of an image and then apply specific tonal enhancements for exposure, sharpening, and many other attributes. What is useful about this new addition: the adjustments actually work. In a shot of an old schoolhouse, I sharpened up the outside of the building because it had a latticed effect.
Another amazing tool is one that helps fix keystone problems. Once again, unlike entry-level photo-editing tools, this keystone adjustment actually works: you can quickly select the corners of a building and fix the “leaning tower” problem where one end of the building slopes at an angle—not because it actually looks that way, but due to a lens issue.
As a pro tool, Capture One also goes the extra mile by offering several advanced color editing features. You can view proofs for specific color printers and service bureau color profiles, and even edit these ICC profiles. In the color tab, you can edit the RGB curves for any image and make some dramatic color improvements.
© Hannah Brandon
© Jamie Allen Larson
© John Brandon
More Advanced Features
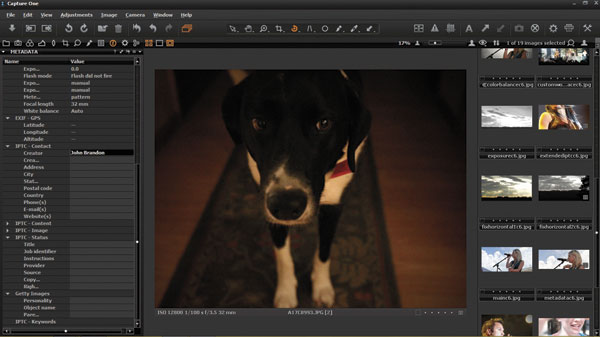
If you prefer to use Capture One as purely a Raw converter and photo manager, you will find the same advanced feature set as the adjustment options. Once again, this software is all about customization, flexibility, and speedy workflow. Unlike more entry-level photo managers, Capture One lets you edit advanced IPTC data such as contact information (including a website and e-mail address). The latest versions add multi-line capabilities for adding several full paragraph tags to images.
When you are ready to export images, Capture One also provides some unique features. One is that you can mix and match output formats easily—say, exporting a series of images as JPEG and another as TIFF. This can help photographers who tend to have clients with very specific needs for file formats.
Capture One is also more than a manager and editing tool. You can use it for tethered shooting, and this is actually how it is often used in pro studio environments. Even in just a cursory look at some behind-the-scenes model shoots on the web, Capture One kept popping up as a tethered-shot tool, likely because it works so well, showing the results on your screen and providing a comparison engine and quick tagging functions. Sure, Lightroom 3 added tethered shooting, but it is nowhere near as powerful as the more robust (and reliable) options in Capture One.
That said, I recommend you check with Phase One to make sure your camera is supported for tethered shooting. I tested the Phase One 645 AF extensively, but the software did not work with a Canon EOS Digital Rebel XTi. When I tested the Canon EOS-1D Mark IV, the software worked for “simple tethering,” which means you can control the camera and snap a photo, then see the results right away. However, it is very odd that Capture One does not work for live viewing since the 1D supports this in the camera. I’d like to be able to position the camera for the best view of the action.
There is one other amazing new feature. Capture One now provides a way to set up an image server so that you can snap a photo, and then run an Apple iPhone or iPad app to view and examine the results. Setting this up is extremely easy: you just click a button to start the server, then open the app on your iPhone or iPad. Then, you select the Capture One server. The app shows the image within seconds after snapping the photo. This helps you share the images with a colleague or client. The only limitation is that the iPhone or iPad must be on the same Wi-Fi network as your workstation—you can’t stream the server to a remote location.

© John Brandon
Capture One Pro 6 also adds a brand-new printing section—you can quickly set up the photo layout, adjust margins, and add annotations and watermarks in one print layout screen. Testing the print functions with an HP CM4540 color laser printer, the software worked extremely well at predicting how the images would look and their position on the page, saving printing supplies and time.
So, what else is new with this release? Plenty—there is now a loupe you can use to inspect images, and a new search feature that allows you to find images based on IPTC data or even camera settings. The program lets you import movies as well, which is helpful for those who own a camera that records videos, such as the Canon 1D I used for this review. Capture One did more than just import the raw video files, though: you can add copyright info, check video settings used for the shot, and manage the movies. Of course, you can’t edit the movies. Since the Canon 1D supports a mode where you can see a live view of the scene and record it, I’d prefer that the software also record this live view. Instead, it is a two-step process of recording the movie, then loading.
The final reaction is extremely positive: Capture One is a software program designed for serious photographers. In many ways, I barely scratched the surface of some of the deeper-level features. (See the screen shot examples.) The program is one that reveals deep functions over time as you use it, and the functions work exactly right. It’s a bit perplexing to think the program has this many extra features and yet none of them are meant to just add feature creep and sell a few more licenses.
For more information, contact Phase One at: www.phaseone.com.


![]()
Get the Latest Photo Tips, News & Reviews from Shutterbug!
| Camera Reviews Other Reviews | Mobile Reviews Photography Reviews Columns | News | Features | How-To | Resources |
 © 2026 Shutterbug
AVTech Media Americas Inc., USA
All rights reserved