Master Class
While Strolling Through The Park One Day Part III

Photos © 2002, Monte Zucker, All Rights Reserved

In actuality, our stroll through the park only took one afternoon. With these monthly articles, however, it's taken three months to show you what we did. I guess that one of these days I should write another book so that you can sit down at one reading and absorb it all. Or, is it really that you have to go out and try these things for yourself?

It's easy to read an article and say, "I know how to do that." It's quite another thing, however, to go out and do it. I'm reminded of that each time I read a ski magazine: I understand completely what's being demonstrated and then go out on the slopes to try it out. Know what I mean? So, anyway, here's the end to our afternoon of shooting during the Asheville, North Carolina, class a few months ago.

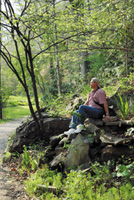
Shoot From Dark To Light!
I posed this bride just on the outside edge of a covered porch. I had my camera on a tripod underneath the porch, shooting out to the light. I then turned her face until I got my regular portrait lighting on her profile. Once I established the position of her head, I placed the body at an angle that would give proper support to her head--a 45 degree angle to the camera.

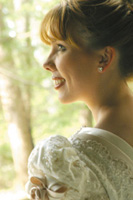
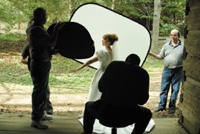
I opened up the shadows on the near side of her face by pointing my silver reflector up to the sky to pick up the light and redirecting it onto her face. No matter where I positioned the camera I was disturbed by all the trees and light areas of the sky that kept appearing in the background.

It then dawned on me that if I placed my translucent background behind her I could get rid of all my problems. Here you see my camera position, the translucent panel, and the silver reflector opening up the shadows. Pretty neat, huh?
And here is the resulting portrait.

Studio Lighting...Outdoors
Beautiful high-key studio portrait lighting can be done simply outdoors. Just place your subject slightly on the outside of a covered area, put the translucent panel behind the subject and open up the shadows slightly, as shown here. Nothing could be easier, could it? Yes, you do need help holding the panel in place, but it can also be held in place with a light stand and some weights on the stand to keep the breezes from blowing it over. Where there's a will...

While still under the porch I positioned the groom just inside the cover and photographed his profile against the greenery behind him. Again, a silver reflector, camera-right, picked up daylight and wrapped it around onto the shadowed side of his face. I could even see that it lit just the side of his face and did not overlight his right ear. See what I mean by saying to photograph from a dark area toward the light?

The background was soft to begin with, but because of all the light areas I softened it even more by applying Gaussian Blur to the background in Photoshop.

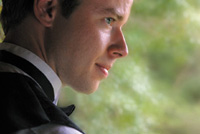
Of course, it was then a natural to position the bride in the same place that I had just had the groom and then bring him in behind her. I focused on her and let the groom go slightly soft.

Notice that the groom's face is turned directly into the lens, keeping the left side of his face toward the light. The right side of his face is being lit with the reflector. Also, see that their mouths are at approximately the same height. This makes the photograph appear to me a little more animated than if the heights of them were much greater.

She is actually looking toward her right slightly, so that from camera position you can see the pupil of her right eye.

Zoom Lenses Can Work Wonders!
While I was photographing the bride and groom I noticed the grandmother talking with her grandchildren. I didn't have to do a thing, except zoom all the way to the full 135mm focal point of my 28-135mm lens on my Canon D60. I did sug-gest to the grandmother how to
pose her feet. Other-wise it was a completely natural picture.

The late afternoon light--backlighting and sidelighting them all--was perfect light for separating them from the background. The solid greenery behind them couldn't have been more appropriate. All available light. No light controls were necessary.

Wow! Switching between the close-up portraits and the full-length of the group was just a matter of a slight twist of the wrist...and look at the difference!

While I was working with the family again I decided to try a close-up of them all together. I seated them on the steps leading up to the cabin. That gave me the ability to keep their heads at varying heights, making the composition more interesting. Instead of having them look self-consciously into the lens, I had them looking at each other--again going for specific facial angles. More importantly, going for expressions and a close feeling of family. My white background behind them cut out distracting elements.

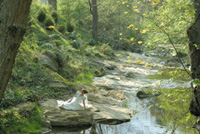
Seeing The Finished Picture Before Even Placing The Subjects...
As we were walking I looked up and saw this "hollow" that just cried out for a person to be sitting there. The framework of the tree, the rocks in the foreground, and the background of the trees far behind were just too much for me to resist. I could just see someone seated there on the rock. One of the photographers volunteered to pose.

I kept his body at a 45 degree angle to the camera and turned his head to profile. The late afternoon sunlight could not have been in a better position.

The last picture of the day just "happened" as I was crossing a bridge on the way back to our cars. I looked down at that stream, at that rock, and heard a voice calling out to me.

I had the bride position herself on the rock, kept her body at a 45 degree angle to me and turned her head to profile. It was just a little late to get the light onto her profile, but I knew that it was still working for me. I would have loved to have had her facing the other direction into the picture but the light didn't work when she was facing away from the light source. Not perfect, but still okay.

Quite a day, wouldn't you say? We were all happily exhausted when we got back to the parking lot. Hopefully, all the photographers in the class and you, the reader, know a little more about how to find the light and how to take advantage of it.

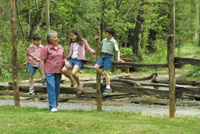
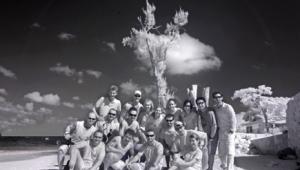
Just for fun: here's the group who were a part of the Asheville class. I promised to publish their picture at the end of this story, since they were all so much a part of it.

By the way, what might be my final classes are still open for photographers who may want to participate. Next year I may be doing other assignments on location that could take up most of my time. Anyway, here are the dates and the places of the two remaining classes: Whitewater, Wisconsin, September 23-27, and Sarasota, Florida, November 10-14. E-mail me for more information at mzphotog@aol.com.


X