- REVIEWS
Camera Reviews 
More Reviews Mobile Reviews Photography Reviews - GALLERIES
- VIDEOS
- BUYER'S GUIDES
Master Class
Shutterbugs First Digital Seminar
Photoshop Fun |
|||
As if that weren't enough, I got caught up in a couple of the "Distort" applications that Sammon had used. So, naturally, when discovering something new I got carried away with it. Here's one of my sunrise shots that I also played with in Photoshop (Image/Distort/Spherize). So simple and so much fun. Perhaps one of these days the excitement of discovery will allow me to take it easy when playing, but not yet. My assistant, Joey Pollack, also played with his images every evening while I was entering photographs each night into my web site message boards on www.zuga.net. |
|||
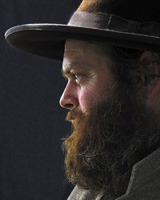
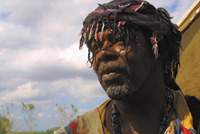
Making Portraits€ Of Photographers I came in close for still another portrait of one of the photographers who shared the excitement of the sunrise with me that morning. Each portrait gave me the ability to explain further how exciting it could be to analyze each and every person's face, photographing them at the most exciting angle and cropping sometimes so closely that you don't even include the whole face. Of course, I explained to them, when you're cutting into faces like this you have to explain what you're doing while you're creating the image. Otherwise, people may think that you made a mistake when you cut off the top of their head. Keeping the eyes about 1/3 of the way from the top of the picture in close-ups is a good rule of thumb, I explained and showed to everyone. Also, you should leave space for the subject to look into when the faces are looking to one side. Again, all available early morning light. |
|||
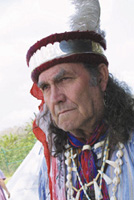
Location Portraits I photographed this gentleman, who was dressed for one of the events that was about to take place there. My assistant had two photographers hold up my large Westcott translucent panels to create a soft, diffused light where it was originally bright, direct sunshine. Then, I turned his face to get beautiful profile lighting. All that remained was to simplify the background. To do that another two of the photographers held up my black Westcott background. Pretty incredible portrait--made right in the middle of where everything was happening. One of the people had painted their face for a battle reenactment that was going to take place in a short while. Working in a shaded area I brought him to the edge of the trees and from a low angle studied his face as I turned it toward and away from the open sky. With his face turned at just the right angle I was able to create strong specular highlights on his cheek and nose. This really brought out the three-dimensional look to his face in what would ordinarily have looked like completely flat lighting. |
|||
Look For Details |
|||
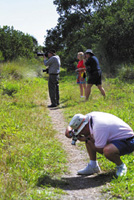
Photographic Safaris I explained to everyone that they should be looking at the side of the paths where the sunlight was either backlighting or sidelighting what they wanted to photograph. Also, to simplify their photographs; not to try to capture everything in one picture. Of course we photographed each other at play, always keeping in mind the angle of the light that created the most depth and three-dimension in the picture. I also kept reminding everyone to carefully compose their photographs to take advantage of the full size and shape of their images. |
|||
"See the finished picture through your viewfinder before you take the picture," I kept reminding everyone. "You have an additional opportunity to crop again later, but I'd prefer that you crop as closely as possible to what you want in the finished image while you're composing it in the camera." Since portraiture has always been my love, I explained to everyone how to find opportunities to create beautiful portraits outdoors by finding places where you could control the lighting. Here, I posed one of the couples underneath an overhang where maps of the location were posted. The light came in from my right. I posed their faces to the light and had my assistant hold my small silver reflector below their faces to open up some of the shadows. I explained carefully to everyone how the main light pattern was established, however, by the sunlight. All the reflector did was to allow me to retain detail throughout the portrait, while, at the same time, have a full range of tones. I did a little retouching in Photoshop using the Rubber Stamp and Gaussian Blur on separate layers. |
|||
Working In Bright Light My assistant quickly held up my translucent panel to cut the light on his right shoulder, toning it down to where it no longer was a distracting element from his face. |
|||
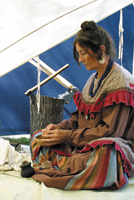
Pick Of The Crop After receiving permission to enter her home, I crawled inside and looked outward toward her and the entrance to her lean-to. I got the idea of photographing her in profile. To create the base for the picture I turned her body at close to a 45 angle to my lens and turned her head to profile. I had to have her pull back her hair from covering her left eye. She was happy to do it. I asked her to raise whatever it was that she was working on to bring it more into the composition of the picture. |
|||
A wooden log outside the tent with two hatchets buried into it was a great prop to fill in that area. Lighting was the diffused light that was coming through the top of the lean-to. The only problem was that the area behind her was way too distracting. I overcame that problem by having my assistant hold up our black background just outside the tent. Look carefully and you can see the white binding around the background where it meets the grass. One exposure. Everything automatic: aperture priority and I got it! Wow! Even while I was composing the picture through my viewfinder I was aware of the great strength of the lines in the composition. I love this image! Photoshop It! Since the theme of this whole weekend had been digital, I decided to play with the picture to see if I could make something better of it in Photoshop. Lo and behold, playing in Curves I brought the white point of the curve all the way down to the bottom and reversed the sky to black and did all kinds of fun things to his authentic Seminole attire. |
|||
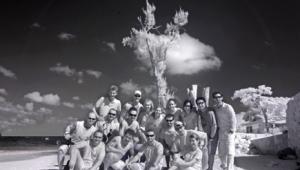
Time Travel My assistant suggested that I change the picture to black and white and then add Filter/Noise/ Add Noise. I couldn't believe how effective the digital transformation looked. This picture could have been taken ages ago, couldn't it? Before we left the Reservation we took a brief moment to record the whole group of photographers who experienced this first Shutterbug digital seminar. From the reaction of all those in attendance, it looks like these seminars that are being prepared for around the country are going to be a permanent part of photographic education. I, personally, was inspired to the greatest heights that I've ever experienced as a result of these past few days. Maybe, we'll shoot side by side at one of their upcoming events? |


![]()
Get the Latest Photo Tips, News & Reviews from Shutterbug!
| Camera Reviews Other Reviews | Mobile Reviews Photography Reviews Columns | News | Features | How-To | Resources |
 © 2026 Shutterbug
AVTech Media Americas Inc., USA
All rights reserved