- REVIEWS
Camera Reviews 
More Reviews Mobile Reviews Photography Reviews - GALLERIES
- VIDEOS
- BUYER'S GUIDES
Macro Photography
Macro Photography
Picture A Small World
by Jim Zuckerman
Macro photography is a world unto itself. Filling the frame with small subjects opens up new and exciting creative possibilities for you, and if you haven’t delved into this realm of photography up to now, I encourage you to do so. I’m sure you’ll love it.
It is very easy to just go out with a macro lens and take pictures without considering the technical aspects of this endeavor, but the results will never be fully satisfying. Macro photography is all about the detail, and if you are going to shoot close-ups you need two important things: a tripod, and a small lens aperture. Selective focus (which means one part of the subject is sharp while the other parts are significantly out of focus) is a creative technique at times, but in a large majority of macro shots the viewer wants to see the beautiful detail in your subjects. Just remember that the closer you get to your subject, the more depth of field you lose and therefore small lens apertures become critically important.
Knowing what is available to you in terms of equipment is important because there are several ways of focusing closely on small subjects. The method you choose will be a function of cost, convenience, weight, and the space you have available in your camera bag or photo backpack.
Macro Lens
The most convenient way to focus closely on small subjects is to use a macro lens. This entails buying a new lens, of course, but the cost can be surprisingly low, at least as far as lenses go. For example, I use a 50mm f/2.5 Canon macro lens that costs about $400 (but it can usually be found discounted in most photographic retail outlets). It is very small and light and that’s why I travel with it. It takes up very little room in my photo backpack, and it is so light (it weighs about 10 oz) that I hardly notice its presence.
This lens can take pictures of people, landscapes, and architecture, too. It is a 50mm lens that also happens to focus very closely. In other words, you are not limited to only doing macro work.
Many photographers prefer a telephoto macro, such as a 100mm or a 180mm macro. These lenses can be used as a medium telephoto lens for portraits, wildlife, and so on, but they also focus very closely to small subjects.
What are the main differences between the normal macro and the telephoto macro lenses? I list them below, but let me say first that I have owned several macro lenses and I have taken great pictures with all of them. I carry the 50mm macro because of its size and weight, but as you read on in this section you’ll see that by also carrying a very small extension tube, I can convert a medium telephoto into a macro as well, thus giving me the best of both worlds.
As I have said, a 50mm macro lens not only takes up less room in your camera bag and is inexpensive, it also has a larger lens aperture than telephoto macro lenses. For macro work, a large aperture isn’t too important because usually (although not always) you want complete depth of field and therefore it is the smaller lens openings that are used more often. However, for normal shooting this is obviously an advantage. The typical telephoto macro lens has a maximum aperture of f/4 or f/4.5.
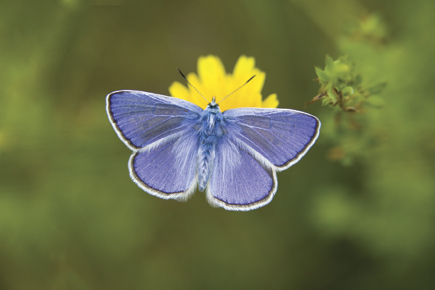
The “working distance”—in other words, the distance from the lens to a macro subject when the lens is focused—is shorter with a 50mm macro than with a telephoto macro. This is important in many situations. For example, in photo (#1) I used a 50mm macro to shoot this butterfly in Slovakia, and in order to focus I had to be about 6” away. This particular insect allowed a close approach if I moved very slowly, but most butterflies take flight if they detect any kind of movement.
 |
|
|
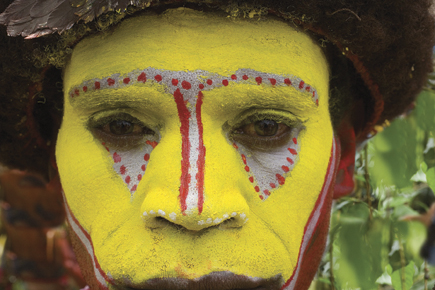
A telephoto macro allows the photographer to stand back 2-3 ft—and sometimes more, depending on the focal length of the macro—so that a close approach isn’t necessary. This is a huge advantage if your subjects are skittish. This same issue can arise when photographing a close-up of many difficult to approach subjects like lizards, frogs, all kinds of insects, and even foreign models. By standing back 3 ft from a Huli tribesman in Papua New Guinea, I didn’t “invade” my subject’s space and therefore I was able to get photo (#2).
 |
|
|
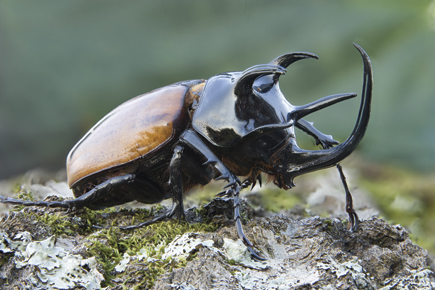
A telephoto macro has less potential depth of field than a 50mm macro. This can work in your favor in some situations and it works against you in other circumstances. Out of focus backgrounds are complimentary to nature subjects as you can see in photos (#3 and #4). The longer the focal length of the lens, the more this occurs. In other instances, shallow depth of field works against you. In the close-up photo of the baby chimpanzee (#5), the out of focus hair of the mother is not desirable. I feel it is distracting and unattractive.
 |
|
|
 |
|
|
 |
|
|
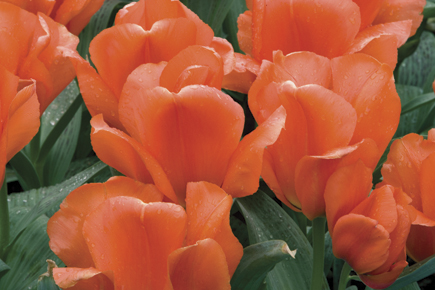
Finally, telephoto macro lenses have a greater sense of compression, typical of all long lenses. This kind of effect is appealing to many photographers. In photo (#6) these exotic tulips seem stacked or compressed in a way that is different from how they really looked. They were photographed with a 200mm macro.
 |
|
|
Diopters
A diopter is basically a magnifying glass that screws onto the front of a lens and allows you to focus closely. You can buy a three-diopter kit where you use either one diopter at a time or stack them for increased magnification. The quality of the glass isn’t as good as your prime lens, so I would recommend instead the Canon 500D two-element diopter. In spite of the name, this will fit any lens made by Nikon, Sigma, Tamron, as well as Canon. This is a very sharp close-up lens, and I’ve used it for years with excellent results.
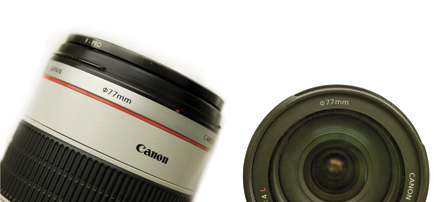
Diopters, like filters, are purchased by size. They screw into the threads of the prime lens. Each lens has a “filter size,” and this number can be found on the lens itself (figure A). Both of these lenses have a filter size of 77mm. The larger the filter size, the more expensive the diopters will be. Having said that, however, diopters are quite inexpensive compared to
regular lenses.
 |
|
|
The advantages the Canon 500D diopter offers are several. First, they are relatively inexpensive. (A 72mm filter size is listed at $190 but they are usually available for quite a bit less.) Next, it is small and light compared to a macro lens. It takes up virtually no room in your camera bag.
Another huge advantage is that there is no light loss when you use a diopter. Consider the maximum lens aperture range when you buy a telephoto, such as an f/4.5–f/6.3 100-400mm lens. This means when you are using the lens at 400mm, the maximum aperture is only f/6.3 due to the variable aperture design. A reduction in light means that a longer shutter speed is required, and with a lot of very small subjects like insects or flowers moving to a slight breeze, this can cause your pictures to be blurred. Therefore, the fact that diopters don’t cause a loss of light is significant.
A final advantage of using diopters is that they can be used on a variety of lenses. Usually they are used on a normal or medium telephoto focal length. For example, photo (#7) was shot with a normal 50mm lens and the 500D, while photo (#8) was taken with a 250mm telephoto plus the 500D diopter.
 |
|
|
 |
|
|
The only disadvantage of using the 500D diopter is that you are introducing more glass into the optical system. Even though it’s sharp, it may not be as critically sharp as a prime lens. I have never felt this was a problem, though. I have enlarged photographs that were taken with the diopter to 24x30” and sold them at galleries, and both the clients and I were pleased with the crisp detail.
Extension Tubes
An extension tube is nothing more than a hollow tube that is machined to fit snuggly between the camera body and the lens. By pushing the lens out away from the body, subjects are magnified and you can fill the frame with very small objects. Tubes come in a set of three where each one has a different width. Just like diopters, they can be used individually or in combination for greater magnification.
The main advantage to using a set of extension tubes is that no additional glass is combined with a prime lens. Therefore there is no possibility of the photographs being degraded in any way. However, the disadvantage is that extension tubes cause a loss in light. If your subject isn’t moving and you are shooting from a tripod, this doesn’t matter.
Extension tubes have one other significant advantage. Used with a telephoto lens (or telephoto zoom), they instantly turn it into a telephoto macro. This gives you the greater working distance, extremely blurred backgrounds, and the strong sense of compression that I discussed earlier. Photo (#9) was taken with a 70-200mm zoom plus one extension tube, and I was able to shoot from about 6 ft away. The greater working distance prevented the frog from being frightened away.
 |
|
|
Another incredible advantage of extension tubes is that they can be used in conjunction with long telephotos to turn them into close-focusing lenses. By using the term “close-focusing” I am differentiating this from a telephoto macro. A macro lens is designed to allow you to focus on very small objects like insects, the insides of flowers, a water drop, etc. and to fill a significant part of the frame with them. A close-focusing arrangement with a telephoto enables the lens to focus much closer than it can unaided, but the subjects are larger—birds, faces, a pattern of tree bark, and so on. It brings these elements in the scene seemingly closer to you, but by definition this isn’t macro photography because the subjects aren’t very small. All lenses have a minimum focusing distance. If a subject is closer to the lens than this minimum distance, you won’t be able to focus at all.
For example, my 500mm f/4 telephoto can’t focus closer than 14.8 ft. However, with an extension tube between the lens and camera body that distance can be cut down to 6-7 ft, and with a second tube I could focus even closer. The mother and newborn baby baboon in photo (#10) were photographed as they sat about 8 ft from my vehicle in East Africa. I used the 500mm lens because I wanted a frame-filling close-up, but in order to focus that closely I had to place a tube between the lens and body. This made the depth of field extremely shallow, of course, but it was important to me to capture an intimate close-up.
 |
|
|
Similarly, I photographed a European starling (#11), at my bird feeder outside my office window using the same technique. Because the bird was so small, I used my 500mm lens in conjunction with a 1.4x teleconverter giving me an effective 700mm lens. A teleconverter is considered an auxiliary lens because it can’t be used on its own. It is fitted between the lens and the camera body and it increases the focal length. For example, a 1.4x teleconverter multiplies the focal length of the lens by 1.4 while a 2X teleconverter doubles the focal length. In this example, the bird was only about 10 ft away so I had to use an extension tube to focus on it. I placed the tube onto the camera body, then the teleconverter, and then the lens. I shot this right through the glass and the picture turned out great. This isn’t macro photography, but it’s another application of extension tubes.
 |
|
|
I consider these invaluable and I carry them everywhere I go.
Bellows
A bellows system (figure B) is very similar to extension tubes in that it fits between the lens and camera body and it doesn’t introduce additional glass. The difference is that the distance between the lens and the body is continuously variable. This gives you the ultimate in control over the magnification. Bellows are also much more expensive than extension tubes, and they are fairly large even when collapsed. It is not convenient to carry them while traveling or hiking, but for studio work or for using your car as a base camp, they work just fine. I photographed (#12) using a bellows system.
 |
|
|
 |
|
|
Depth Of Field Issues
The biggest challenge in macro photography is getting enough depth of field. A tripod is essential for this kind of exacting work because as you close the lens down for increased depth of field—and typically you’ll be shooting at f/22 or f/32—the reduction in light forces the shutter speed to be slow. This, in turn, means that a tripod is required.
 |
|
|
 |
|
|
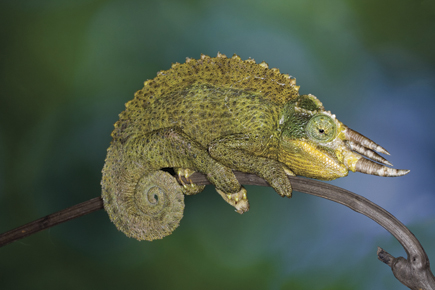
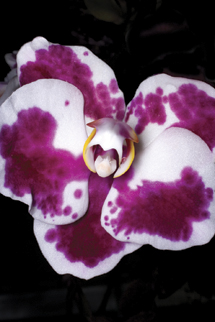
Another technique that helps improve depth of field is to make the back of the camera as parallel as possible with the plane of the subject. If the camera is angled at an oblique angle, depth of field decreases quite a bit. In photo (#13), for example, I placed the camera such that the back was parallel with the plane of the chameleon. Not all subjects are flat, of course, but even with a subject like the orchid in (#14) the depth of field can be increased using this simple technique.


![]()
Get the Latest Photo Tips, News & Reviews from Shutterbug!
| Camera Reviews Other Reviews | Mobile Reviews Photography Reviews Columns | News | Features | How-To | Resources |
 © 2026 Shutterbug
AVTech Media Americas Inc., USA
All rights reserved