- REVIEWS
Camera Reviews 
More Reviews Mobile Reviews Photography Reviews - GALLERIES
- VIDEOS
- BUYER'S GUIDES
Image Processing: Find The Potential In Your Images
The overall end result—an expressive image and perhaps print—might not have changed, but the approach and procedures have changed radically. And, while many of the terms used in darkroom work are still used in programs like Photoshop, they are more references and analogies than having any resemblance to how digital images are processed today.
This section is dedicated to opening a discussion about image processing from the Raw file to the moment you are ready to print. Please note that there are many image processing programs available for this work, and that all of them change on a fairly regular basis. I cannot cover them all, or possibly anticipate what version of a particular software you use, or what new features will come down the pike between the time I write this and you read it.
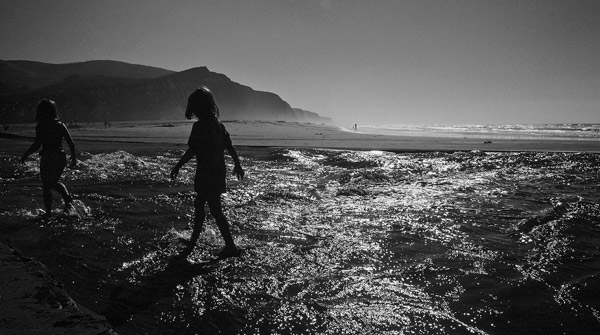
What you do prior to processing—exposure—has a profound effect on what you can do later with the image. This photo was made in very high contrast conditions that forced exposure for the highlights (#1). That “box” could be expanded, however, during processing to exploit the character of the image etched in by exposure.
All Photos © George Schaub
My aim here is to give you a sense of the potential available in every image you make and to explore tools that allow you to mine that potential to its fullest, rather than chase the next version of a particular software. There is no way for me to cover all the possible processing scenarios, but I will endeavor to give you a good idea of how to handle some common problems and approach some creative options.
There is no question that the adage “garbage in, garbage out” applies here, and you will find that your best exposures lend themselves to more creative work while your miscues will take up most of your time in just playing catch-up and fixing the mistakes.
When you make an exposure that gathers in as much information as your sensor is capable of recording, and use Raw format, you are optimizing the potential of the image. Here I could have gone for more or less contrast in processing, and chosen to deepen shadows or, as seen here, keep them open and detail-rich (#2). The reason I had so many options is that my initial exposure ensured that shadow detail was well exposed.

Throughout this volume I have emphasized shooting in Raw format, and that will continue here. The first stage, then, is converting the Raw RGB image to monochrome, or black and white.
Raw “Conversion”
The first stage in processing images is converting from the Raw format to a TIFF, .PSD or other image file that can be used for printing, transmission and web use. You need not convert all your images right away—just be sure to back them up on a CD, DVD or a separate hard drive. As every Raw file is proprietary (all different) the first step is bringing that file into software that can decode the Raw format. Once you finish that stage of processing you can bring it into an image-editing program. Some Raw converters, such as Adobe Lightroom, Apple’s Aperture and Adobe Camera Raw, allow you to do even more processing work on the file after conversion. There are numerous Raw converters, including software offered by the camera manufacturer and independent Raw converters that work with the file format you might use.
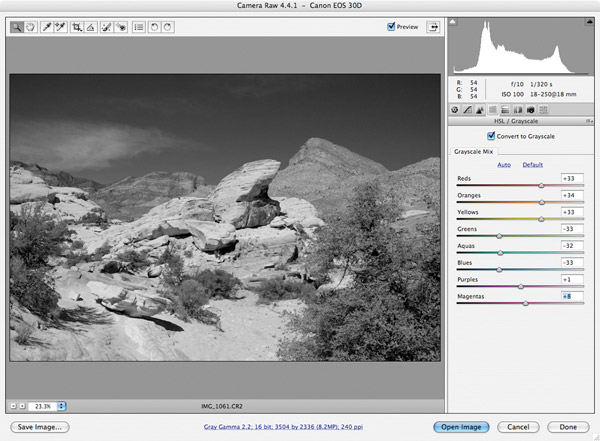
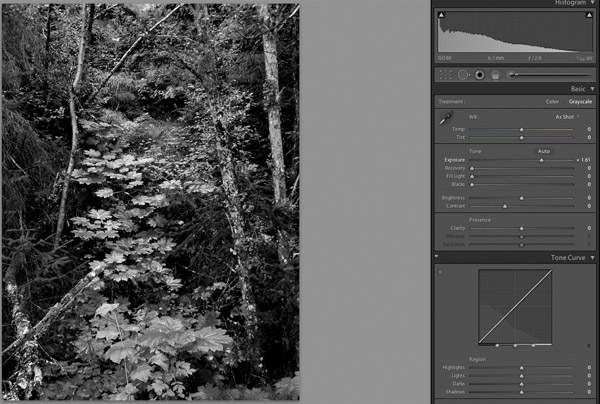
Many “Raw converters” have controls similar to Adobe’s Camera Raw (ACR), which is updated every so often to accommodate new Raw file formats as new cameras come to market. Always check your “update software” menu item to ensure that you have the latest version. When you click on an image in Adobe Bridge and the file you select is a Raw file the image is automatically opened in ACR. There are many options here for working with the Raw image, including settings that are similar to or the same as those you might make in the camera, but with much more nuance and control. Note that with current versions of ACR you can evoke the same controls by pressing Apple/Cmd R for TIFF and JPEG files. Aperture and Lightroom also allow you to work on these non-Raw files using Raw processing tools, although working from a Raw file gives you the most options and processing leeway. This screen grab (#3) shows the ACR processing screen dialog.

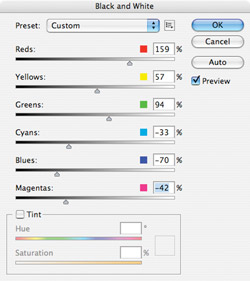
Here I have selected the “Convert to Grayscale” dialog (#4). Note the position of the sliders on the right. These represent the ability to change color into grayscale values in very distinct fashion. All of these can be manipulated.

Here I have moved the color conversion sliders to emulate the scene as if a yellow/green filter were placed over the lens when exposing panchromatic film (#5). That might seem odd, but by brightening both yellow and green elements of the scene it is in fact like being able to use two color contrast filters at once. I dropped the red and blue filters to enhance the contrast further.
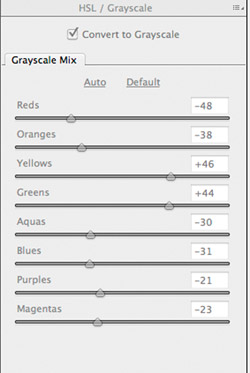
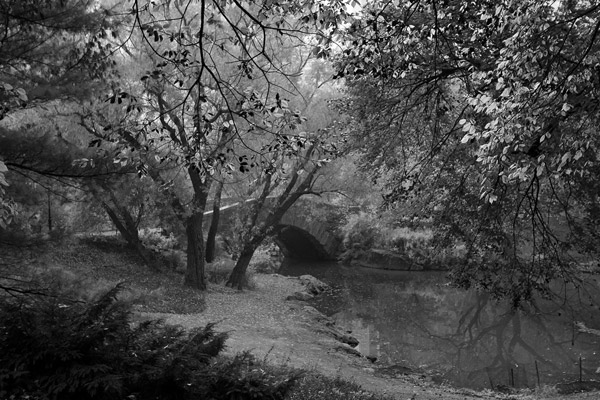
Image (#6) shows the final image with tonal values manipulated solely by working with the color to grayscale conversion.
Each camera company that offers a Raw file format in their camera has their own software for Raw conversion and image processing. Raw files are identified by their extension, the three letter or number code that follows the image file number. That could be .CR2 for Canon or .NEF for Nikon cameras. This will show up in the picture ID under the image in your Browser.
Nikon offers Capture NX as an optional Raw software. To convert to black and white in their processor you choose Photo Effects>Black and White (#7). You then have control over channel rendition and brightness, with more subtlety than available in the camera.

Canon’s Raw processor (Digital Photo Professional) approaches black and white conversion in similar fashion, using a control that is the same as the settings in the camera, which they call Picture Style. Choosing monochrome converts the image to black and white; you also have control over filter effect (yellow, orange, red, etc.) contrast (via curves) and sharpening. The toning control is for creating sepia, blue and other color masks on the monochrome image (#8).

There are numerous “do-it all” imaging programs that incorporate organizing, editing, processing and printing controls in one package. Apple’s Aperture, recently updated to Version 3, is one such program; here’s the black and white conversion scheme that includes a “Monochrome Mixer” for adjusting specific color to grayscale values plus “presets” that look quite similar to the “filter effects” in the Monochrome Capture mode in digital cameras (#9). You can also adjust contrast and exposure in the same Adjustments control dialog.

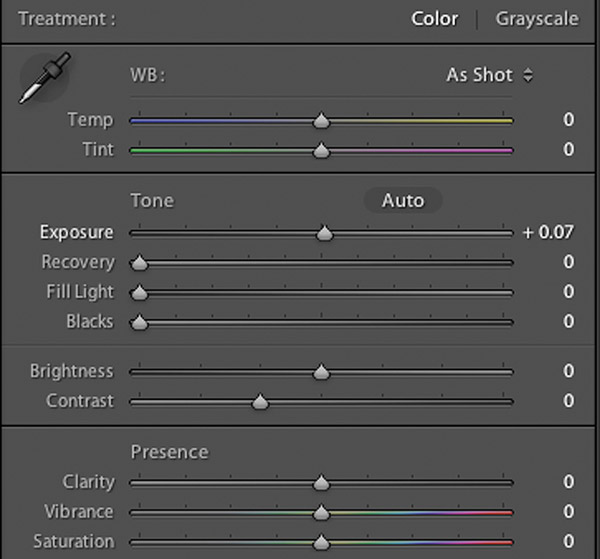
Another comprehensive program is Adobe Lightroom, recently updated to Version 3. It features similar black and white conversion controls as found in Adobe ACR and the full version of Photoshop’s Black & White New Adjustment Layer (#10). It also offers numerous presets, and allows you to create your own presets and save them for use on future images.

Presets can help you set a foundation for further changes. You can use dialog boxes to modify them as you see fit. Color Efex Pro from Nik software has numerous conversion effects and options using a very handy split screen viewing tool (#11).

If you have not shot Raw or work from scanned images you still can use sophisticated black and white converters. This JPEG shot is being converted using the Black and White Adjustment Layer in Photoshop (#12).
The important thing about Raw processing is that you maintain the integrity of the Raw image file and when you make any changes you are, in essence, doing a “Save As” when you are done. In other words, the Raw information stays unchanged in your files and the conversion becomes a “new” image file in the sense that it has new processing instructions. This “non-destructive” processing scheme means you can always go back to the original file and make other changes without having to “back out” of the changes you have made—you are just changing the computer instructions on how to handle the image.
The Raw file made in the camera becomes a digital negative; the changes you make become a version, or, if you will, a “print” of those changes. This is what is called “non-destructive” editing. When you import your images in, say, Photoshop Lightroom, you can also import them as a DNG format, or Adobe digital negative format, something Adobe assures us will not become archaic as long as they are in business. In Apple’s Aperture you are always making a Version of the image and the original is untouched by your work. So keep this in mind—the original image file remains as you exposed it; the processed image is how you process it and save it as a version of the original.
Processing Choices
How you process an image depends on what program or programs you have installed and your level of experience with those programs. Some folks do all their processing in Lightroom or Aperture, especially now that those programs allow for local adjustments using brushes without the need to go into the more powerful Photoshop CS. Some perform certain key processing functions during Raw conversion and leave the “particular” work on their image until later, such as fine contrast, local exposure and sharpening.
Color Conversion To Grayscale
An important aspect of RGB to grayscale conversion, whether done in the Raw converter or later, is how various colors will be rendered in grayscale, a selective color contrast decision that goes a long way to building the foundation image on which you will apply more processing later. This is a wonderful “shortcut” that saves your having to, for example, select the sky later to deepen it. All you need do is, given that it is a blue sky, use the “blue” slider to make the blue “read” darker in the converted image. Or, if your subject is red rock formations, you can brighten the red so you will not have to dodge it or select and add contrast through curves later.
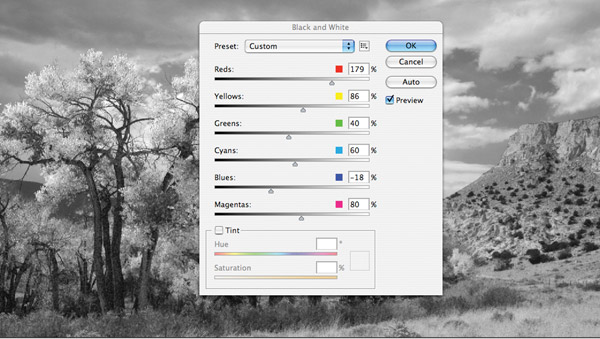
This photo can be interpreted in many ways depending upon how the colors are converted to grayscale values. Here’s the color shot (#13) and the black and white version in ACR (#14). This version shows the result of making the red values lighter and dropping the blue values to deepen the sky. The detail of the settings (#15) show grayscale choices with red and yellow lightened and the blue (sky) made darker. There are many ways you can go with an image like this—this is just one variation using conversion alone.

You can use the converter stage as a way to make corrections as if you were making those setting in your camera when the exposure is made. The amazing part of this stage of processing is that you can in essence “reach back” into the camera settings and rework them as if you had made those decisions in the field. This sounds rather unbelievable, but keep in mind that this is all code and not a certain exposure etched in film; you can actually change exposure compensation, to an extent, as if you had done so when the picture was made! In fact, the parameters in the Raw converter are quite similar to those in your camera menus.
After Conversion
Depending upon how your software is set up—whether it is a separate part of the processing flow or a full processing and management system (like Apple Aperture and Adobe Lightroom) you can make contrast and exposure processing moves in various ways.
I have developed a certain “workflow” or step by step approach to the work; you may find another workflow is best for you. My processing handles exposure and global contrast changes, and then selective work on certain parts of the image. The first step is making the conversion—as we’ve seen, that can handle lots of contrast choices. But you can also change contrast and “burn and dodge,” or selectively make certain parts lighter or darker as you go.
Many programs work in similar fashion. The first changes you should make are “global” (overall, that affect the entire image). After the global effects you can do “local” changes, or refinements on the global image. My aim here is to give you a sense of the potential of image processing for black and white and not explore every possible program and effect.
As mentioned, my work starts with conversion to black and white, proceeds through exposure and contrast on a global and local level, then deals with color toning or other effects, and ends with sharpening.
Exposure
My first step is to address the overall exposure, and this can be a “corrective” or “creative” change. By corrective I mean making up for a deficiency of camera settings, and by creative I mean altering the mood.
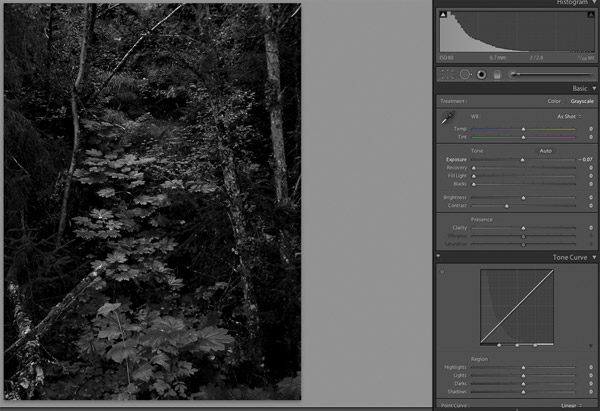
Here’s the workspace in Lightroom V2.7 (#16), quite similar to Version 3. Note the sliders; the one we work with here is Exposure. This shot (#17) was made in a deep forest and the image is about a stop underexposed. By moving the Exposure slider to the right it is as if we had exposed with +1 EV or added a stop to exposure (#18). This does not alter the original file—just the processing instructions on this file when it is opened in the computer. Those instructions “travel” along with the image until you change them.
The workspace in Aperture has similar controls. Here’s an infrared image after the red color cast has been removed using Aperture’s Monochrome Mixer (#19). Note the characteristically flat look of infrared. This is easily fixed using the Contrast and Definition sliders (#20).


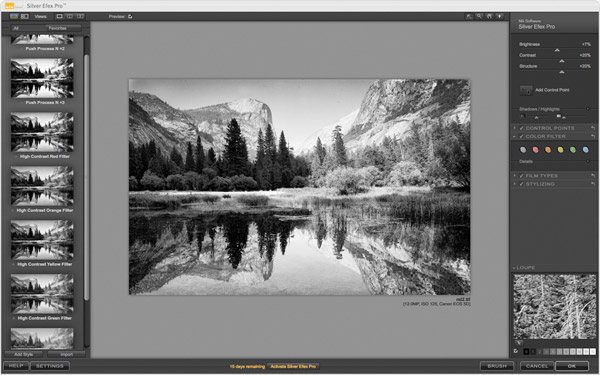
Plug-ins like Nik Silver Efex Pro are accessed right from programs such as Photoshop, Lightroom and Aperture, and offer presets as well as refinements via a preview window (left) and sliders (right) (#21). After conversion I wanted to add some contrast to this image. I used a “green filter high contrast” preset and was able to get just the look I desired, which I then refined using the Exposure slider on the right (#22).

Adjustment Layers
If you are working in Photoshop you have many options as well, some of which are offered in the other programs. Photoshop has a feature known as a New Adjustment Layer (NAL) that can be used for conversions, contrast, special effects and more. When using a NAL you are creating the changes on a Layer, which is like a version of the image that sits on top of the original. One real advantage of Layers is that you can use what’s called a Layer Mask to selectively “cut through” the new Layer to reveal parts of the image below. Note that many plug-ins and presets for plug-ins create a Layer as well, which you can easily modify and use in Layer Masks in Photoshop.
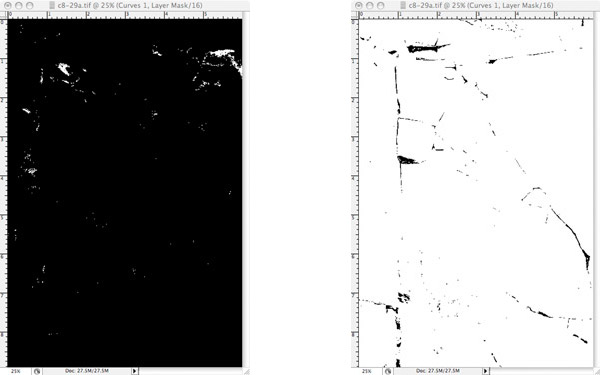
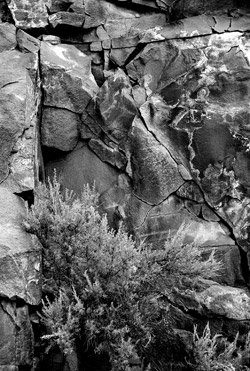
This image (#23) was photographed in the shade and is quite flat, though bright. My aim was to enhance the contrast between the white bark and the undergrowth. After conversion I used the Levels NAL and upped the contrast on the shadow side, but didn’t touch the highlights. I then used the accompanying Layer Mask to “paint back” or cut into the light area of the bark below (#24). This kind of detail work can take some time. But NALs and masks allow for lots of freehand creativity (#25).


Curves And Image “Snap”
Curves are used to enhance the contrast of an image. I suggest that you check the contrast and the resultant tonality even if you think the image looks good already—there can always be room for one more enhancement.
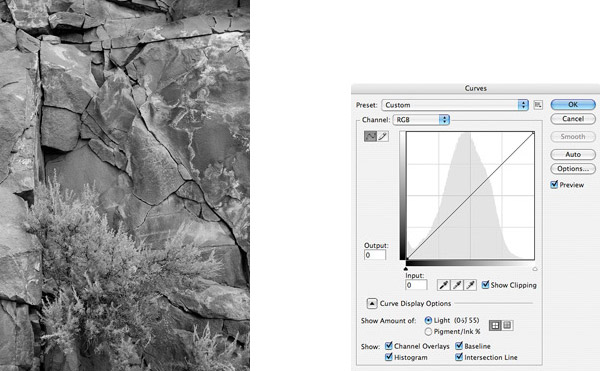
The following Photoshop technique is something I do on many images I plan to print. It is a way to bring out a “silvery” or “specular snap” quality to images by deepening the deepest shadows and adding some “sparkles’ to the highlights. (For darkroom fans it is much like using a dilute solution of selenium toner after development.) While I am illustrating this with a Curves control you can do the same with Levels.
The key here is checking ON the “show clipping” box in the Curves dialog box. (Note: You can do the same in Levels by pressing the ALT/Option key as you drag the sliders.)
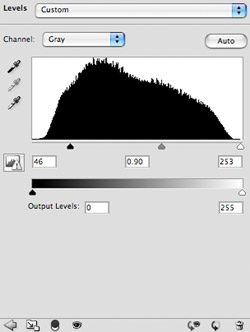
This photo (#26) was made in open shade. Contrast was enhanced somewhat in the RGB to grayscale conversion, but it still could use some additional “snap.” The predominance of middle gray values is shown in the Curves dialog box Histogram (#27), which shows you right away that it is a “flat” image. To start, “show clipping” is checked. When that box is checked and you move the highlight (right side slider) the preview goes black until you begin to “clip” or cut off the highlights in certain areas (#28). Here I have gotten some clipping and have begun to create those specular snap areas. The same goes for the shadow areas, which you can also show as being clipped by moving the (shadow) slider on the left side (#29). The final image (#30) shows a marked improvement over the original in terms of tonal character.
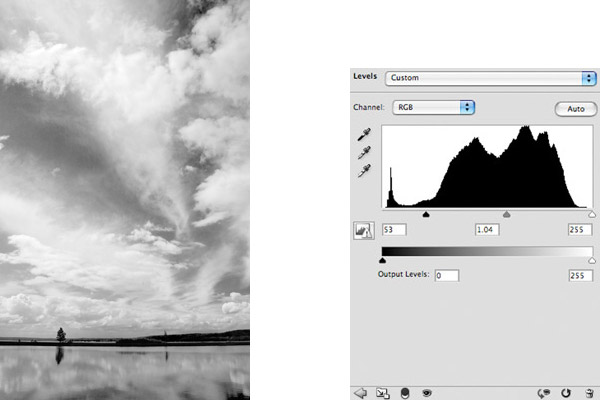
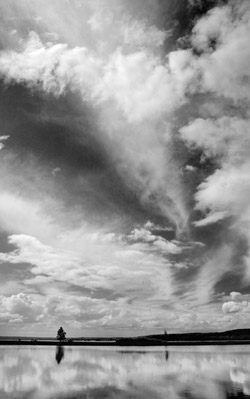
Tonal control can combine a number of tools, each of which brings something to the process. Here I have combined color to grayscale conversion with the Levels control. This cloudy sky over Yellowstone Lake provides a good canvas (#31). Here I opened the Black and White New Adjustment Layer in Photoshop (#32) and created a fairly good tonal play in the sky by “dropping” the blue value (#33), but I wanted more drama in the sky. I then opened the Levels>New Adjustment Layer (#34), which is similar to the contrast slider in other programs and moved the shadow side slider toward the left, thus created darker midpoint and shadow values and a darker sky. This darkened the sky nicely, but then the ground went too dark. I then worked with the Layer Mask to adjust the image so the ground was not too dark, leaving the sky untouched (#35).


![]()
Get the Latest Photo Tips, News & Reviews from Shutterbug!
| Camera Reviews Other Reviews | Mobile Reviews Photography Reviews Columns | News | Features | How-To | Resources |
 © 2026 Shutterbug
AVTech Media Americas Inc., USA
All rights reserved