Film Simulation Software Shootout: DxO FilmPack 4 Vs. Alien Skin Exposure 5
I have always had mixed feelings about so-called “film simulation” software, programs that offer one-click presets that add effects and options for manipulating digital images. On one side, I am unsure why the designers use visual references to types of film for their preset IDs. It strikes me that an increasingly small proportion of folks relate to them. On the other side, I admire their offering programs that open up a raft of image expressions in easy to attain fashion. I will not revisit that discussion here, although the near concomitant release of two such programs, Alien Skin’s Exposure 5 and DxO’s FilmPack 4, makes it tempting to do so.
Both companies justify version upgrades with claimed improved workability and “interface ease of use”; additional presets (DxO sells an “Essential” and “Expert” edition, with the latter having more options and extras, while Exposure 5 has more preset options overall); stand-alone versions and plug-in functionality with the usual suspects; and a preset “search” that allows you to describe what you might be after so that the program can recommend some options. Check pricing at the end of this article and each company’s website for system compatibility.
All Photos © George Schaub
Workspace
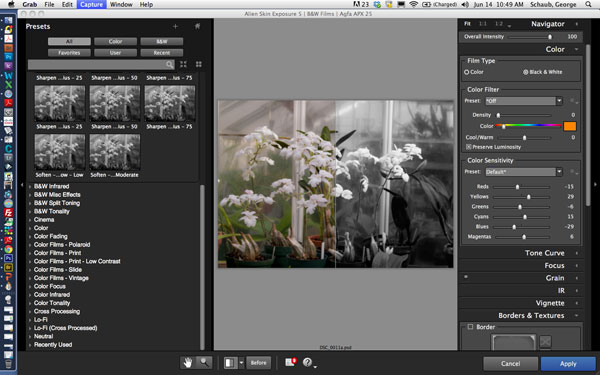
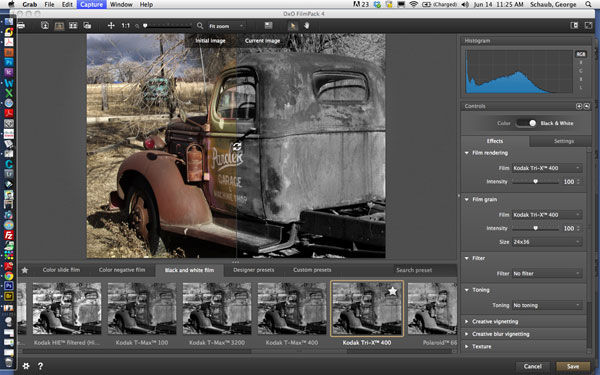
I worked with a MacBook Pro and base my observations on using that OS. Both programs have similar workspaces, although the left-side preset panel of Exposure 5 differs from the baseline groupings and image option crawl/slider at the bottom of the space in FilmPack 4; before and after split views; very quick previews of selected effects; failure to handle Raw, .PSD, and formats other than JPEG and TIFF (you have to convert them first and cannot move Raw or .PSD in from the directory or browser); and offer a large number of preset customization options that you can apply individually to images or save as a customized preset for other work.
As Stand-alones
The stand-alone versions allow images to be opened via your directory or dragged-and-dropped from a browser. I used Adobe Bridge. There is no browser in either program, and although that would be ideal I’m sure it would also jack up the price. I started with Adobe Bridge first and then dragged-and-dropped an image into both programs’ “stand-alone” mode. Both programs worked quickly and had an almost instantaneous readout of the various preset effects. Once selected, the image pops right up in the main workspace.
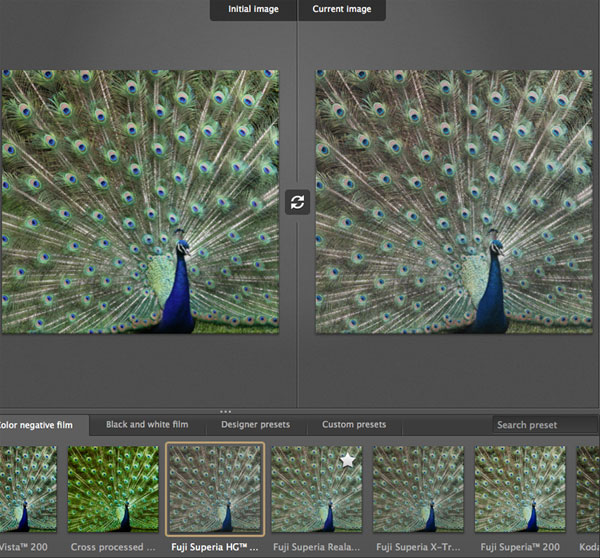
As to the effects menu, both showed all the variations quickly on the effects panel, although I found the DxO interface less cluttered, something I partially solved by choosing the three-column view of the effects in Exposure 5. The DxO preset bar, with groups shown at the base of the workspace and selected by tabs, and then the various effects chosen via a slider, was, for me, an easier way to work. The default Exposure 5 effects menu took a lot more time to work through, as opening each grouping (B&W, Color, with numerous subsets) in essence pushed down the other effects so it made for more scrolling when “fishing” for the right look. Again, choosing the three-column preview option helps alleviate that somewhat.


Both programs allow for many, many modifications of presets using the right-side panel, and both allow your modifications to be saved as your own custom preset, something that comes in handy when doing batch processing. Again, I found the DxO workspace to be a bit more compact, although scrolling down through the options in the right-side panel in Exposure 5 requires no great effort.
Overall, both score well in regard to customization. One interesting thing is that when you work in black and white the options are different than when in color, something that becomes apparent in the “Filter” effect, which works more like putting a glass filter over the lens when shooting panchromatic film, such as a red filter increasing contrast, etc. This is differentiated from “Toning,” which gives the usual sepia, cyanotype, etc. options.
The Plug-In Side
I then moved on to working from within a host program, in my case Photoshop 6. I first browsed via Bridge, converted from Raw if need be, opened the image in Photoshop, and then went to the Filter menu, which showed the programs at the bottom of that drop-down menu. Clicking on the program evokes it and opens the image inside it.
One note of interest is that neither program would allow me to open a layered TIFF (or .PSD) file; in other words, if I had worked on an image in Photoshop and saved as a TIFF to preserve the Layers, the plug-in filters were grayed out, indicating non-compatibility with export to the plug-in. If the TIFF was right from a Raw conversion it was fine, since that is flattened and serves as the Background Layer.
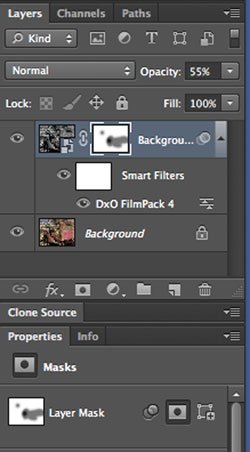
Layers, Backgrounds, And Workarounds
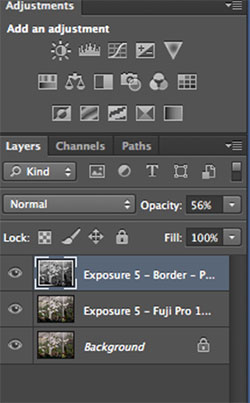
The final stage of my work was, at first, something that showed the biggest difference in the programs, but further investigation revealed a workaround. When you click Save on a worked file in Exposure 5 it saves the image back to Photoshop as a layered TIFF file with each stage as a Layer; in DxO you get a flattened TIFF. So, each stage of the work you do in Exposure 5 (say you change from color to vintage black and white using the presets, and then add contrast in the modify panel) yields a Layer. In DxO it comes in as a Background.
Why is this important? Once I have Layers in Photoshop I can further modify that Layer as I see fit—opacity and masking being main work tools I use in a layered file. You can evoke a Layer Mask and cut away as desired, which adds even more options and versatility to image creation. For me, the more options I have the better.
But FilmPack 4 does have a solution to the saved single Layer file dilemma. I queried DxO tech about this matter and they revealed an interesting workaround. When you open a TIFF in Photoshop immediately make a Dupe Layer (Layer>Duplicate) from the Background, then go to Layer and convert that Layer to a Smart Object (Layer>Smart Objects>Convert to Smart Object). Then go to Filter and choose the FilmPack 4 plug-in. Do the manipulation and then click Save. You then have a workable Layer for opacity, etc., and can go about your business from there.


Comments And Recommendations
So, what’s the final score? In terms of workspace and ease of getting around I give the nod to DxO FimPack 4’s arrangement and display, although if you play around you can alleviate the default setup in Exposure 5. Both programs have a very good selection of presets and a gazillion modification tools to create just about any look you could desire. Yes, there are some differences in how the presets are expressed and some variations in modification tools, but overall that’s a toss-up.
DxO FilmPack 4 has some built-in tools that you might otherwise have to send the image back to Photoshop to accomplish, like “Vibrancy,” a Clarity tool they dub “micro contrast,” and even “snapshots,” a kind of history record, but on the other side there’s a host of “glamour looks” and thumbnails for added grain selections in Exposure 5.

I do wish that there was some kind of browser in the stand-alone in both programs, and that layered TIFFs and even .PSD files would be accessible via the plug-in. As mentioned, Exposure 5 delivers layered files back to the host program, while FilmPack 4 requires that workaround, although if you know about it and do it once or twice it is no impediment to advanced work.
Price might also be a factor. FilmPack 4 comes in two versions—an “Essential” for $79 and an “Expert” for $129—although I have to say that the Essential option is a bit of a stripped-down set of presets without some of the more intriguing features of the higher-priced option that make the extra $50 quite worthwhile. Exposure 5 runs $149 ($69 upgrade if you have a previous version).
Check each company’s website for a full list of features and system compatibility, and especially the FilmPack 4 version options to see if you need the full package (which I recommend). Read the full sheet of specs. And be sure to take advantage of their free trial offers to give each one a whirl. In all, both are much more than sets of “push-button” presets, as intriguing as they might be, and allow you to take the foundation images those presets create into entirely new creative directions.
Contacts
Alien Skin Exposure 5: www.alienskin.com
DxO FilmPack 4: www.dxo.com


