- REVIEWS
Camera Reviews 
More Reviews Mobile Reviews Photography Reviews - GALLERIES
- VIDEOS
- BUYER'S GUIDES
DxO Optics Pro 7 Elite: A Powerful Raw Converter/Nondestructive Editor
DxO Optics Pro Version 7 is a Raw converter for Mac and Microsoft Windows with some nifty tricks up its sleeve. It offers its own brand of nondestructive image editing, with tonal, exposure, geometric, and optical corrections that make it stand apart from the crowd. As was true of Version 6.6, Optics Pro 7 supports the company’s new FilmPack 3 film emulator plug-in (see sidebar below). We will have a more complete review of the film emulator in a future issue.
Optics Pro Version 7 is a dramatic departure from earlier releases. The Select pane is gone, so you no longer have to deal with tedious Projects (unless you want to). Now you go straight to work after opening a folder. Double-click on an image and that takes you right to the nondestructive editing phase, in Customize. Beyond this point the Mac and Windows versions part ways in one key respect: the Windows version runs faster than the Mac version, which continues to be laborious.
In the past, the program imposed a Preset that modified every image that was opened, like it or not. Now, you can set Preferences to select the No Corrections Preset so that no changes are made as you embark on this journey, although you still have the option of choosing any image-altering Preset as your default. (Note: Make your choice at the outset, or the program will apply its own default Preset.) You can tailor and save Presets and use them at any time while in Customize. (In addition to Presets, you can also copy and paste correction settings.) Interestingly, you can use Presets in the Organize pane, even before you start customizing (editing) the image.
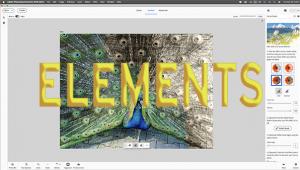
DxO Optics Pro 7 “Customize” Workspace (Mac Platform)
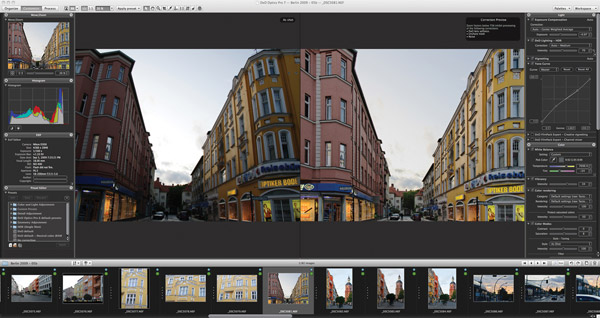
All Photos © Jack Neubart
The final step in the DxO Optics Pro workflow is “Process,” where images are exported and saved. I had no problem saving files as JPEG, 8/16-bit TIFF, or DNG, but you can’t open files saved as DNG.
Lens Profiles
DxO Optics Pro employs custom profiles tailored to the cameras and lenses that you use. These install as modules. They can be added later, when Optics Pro recognizes a need for them as you view relevant images. You may be able to use a module for a similar lens if the one you need is missing or you can manually input the corrections—usually a fairly easy process. In several instances where the provided profile did not adequately correct for barrel distortion, for example, I found that manual input did the trick.
The widest camera and lens support is found in the Elite edition (reviewed here), which covers pro and prosumer D-SLRs, as well as a slew of amateur cameras covered in the Standard edition. (Check the DxO website regarding Raw files and features supported for your camera.)
Using Presets

Noise Removal


Geometric & Optical Editing Tools
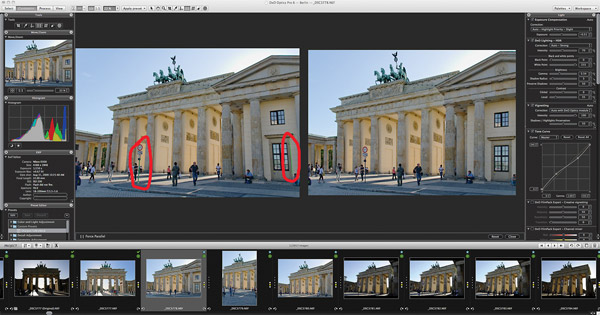
DxO Optics Pro gives you some of the best tools for correcting perspective distortion, although they can prove confusing to the uninitiated—and more time-consuming at first. Other applications may apply similar fixes when the image is opened, but for me here’s what sweetens the pot: the “Force Parallel” and “Force Rectangle” keystone correction tools. I find that viewing the image at 100 percent often works best when fine-tuning these corrections.
Force Parallel is the easiest to use. Just draw two lines, one on either side coinciding with a slanted vertical line, and the image comes to attention. This may require some finessing, and sometimes it’s better to leave a little keystoning in so as not to cut off important parts of structures.
The Force Rectangle tool is a bit tricky. It’s essentially every keystoning parameter in one. As with several tools in Optics Pro, select it and the view changes to before (uncropped), serving as a sketch pad, and after (modified). Start by drawing a rectangle on the “before” image and watch the changes practically in real time as you then morph angles until the shapes and lines align properly, which includes leveling off the horizon line. The various keystone correction tools may override each other, so be careful. The lack of a History panel and Snapshots makes it necessary to work diligently. A slip of the mouse may ruin your work, so before taking any further steps, use Undo to restore the latest geometric correction and continue from there.
Another option is called Volume Anamorphosis. This is where you correct shapes that may have gotten distorted. It requires a studied eye to judge when you’ve got it right. Volume Anamorphosis may reintroduce curvature, if very mild, in some extreme wide-angle shots, so use discretion. As a rule of thumb, use shapes in the original image as your guide. Even fisheye images harbor a sense of the real world. Take a similar tack with X/Y Ratio geometric corrections.
Keystone Correction


NR & HDR
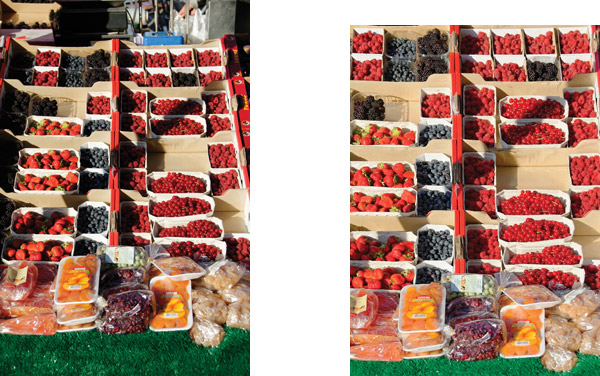
Noise Removal (NR) in DxO Optics Pro is much easier to use than any NR plug-in I’ve ever encountered, and better. It convincingly removes color noise, while commandingly dealing with luminance noise without making images look plastic (provided you don’t overdo the luminance correction—use the Auto settings for starters). What’s more, I’m comfortable filling in shadow detail without worrying about digital noise creeping in, thanks to these algorithms. NR even works well with JPEGs. Effective NR plays a hand in producing better-looking film emulations with FilmPack 3.
Speaking of shadow detail, another neat tool is single-shot HDR. Normally, I don’t believe in such expedient measures, but Optics Pro has me believing that it can be done, and done well. The HDR tool by itself appears to favor shadow values and is often best used in combination with one of the Highlight Priority settings under the “Light” palette (when used correctly, they form a nice balance). There are also HDR Presets that work well. If you’re not happy with these, do as I did and design your own.
Fisheye Distortion Correction


Another essential tool is DxO’s own “Lens Softness,” which I use in landscapes (with Global and Details settings beyond the defaults) together with “Unsharp Mask” (at modest settings so as not to introduce artifacts). Lens Softness is a sharpening algorithm based on the way the lens forms an image in the real world, not simply on an amalgam of two-dimensional pixels that are unrelated to the optical characteristics of the lens.
Version 7 introduces the “Bokeh” slider under Lens Softness, to reduce sharpening artifacts in out-of-focus areas. While subtle, this may, however, have the unintended effect of reducing sharpening in other areas as well. Also new is the “Edge offset” slider under Unsharp Mask. This is supposed to help sharpen the image outward toward the edges, but the effect tends to be cumulative with other settings. When employing this parameter, pull back on the “Intensity” slider to avoid introducing sharpening artifacts. Edge offset is said to be especially useful where no DxO lens module is available.
A Different Slant
Noise removal, sharpening, and dust removal should be viewed at 75 percent or greater magnification. Otherwise, the effect is not apparent.
(Sidebar): DxO FilmPack 3 Expert Edition: A No-Frills Film Emulator
FilmPack 3 (purchased separately) installs both as a stand-alone app and a plug-in. As an external plug-in, it works with Adobe Lightroom, Apple Aperture, and Adobe Photoshop (requiring the 32-bit version). It also installs in Optics Pro 7.
As an Optics Pro plug-in, FilmPack 3 lacks the user-friendly interface found in the runtime plug-in/stand-alone version. The runtime/stand-alone comes with a filmstrip depicting the Preset film types. However, the advantage to using FilmPack 3 inside Optics Pro is that you’re working with the original image file and can use Optics Pro’s image editor to fine-tune the image every step of the way, all in a nondestructive fashion.
The Presets in the plug-in/stand-alone version are a visual thumbnail representation of numerous films. There are many more Presets in the Expert edition than in the Essential version: negative, positive, black and white, and cross-processed, plus some creative renditions thrown in.
Graininess is set automatically with each Preset selected, but you can instead apply grain structures associated with any film. In addition, there are numerous parameters that can be adjusted, with the addition of creative vignetting. Black-and-white film renditions benefit from filters, toning, and a channel mixer.
While I didn’t find these emulations that “realistic,” I prefer to consider these effects as one more tool I can use to give my images a different look, and another creative avenue to explore. In the end, DxO FilmPack 3 is fun to use—and uncomplicated, which is a plus. FilmPack 3 will get a fuller treatment in a review to run in a future issue of Shutterbug.
The Expert edition costs $99 (street); the Essential edition costs $49 (street).
DxO FilmPack 3 Plug-In Interface


In The Final Analysis
DxO Optics Pro 7 is a powerful image-editing application. However, it still lacks important ingredients, among them, a local adjustment brush, a graduated filter, layering, and a search engine. And it needs a better filtering system, along with a more convincing dust-spotting tool that can effectively be used for retouching. Perhaps the program’s biggest failing is lack of support for third-party plug-ins and printing. You still can’t compare different images on screen at the same time. And the Mac product still lags behind its PC counterpart in terms of ease of use and performance.
Still, DxO Optics Pro packs a pretty good wallop, with an arsenal of geometrical, optical, and tonal adjustments, and some of the best sharpening and noise-removal algorithms on the planet. I’ve found myself revisiting photographs to see how they could be improved with Optics Pro, and improved they were.
The Elite edition of Optics Pro 7 costs $199 (street); the Standard edition costs $69 (street).
Test environments: a Quad-Core iMac running OS X 10.6 with 8GB of RAM and a Quad-Core Gateway Windows 7 laptop with 4GB of RAM.
For more information, contact DxO Labs at: www.dxo.com.
Editor’s Note: Our review focused on DxO Optics Pro Version 7.1. DxO has since released Version 7.2, which adds support in the form of new camera modules for the Sony NEX 7, Nikon 1 J1/V1, and Olympus E-P2. Since DxO constantly updates their software, adding new camera and lens modules, you should check their website and, if you own the software, always check for updates by selecting the appropriate Menu option.


![]()
Get the Latest Photo Tips, News & Reviews from Shutterbug!
| Camera Reviews Other Reviews | Mobile Reviews Photography Reviews Columns | News | Features | How-To | Resources |
 © 2026 Shutterbug
AVTech Media Americas Inc., USA
All rights reserved