- REVIEWS
Camera Reviews 
More Reviews Mobile Reviews Photography Reviews - GALLERIES
- VIDEOS
- BUYER'S GUIDES
Backlight, Schmacklight…A Problem Solved
If you photographed on slide film you know that there isn't much you can do; if on negative film you could do some serious dodging, but sometimes at the cost of muddy details in those shadow areas. And raising the overall contrast just gives you a better foreground subject but washed out background details, a compromise that can be made but that affects overall image quality.
While digital certainly has issues in exposure, such as washed out highlights that are a real problem to cure, backlight is one lighting condition that is fairly easily solved. The key is to use the tools in the digital darkroom to bring out details in the shadows while maintaining the same exposure level on those highlight values. For those with the latest versions of Photoshop CS or Elements there is the Highlight/Shadow tool, which in my opinion still needs some work, due to a posterized look when overused, but a modern miracle if there ever was one. You simply open the tool (Image>Adjust>Highlight/Shadow) and play with the sliders to your heart's content.
For those without this tool, or who are not so satisfied with results, here's another fix.

This is a typical backlit condition, taken in early morning in a small town in Germany. The sky is pretty nice but the church itself is cast in shadow.
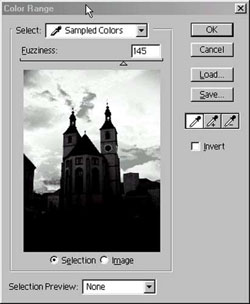
Here's the solution for Photoshop users. Go to Select>Color Range and choose either highlights or shadows from the dropdown menu. This will select either the sky area (highlights) or the foreground, should you choose shadows. If not everything is selected to your needs then just go to Select>Grow and repeat that modification until everything you needs is selected.
For Elements users choose the Magic Wand and click in the sky, and then use the Grow command (under the Select menu) until you get all the sky selected.
The next step is to get the darker foreground area selected. If you first selected the sky you can get the other areas selected by going to Select>Inverse. Now the shadow areas are selected.
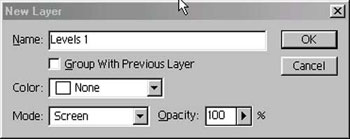
Now that the foreground is selected we'll create a New Adjustment Layer
and choose "Screen" under the Mode dropdown menu. Screen, in a sense,
opens up the exposure by a stop on the selected area.
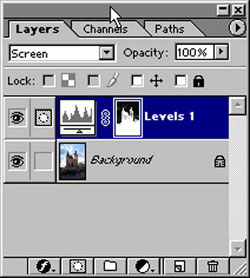
If you look at the Layers Palette you can see the selection and the fact that it's on another layer.

This is how the image looks after these easy steps. Because the foreground
is selected, you can modify the look to taste using the sliders in the Levels
control.


![]()
Get the Latest Photo Tips, News & Reviews from Shutterbug!
| Camera Reviews Other Reviews | Mobile Reviews Photography Reviews Columns | News | Features | How-To | Resources |
 © 2026 Shutterbug
AVTech Media Americas Inc., USA
All rights reserved