- REVIEWS
Camera Reviews 
More Reviews Mobile Reviews Photography Reviews - GALLERIES
- VIDEOS
- BUYER'S GUIDES
Apple’s Aperture 3; Organize, Edit, And Adjust (Too Bad It’s For Mac Only)
Aperture 3 is an amazingly powerful workflow aid for any photographer. An improved interface that promotes a “work the way you want” aesthetic makes it easy to learn and use, revealing a deep feature set over time as you explore new features—200 of them since the last release. In fact, Aperture 3 is one of the best photographic software apps released in recent years. Interestingly, the only real issue I had with it is that it only works on a Mac (which leaves out Windows users). There are a few minor issues—including some performance snags—but overall it’s a major update.
 |
|
|
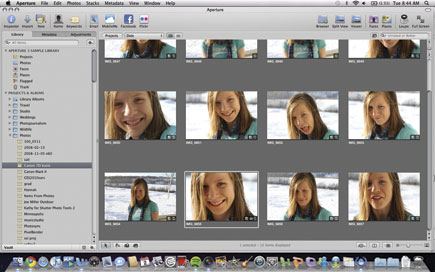
For Mac users, the most obvious change has to do with the newly updated interface. Aperture 3 now looks and acts almost exactly like Apple’s iPhoto (free with every Mac) and even borrows a few consumer-oriented features from that application, such as a way to tag faces automatically. While Apple has steadily added advanced features to iPhoto over the past few years, such as Raw camera file support, the new version of Aperture looks more like a consumer tool. In fact, when you first import photos, you’ll see a rather simplistic browser window and a list of projects on the left. You might wonder: how do I tag photos? Where are the exposure adjustments? Why is this app worth $199? Apple removed the trendy black look of previous versions that gave it a professional sheen.
|
Faces
|
|
 |
|
|
In truth, Aperture is much more powerful than iPhoto. The changes were intentional to make the program appealing to any photographer, and to acknowledge that not every pro is a computer geek who enjoys reading detailed histograms. Some photographers are still using a physical filing system in a cabinet, so those who decide to go computerized will appreciate the easy learning curve. Aperture 3 reveals its power over time, and it’s easy to explore the advanced features on your own timetable rather than having every last feature available on the main screen, causing confusion.
So what is the simplified workflow like? Let’s take a look at each step and find out if Aperture 3 is the best go-to tool for organizing photos, fixing photos, and producing final art for clients.
|
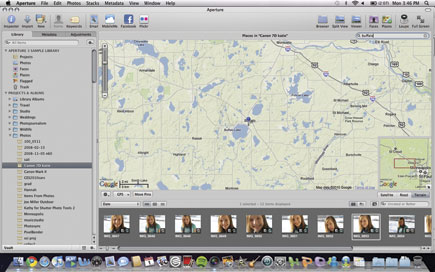
Places
|
|
 |
|
|
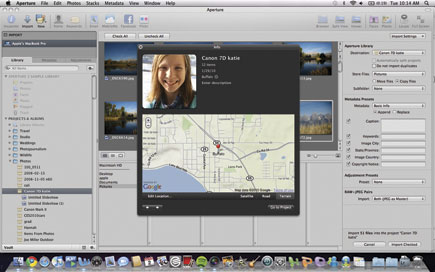
Importing Images
For starters, import options are now more flexible and powerful. Continuing on the theme of a simplified workflow, you can just click on your network location or a USB drive and import images. These images are added automatically to a “project” on the left side of the screen. You can then browse each project and quickly select images for basic editing and then export them to the web or set up a print job. Or, you can configure a vast number of options for each import; e.g., choosing to make an immediate backup of imported photos, or adding metadata information to every shot, such as new IPTC info that helps you track images for submission to a newspaper or magazine and follow editorial guidelines.
In my testing, I imported about 8000 images in about 15 minutes (they were all very high-resolution Raw images, many taken with a Canon EOS 7D camera). Aperture 3 lets you continue to use the program while the import takes place. It doesn’t take too much effort to explore the deeper functions, though. At import, I noticed I could add an adjustment preset on the fly. For example, I used the Auto Enhance preset on a photo shoot for a 2010 Dodge Grand Caravan where I knew the images were a tad too bright—taken mostly in direct sunlight to show the technical features on this minivan. The adjustment worked flawlessly, removing some extra brightness in every one of the 200 shots.
|
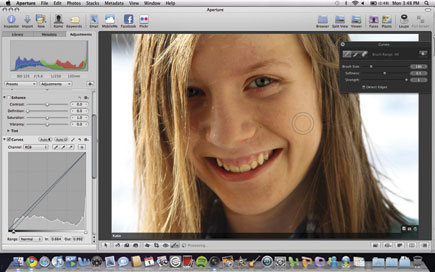
Curves
|
|
 |
|
|
Aperture 3 adds a few twists compared to the last version. For me, since I work in Raw and then send JPEG images to magazine editors as part of my job as a journalist, I tend to shoot in Raw+JPEG. That way, I know I can edit Raw images and export them as JPEG images, or just use the unaltered JPEG images as is. Aperture 3 can be set to only import the JPEG image or only the Raw image, a handy new addition. I also liked the new ability to see EXIF data—such as the exposure setting—for images before import. That way, it’s easy to select images and skip import for those you don’t want, based on the camera settings. This improves the workflow over other organizers because you can start making photo decisions even at import.
One last improvement of many: if you own a camera that lets you flag photos, such as the Nikon D700 and Canon 1D models, Aperture 3 can be set to only import those images. This also improves workflow because, once again, your workflow starts in camera as you select shots you know you want.
|
Direct Uploading
|
|
 |
|
|
Organizing
After import, Aperture 3 shows you a list of projects for each imported photo set. For example, I imported photos of a Dodge Caravan and labeled the project “Caravan” to make them easy to find. One comment about working with projects: it’s a great way to speed up the program, because I could browse 200 photos in real time (there was never any delay in scrolling through these images). Conversely, viewing all 8000 images in one window caused some slowdowns as thumbnails popped in slowly. Projects are a great workflow paradigm, and Aperture 3 enhances the idea—you can now view a project summary window that shows you the location of those shots. You can browse projects this way—once you view the info for one project, you click an arrow to see other project summaries.
Projects are stored in libraries, and you can now switch between libraries without having to restart Aperture 3. This command is listed under the File menu, although I’d prefer an even faster way to switch libraries right from the main screen. One workaround for this: when you open Aperture, you can hold down the Option key to select the library you want to use for that session.
|
Project Information
|
|
 |
|
|
Aperture 3 also adds a few overdue features for tagging images, which helps you keep them organized. You can now apply a color label. I tagged all of my car photos in red, portrait shots of my kids in yellow, and other candids in blue to quickly delineate them. You can now merge projects into one, export entire libraries and keep the project folders intact, and flag photos (just press /) to tag them as important shots. You can then sort project folder and images according to date, location, flag, etc.
The new sorting options for face tagging and place tagging (borrowed from iPhoto) are useful enough, but not wholly impressive. The Faces feature automatically detects faces and groups them. You can then tag additional images for that person, and the program uses your selections to “learn” to identify that person in other photos. In my tests, where I had thousands of images of four or five people, Aperture 3 only tagged a small handful initially but did start tagging additional images correctly the more I “trained” the program over time. Still, for professionals, this feature has a negligible value overall. We tend to know our subjects well enough to tag them appropriately and group them into projects.
|
Browser
|
|
 |
|
|
|
| |||||||||


![]()
Get the Latest Photo Tips, News & Reviews from Shutterbug!
| Camera Reviews Other Reviews | Mobile Reviews Photography Reviews Columns | News | Features | How-To | Resources |
 © 2026 Shutterbug
AVTech Media Americas Inc., USA
All rights reserved