- REVIEWS
Camera Reviews 
More Reviews Mobile Reviews Photography Reviews - GALLERIES
- VIDEOS
- BUYER'S GUIDES
5 Tips for Editing Long-Term Documentary Photo Projects

(Editor’s Note: Exploring Light is a monthly Shutterbug column featuring tips, tricks, and photo advice from professional photographers in Canon Explorers of Light education program. This month's column is by Krisanne Johnson, with tips on editing long-term documentary projects).
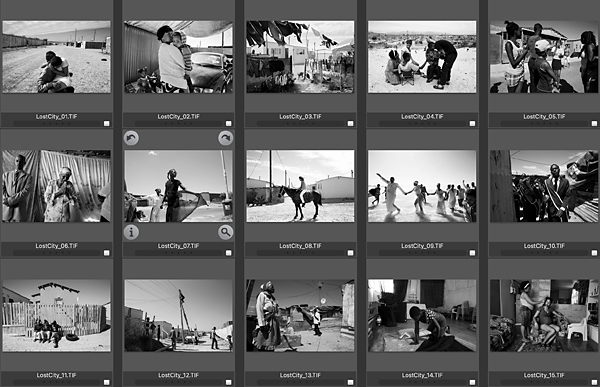
As a documentary photographer, we spend a great deal of time researching and planning our projects before we even hit the ground. We then spend weeks in the field meeting people, conducting interviews and taking photos. For my most recent project titled Lost City, I spent six months over two years documenting community life on the Cape Flats amid Cape Town, South Africa’s growing and contentious housing crisis and the failure to integrate affordable housing. And after each trip in the field, the second part of the journey begins —the photo edit.
Editing your photos after a lengthy shoot can be just as intimidating as taking the first photo in a new project. We all know the feeling. You’ve put the edit off long enough and today is the day. Today you will finally sit down to sort through thousands of photos from weeks of work; it’s just, where do I start? The process can be tough and overwhelming, but it is just as important as your initial research and creative shoot. Here are few tips that I use to help my process:
Make small prints
My first edit of photos always has one rule: follow your instincts. If I feel something works in the photo it stays in. And as I move through the following rounds of an edit, I weigh the context of the story/caption and the elements of the frame for a wide edit with a small pile of outtakes. Now I’m ready to step away from my computer to something more tangible. I order small 4x6 work prints of the edit to place on my editing board. Try to create a space in your office or home to layout the prints. I often use a piece of sheet metal and magnets. But you could easily use a table or floor space.

Anything that allows you to lay out the prints so you can move them around and step back for a wide view. This space is now your storyboard to finalize your edit and sequence.
Sequence/Movement/Cadence
My favorite part of finishing an edit is to start playing with the sequence of images. I want each photo to move into the next to build momentum and sense of place to keep the visuals activated. I think of it as a cadence from one to the other. Consider light changes and composition as you move to the next. For example, you might have a sequence where it makes sense to keep the outdoor photos together, followed by a group of indoor shots. It’s also nice to have a quiet photo within your sequence that allows one to pause a bit before moving into more complex images in a large edit.

Invite People You Trust Into Your Editing Space
I’m a firm believer you should practice the art of editing your own work. You’ve created the photos and your wide edit reflects the vision and voice you’ve brought to your personal long-term work. But once I have my wide edit on the board, I often invite a few trusted friends to come give feedback and advice on the edit. This meeting helps you verbally explain your project and your reasons for including certain photos. I find it very helpful to hear an outside perspective and to see another person’s reaction to the photos and sequence. You can move photos around together and take photos of different edits to contemplate and return to after reflection.
I Can Tell My Story in XX Prints
Another fun and challenging way to hone your editing skills is to tell your story in varying lengths. If you had to tell your story with six photos, which photos would you use? Moreover, if you could tell your story with 10 or 15 photos, what would your essay look like? How will it differ from essays using less (or more) pictures? This exercise forces you to take a serious look at your collection of images. Which photos are essential to telling the story and make the cut regardless of length? Which photos help enhance your story with important details? And, at what point do too many photos dilute the story you want to tell? Going through this exercise will not only make you a better editor, but it might also help you navigate your next project with a more critical eye.
Go With Your gut
After taking time to look over your various edits, it’s time to trust yourself and go with your gut. Long-term work allows you to develop your own voice as a storyteller and your edit reflects this. You’ve built trust with everyone who has opened their lives to you, and it is important to stay true to the vision and heart of the project.
Bio
Based in Brooklyn, New York, Krisanne Johnson is best known for her black-and-white photographs examining the intimate, daily life moments and complexities of youth culture. From the underground NYC Vogue/Kiki scene to young women coming of age amid the HIV/AIDS epidemic in both the US and southern Africa, to post-apartheid youth, her work looks to document the nuances of their multifaceted shifting lives.
Johnson's work has been awarded by World Press Photo, Pictures of the Year International, and the Best of Photojournalism. She has received the W. Eugene Smith Grant in Humanistic Photography, two Getty Images Grants for Editorial Photography, support from the Magnum Foundation Emergency Fund as well as a New York Foundation for the Arts Fellowship. Krisanne's work has been exhibited internationally and has appeared in various magazines and newspapers, including The New Yorker, TIME, The New York Times, and The FADER. Her affiliations include Prospekt Photographers and Women Photograph.
Social links:
https://www.facebook.com/krisannejohnsonphoto


![]()
Get the Latest Photo Tips, News & Reviews from Shutterbug!
| Camera Reviews Other Reviews | Mobile Reviews Photography Reviews Columns | News | Features | How-To | Resources |
 © 2026 Shutterbug
AVTech Media Americas Inc., USA
All rights reserved