- REVIEWS
Camera Reviews 
More Reviews Mobile Reviews Photography Reviews - GALLERIES
- VIDEOS
- BUYER'S GUIDES
When Tripods Are Not Permitted
When Tripods Are Not Permitted
How To Capture Great Images Anyway
by Jim Zuckerman
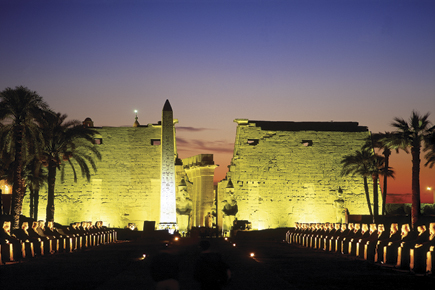
Too often, we photographers are forced to take pictures with what seems like one hand tied behind our backs. By this I mean we can’t use a tripod in low light situations. Sometimes this prohibition is reasonable, such as in museums. No one wants tripods tripping people or falling over and breaking irreplaceable treasures. On the other hand, there are instances when tripods are not allowed and there is no apparent reason. For example, in India you can’t use a tripod on the grounds of the Taj Mahal or any archeological or historical site administered by the government. In some places photographers have to pay extra to use a tripod, such as in the Egyptian ruins at Luxor, and even though I don’t like it, I’m happy that there is a provision for us to use one. I was able to get a sharp picture of the Temple of Luxor at twilight (#1) because I paid the few dollars to bring my tripod into the site.
 |
|
|
I have had to improvise in countless situations where I was not so lucky to be able to use a tripod. In low light circumstances, a tripod is essential because you usually can’t hand hold a camera when using a slow shutter speed and expect to get sharp pictures. I want to share with you some of my methods for dealing with this problem because it’s an important part of travel photography. What I try to avoid as much as I can is raising the ISO too high because of the increased digital noise. This is especially obvious in the dark areas of your picture like shadows and the night sky. I only increase the ISO above 400 when I have no choice.
One of the things I’ve discovered when traveling is places that prohibit tripods never tell you that ball heads aren’t permitted. This revelation occurred to me when I was photographing in a beautifully lit underground cistern in Istanbul (#2 and #3). Tripods were prohibited, but I wanted very much to get sharp pictures—with depth of field—in this ancient water storage facility built by the Byzantines 1500 years ago. It occurred to me that the security people who were looking for tripod use weren’t interested at all in a ball head, so I entered the cistern with only my camera and a ball head attached. I held it like a handle, as if this was some kind of photographic way to grip my camera. There was a railing that paralleled a walkway that surrounded the stone columns, and I used that as a platform from which I could shoot.
 |
|
|
 |
|
|
All ball heads have a flat base, and this is what I rested on the top of the platform. The ball allowed me to adjust the angle of the camera and compose the picture. I used the built-in self-timer on the camera and the mirror lock-up feature that locks the mirror up inside the camera before the picture is taken to hopefully eliminate vibration from degrading picture quality. At the same time, I applied a continuous downward pressure on the camera to give it a certain amount of stability.
As you can see, it worked. The photo of the large stone head of Medusa (taken from a Greek temple in the 6th century AD and positioned upside down so the early Christians wouldn’t worship it) is tack sharp and so is the row of columns. The security guards watched me shoot this way and didn’t say a thing. Even when I lay on the concrete floor and shot from a low angle with a wide angle lens, they merely watched in curiosity and didn’t stop me.
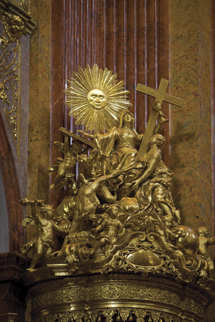
I used the same technique when I shot the detail in the Monastery at Melk in Austria (#4), although this time I rested the flat base of the ball head on a wooden pew. Again, the picture is perfectly sharp. Sometimes the situation is such that I have to use a wall or even a cylindrical column. In those cases, I also use a continuous amount of pressure against the ball head to prevent any kind of movement, and I find that the resulting pictures are just as sharp as if I had used a tripod.
 |
|
|
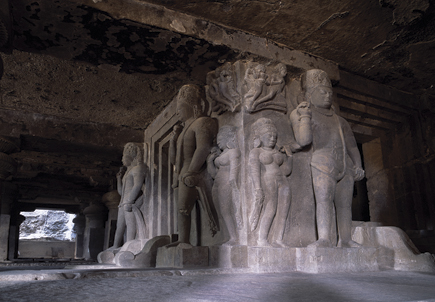
When I photographed one of the ancient Buddhist caves of Ajanta in India (#5), I used my camera backpack instead of a tripod. The backpack was positioned on the floor of the cave and I nestled the camera down into the firm fabric. I used the self-timer and mirror lock-up feature again. This time I also used a 90? viewfinder that attaches to my Canon and allows me to look straight down into the finder. The advantage of using this right-angle optic is it saves your neck when the camera is on the ground, it’s very difficult to look through the normal viewfinder without bending your neck in ways it was never designed for. This small 90? finder solves the problem and makes it much more comfortable to compose a picture. (If your camera has Live View with an articulating monitor you can do the same thing without the need for any attachment.—Editor’s note.)
 |
|
|
When I was in the Cairo museum, I used my wallet instead of a ball head. There was a glass case of jewelry adjacent to the famous gold mask from King Tut’s tomb (#6), and I didn’t want to scratch the glass. Therefore, I placed my leather wallet on the glass and then my camera on top of the leather. It was a little tricky to angle the camera just right to get a decent composition, but eventually I was able to do it. Using this technique, I was able to use a low ISO for maximum picture quality and a minimum of digital noise.
 |
|
|
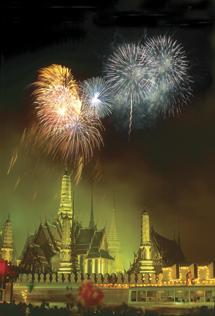
When I photographed the celebration of the King’s birthday in Bangkok (#7), I had arrived early to get a good position on the sidewalk to shoot the fireworks above the Grand Palace. As the time approached for the festivities, the density of the crowd became such that I couldn’t use a tripod at all. There just wasn’t enough room. Traffic stopped and people could hardly move due to the crush of the crowd. The only way I could get a sharp picture of the fireworks was to climb up on a wall to get away from the crowd. However, the top of the wall was crenelated (like the wall you can see in front of the palace), so again I used my leather wallet to give me some kind of stability. I pushed hard in a downward direction to make the camera as still as possible, but all my exposures were two seconds. In 20 shots, I got four that were tack sharp.
 |
|
|
Image stabilization is a feature that can work to your benefit in many circumstances. In St. Peters Basilica in the Vatican, no tripods are allowed. One of the pictures I wanted very much is the stunning Pieta by Michelangelo (#8), but of course the interior of the cathedral is quite dark. I raised the ISO to 640 and shot it with 1⁄10th of a second. Since I was hand holding the camera, I could use the IS feature (in Nikon it’s VR), and to be honest it surprised me. I was able to get tack sharp pictures of the sculpture when using a shutter speed of 1⁄10th of a second. I held my breath and squeezed the shutter gently, and even using a fairly heavy 70-200mm f/2.8 telephoto, the picture was sharp.
 |
|
|
When I shot the skyline of Nashville, Tennessee (#9), I did so from the football stadium of the Tennessee Titans. The stadium is in a great position to get an elevated view of the skyline, but I had to shoot during a game. That meant that there were tens of thousands of people in the bleachers and on the walkways to the seating. The subtle vibration could be felt in my feet, on the railings, and even in the huge I-beams that support the entire structure. Therefore, using a ball head was impossible because everything was vibrating. It was night, and even with my lens aperture wide open, the shutter speed was impossibly long. I raised the ISO until I got to 3200, and the shutter was only 1⁄10th of a second. I was using my 28-105mm zoom lens, and I hated to use such a slow shutter considering the wind and the vibration of the stadium. I went to ISO 5000, and that gave me 1⁄15th of a second and that’s what I used. I knew that ISO 5000 wouldn’t give me what I wanted—a clean, sharp, high quality image—even though my Canon 5D Mark II handles digital noise very well. At night, all those shadows would really show the noise. I took several shots with the IS feature turned on, and most were sharp. I also experimented with using ISO 3200, hoping that some of those would also be sharp and that I’d benefit even a little from the lower ISO setting. Out of 10 frames, I got four critically sharp images, and I have the ISO feature to thank for that.
 |
|
|


![]()
Get the Latest Photo Tips, News & Reviews from Shutterbug!
| Camera Reviews Other Reviews | Mobile Reviews Photography Reviews Columns | News | Features | How-To | Resources |
 © 2025 Shutterbug
AVTech Media Americas Inc., USA
All rights reserved