- REVIEWS
Camera Reviews 
More Reviews Mobile Reviews Photography Reviews - GALLERIES
- VIDEOS
- BUYER'S GUIDES
Using Flash For Macro: Up Close And Personal

All Photos © Jim Zuckerman
For example, in my online courses for www.BetterPhoto.com, I see many students submit close-ups of flowers, insects, faces of pets, etc., and they are blurred. The reason? They didn’t use a tripod. The problem is that the laws of photography conspire against photographers. The greater you magnify a small subject and the closer you get the narrower the depth of field becomes regardless of aperture and focal length. If you want more depth of field and use a small lens opening, the shutter speed becomes very slow. Hence, without a tripod, the photos will be blurred.

This is where flash comes in. A flash provides a huge amount of light when it’s used on-camera because it’s so close to the subject. That means you can have as much depth of field as you want and the shutter speed to freeze anything that might be moving.
Using flash for macro work requires special technical and artistic considerations. This is what must be overcome to take beautiful macro images.
1. If you use a typical portable flash on-camera, the flash head sits above the lens about 6”. This means that if you use a 50mm macro lens (and possibly a 100mm macro as well), the light from the flash will go over the subject. Some of the light will spill onto your subject, but the bottom portion of the picture will be dark.
2. Unattractive shadows occur behind your subjects. If the background is close, those shadows will be very defined and unattractive. This is especially true when you do vertical compositions.
3. Working distance is an important consideration. Many small animals and insects won’t allow you to get physically close to them. They will run or fly away, and the flash can certainly startle them.
4. A single flash placed very close to a subject gives a dimensionless type of lighting, and in many instances you want a lighting ratio or side light.
5. When you move in very close to a subject, such as a flower or insect, other elements in the shot—such as leaves and small branches—can get in the way of the flash head and the lens.
Now let’s solve these problems.
Macro Flash Setups
There are three options for using portable flash when shooting small subjects. First, you can use a normal flash unit that sits on the top of the camera. However, you must be at least 3-4 feet away from the subject. This prevents the light from going over the top and giving you uneven illumination. The problem, though, is that as you move back, you may not be able to fill the frame with a small object. Therefore, if you use this method of illumination, you must use a lens that allows you a greater working distance but still provides sufficient magnification. This means using either a telephoto macro lens, such as the Canon 180mm f/3.5L macro, or using extension tubes placed between the camera body and a regular telephoto lens.
When I photographed a red eye tree frog (#3) I used a 70-200mm f/2.8 IS medium telephoto along with a single extension tube. I was about 5 feet away, and I was able to fill the frame from that distance using a 200mm focal length. A single flash illuminated the shot. Note the catch light in the eye—it’s just a single dot. Also note that the entire frog is illuminated with no unwanted shadows and with even lighting. This only happened because I was far enough way so the flash, which sat above the lens, had enough distance to disperse. Even though my lens sticks out 8” beyond the camera body (without the lens hood), it didn’t block the flash from any part of the image.

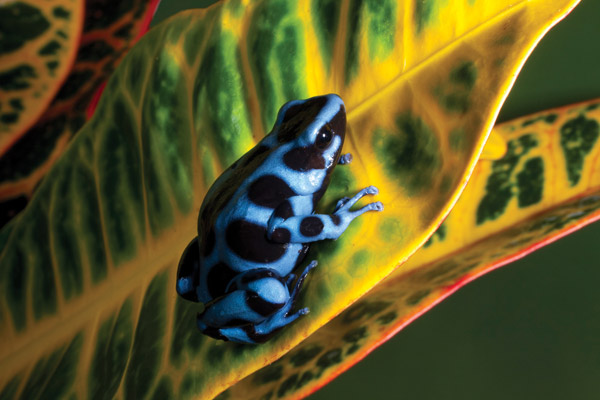
Compare the photo of the red eye tree frog with the picture of the auratus frog (#4). Look at the light dispersion. Half of the image is darker than the other half, and this happened because I was too close to the subject. I used a 50mm macro that forced me to be physically close—in this case to my disadvantage. I angled the camera, which is why the light changes from right to left instead of top to bottom, but the point is that the flash was too high above the lens and I was too close to the frog to get even illumination.
If you use this lighting option, adding a diffusion device, as discussed, will spread the light in a shorter distance and therefore that will allow you to work closer. How close depends on which diffusion device and how long your lens is.
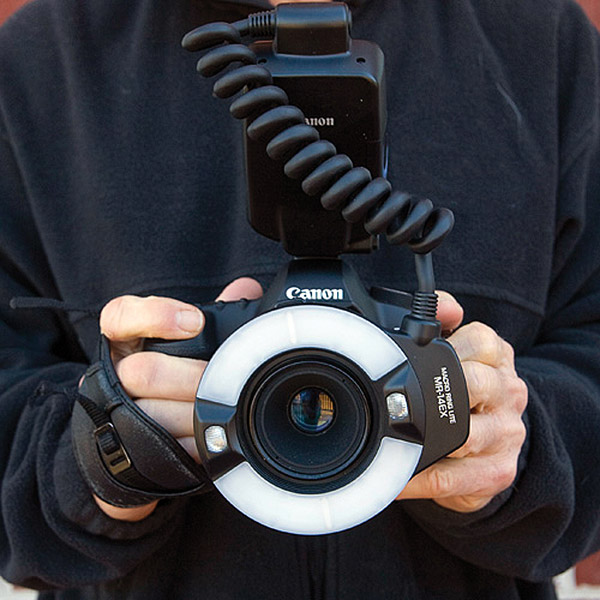
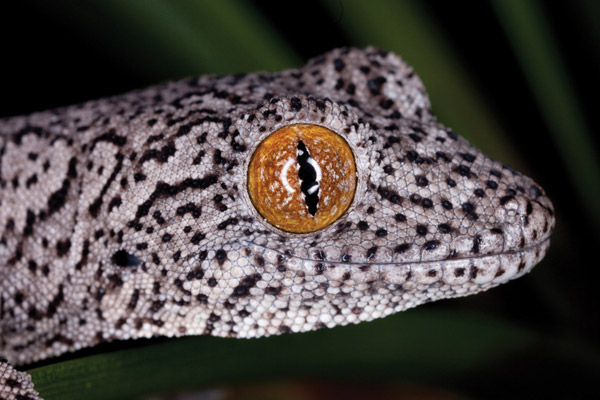
The second option for doing macro photography with flash is the ring flash. You can see in (#5) how the unit goes around the lens, providing a diffused light source when used very close to the subject. I bought my first ring flash when I started doing the frog and reptile workshops because I wanted a light that would reveal all of the fascinating detail in the animals. I didn’t want dark shadows on their bellies or under their heads. The ring flash was perfect. You can see in (#6) how the light wraps around the subjects, and you can appreciate how important it is to show all of the intriguing detail.
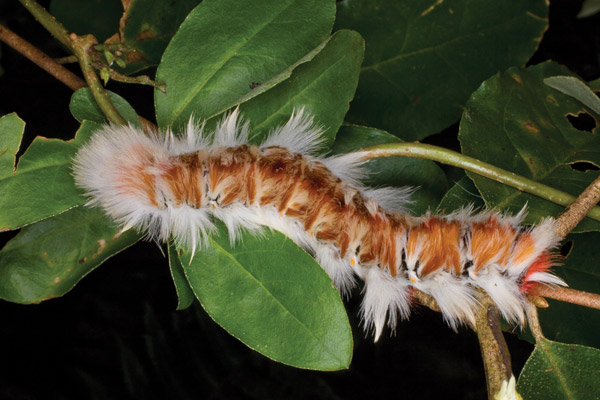
The only problem with a ring flash is that the reflection in the eye shows the actual ring of light, and this is obviously undesirable (#7). The reason why you don’t see it in (#6) is because I cloned it out. That’s exactly what you have to do because a single dot of light from a flash is acceptable and sometimes desirable, but two semicircles just don’t look good at all. Of course, in a subject like (#8), a bizarre and beautiful caterpillar I found in the Costa Rican jungle, there is no reflectivity in the creature at all so this unwanted reflection was not a factor.
Another issue that comes up with this type of lighting is that it is so diffused that there is no dimension or depth. To overcome that you can get a ringlight flash system that allows you to set up a lighting ratio. The two small lights inside the ring can be adjusted to provide 2:1, 3:1 and, 4:1 light ratios. This means that one side of the image will receive more light than the other. The differences are subtle, and they can only be seen if the camera and flash are placed within a few inches of the subject. As you move back, the lighting ratio you’ve chosen is pretty much irrelevant because the flash acts as a single ring of light.
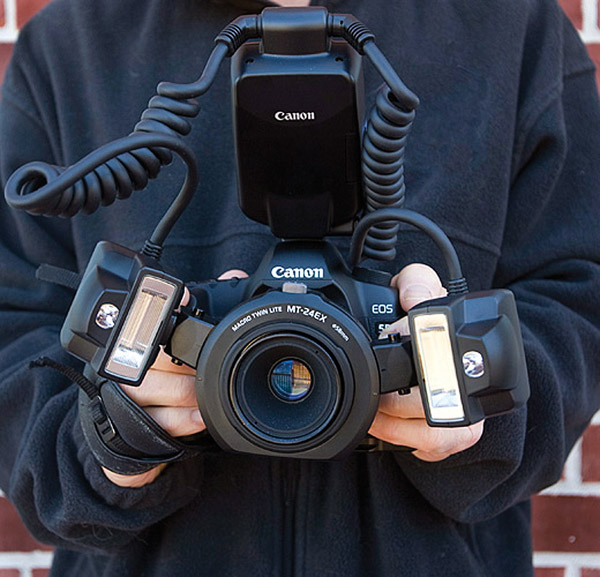
A third option for shooting close-ups of small subjects with flash is to use a twin light macro setup such as the MT-24EX Macro Twin Lite Ringlite flash (#9), the Nikon R1C1 Wireless Close-Up Speedlight Flash System or similar. Third party manufacturers also make twin flash setups for both Canon and Nikon. The two small flash units are positioned on either side of the lens, and this gives you the ability to create side lighting as well as a light ratio that is more pronounced than what a ring flash can do. The photo of a moth (#10) is an example. Notice how much texture on the insect is revealed because of the cross light.

Background Considerations
A background is virtually as important as the subject in making a picture successful. This is true of any aspect of photography, and it’s certainly true in macro work. There are two main problems: bad shadows and black backgrounds. If the exposure and the shooting angle don’t solve the problem, then the only other solution is to use Photoshop to replace the background entirely. Obviously, the best-case scenario is to get it right in the first place, but too many times you don’t have as much control over a situation as you would like in order to produce a perfect in-camera picture.
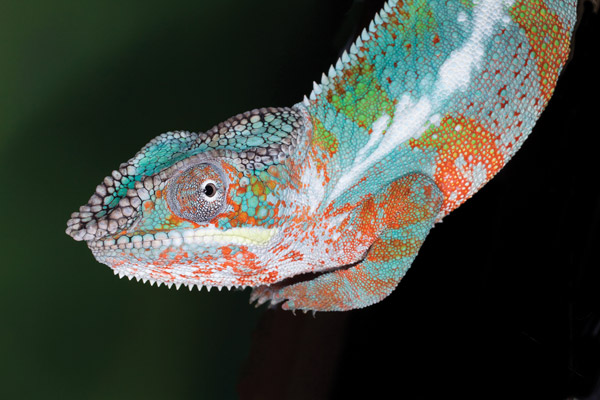
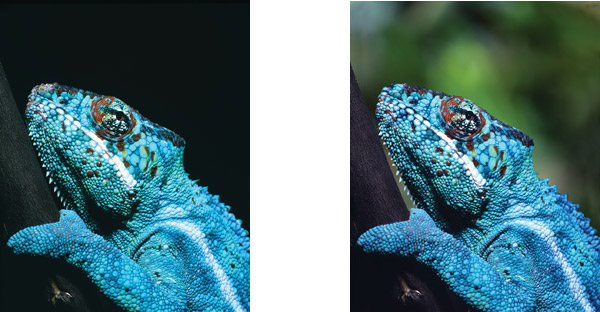
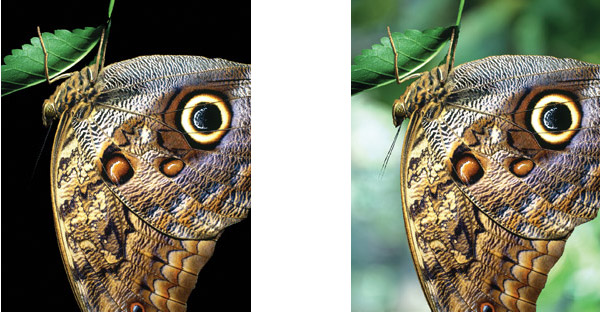
When I photographed a panther chameleon, (#11) I wasn’t happy with the black background because they are not nocturnal. Therefore, I cut and pasted an out of focus foliage background behind it (#12), and this made the image more natural as well as more attractive, in my opinion. I did the same thing behind an owl butterfly I photographed in a butterfly house in Florida, (#13 and #14). The butterfly was hanging on a leaf and the background elements were at least 20 feet away. The flash didn’t reach that far, so I used Photoshop to make this look more biologically correct.
Exposure
Assuming you want maximum depth of field, the best approach is to use the camera on Manual mode. Set the flash to ETTL for Canon (I-TTL for Nikon) or an Auto TTL mode on whatever flash you use and use a low ISO and a small lens aperture like f/22 or f/32. The automatic metering system will give you correct exposures even if you use extension tubes (which cause a loss of light). If your subject happens to be very dark or very light, you may have to tweak the flash exposure compensation to adjust the exposure to taste.


![]()
Get the Latest Photo Tips, News & Reviews from Shutterbug!
| Camera Reviews Other Reviews | Mobile Reviews Photography Reviews Columns | News | Features | How-To | Resources |
 © 2026 Shutterbug
AVTech Media Americas Inc., USA
All rights reserved