- REVIEWS
Camera Reviews 
More Reviews Mobile Reviews Photography Reviews - GALLERIES
- VIDEOS
- BUYER'S GUIDES
Telephoto Lenses: Up Close And Personal
There are both technical and artistic considerations you need to look at when using a long lens (“long” refers to the fact that the focal length of the lens is much longer than wide angles and normal lenses). The most important aspect of using “teles” is making sure that your pictures are as sharp as possible.
Sharp Strategies
Telephoto lenses magnify distant objects so they seem closer than they really are. At the same time, however, the movement of the lens as you hand hold it is magnified. This movement is obvious when you look through the viewfinder. The heavier the lens is, and the longer the focal length it is, the more movement you’ll get. As a result, if you don’t use a fast enough shutter speed, your pictures will be blurred.
The general rule that correlates the speed of the shutter with focal length with respect to getting sharp pictures is this: The shutter speed should be at least the reciprocal of the focal length if you are hand holding the camera and lens. In other words, if you are using a 300mm telephoto, the shutter speed should be 1⁄300th of a second or faster. With a 500mm super telephoto, if the shutter speed is less than 1⁄500th of a second, there is a good chance your images will be blurred. If you are shooting from a tripod, this guideline doesn’t apply. (Read on about image stabilization lenses for a further refinement of this rule.)
The amount of light you have available is a critical part of the equation, of course. If you are shooting with a long lens in the shade, such as photo (#1), you may not be able to use a very fast shutter speed unless you bump the ISO up higher. This introduces too much digital noise, though. Therefore, we are forced to make a tough decision: We can raise the ISO and suffer the loss in image quality, or we have to risk getting less than tack sharp pictures by choosing a shutter speed that is relatively slow for the lens.

All Photos © 2010, Jim Zuckerman, All Rights Reserved
This is why the maximum lens aperture is so important. If you have an f/2.8 lens, like the 70-200mm f/2.8 medium telephoto, in low light circumstances the light gathering ability of the large aperture means you can use a faster shutter speed. If you have a lens like the 18-200mm f/3.5-f/5.6 lens, at 200mm the largest lens opening is two full f/stops smaller than f/2.8 (f/2.8>f/4>f/5.6). With the f/5.6 aperture, you’d be forced to use 1⁄50th of a second instead of 1⁄200th. If you insisted on the faster shutter (a good thing to do in this case), then you would be forced to raise the ISO. Instead of using 200 ISO, for example, you’d be forced to shoot at 800 ISO—not a great option.
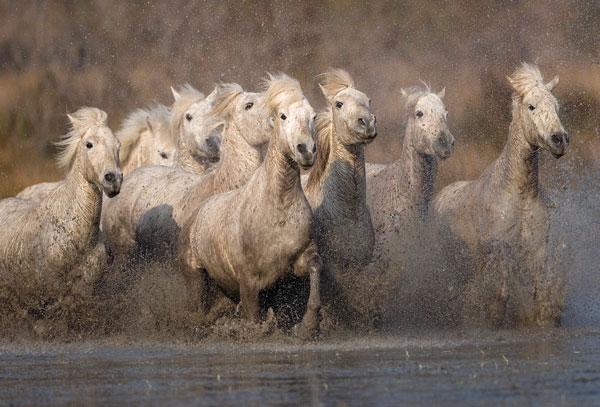
Using a tripod allows you to use a slower shutter speed providing that the subject isn’t moving. In (#2), for example, I used a 500mm lens, and even though the horses weren’t perfectly motionless a tripod would permit a shutter speed slower than 1⁄500th of a second. I wouldn’t like to go less than 1⁄125th, though. In a landscape shot like the lavender field in Provence, France (#3), nothing was moving at all (fortunately there was no wind). In this situation, any shutter speed can be used from a tripod. However, it’s vital to do two things:


1. Use the mirror lockup feature in the camera. This eliminates any possible vibration from the mirror going up and down inside the camera body. Every time you take a picture, the mirror flips up out of the way of the sensor so the light coming through the lens can form an image. After the shutter closes, the mirror flips back down so you can again see through the viewfinder.
2. Use a cable release or the built-in self-timer feature. This prevents the camera from being jarred by your finger pushing the shutter button.
Everything that you can do to make sure the pictures are tack sharp is worth the effort. If you are not already familiar with these functions on your digital camera, it’s worth your time to learn where they are and how they work.
Image Stabilization
As I mentioned earlier, image stabilization is designed to minimize or even eliminate blurred images due to camera movement when telephoto lenses are hand held. When IS and VR lenses are used on a tripod, lens manufacturers suggest turning the stabilization off with some lenses. This is especially true for the original stabilized lens designs, and for some of the newer image stabilized lenses we are told that even when using a tripod, the IS and VR feature can be left on.
I have done testing with my own lenses and I’ve come to the conclusion that even if the manufacturer indicates it’s safe to leave the IS feature turned on while using a tripod, it’s best to turn it off. While some pros as well as camera company reps may disagree with me on this, every time I use a tripod and leave the IS turned on, my pictures are not as sharp as I expect them to be. This includes monopods and bean bags (such as the type used on safari in Africa), too.
Compression
Lenses don’t capture the world as we see it with our eyes. I have demonstrated the type of distortion inherent with wide angle lenses in the previous section, and now I want to explain how telephoto lenses distort reality.
There are two ways in which long lenses alter a subject or scene. First, they compress the elements that make up the composition. This means that they make the foreground seem like it is closer to the background than it really is. The longer the lens, the more compressed the image is. Second, telephoto lenses have such shallow depth of field that foreground and background elements in front of and behind the subject are often out of focus. Our eyes never see this. Both of these characteristics are the opposite of what wide angle lenses do.
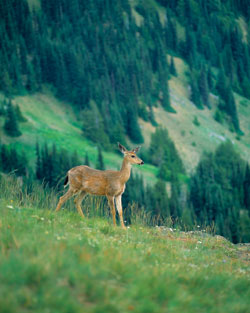
Photo (#4) is a good example of what I mean by compression. Sometimes this is referred to as “stacking”, where the elements seem to be stacked on top of each other. The black tailed deer fawn photographed in Olympic National Park in Washington was a great distance away from the mountain backdrop, but you can see that due to the compression effect it seems like that distant mountain slope is quite close. In actuality, it was about one third of a mile away. Similarly, in the photo of the group of giraffes in Namibia (#5), the animals look like they are in a fairly tight grouping, but in fact the foreground giraffe was at least 100-200 ft in front of the rear giraffe. The 300mm lens compressed the elements in the shot to make them seem like there were closer to each other than they really were.

This stacking effect is a great tool when you want to show a mass of objects. For example, in photo (#6) the charging muddy horses I shot in France were compressed by my 500mm telephoto so they look like a fearsome mass of power, and in (#7) I used a 200mm lens to underscore the incredible density of people in Puri, India. Notice this was taken from an elevated viewpoint. Had I shot this from street level, the foreground people would have been blurred if I focused on the middle of the crowd. Also in India, with a different kind of composition, I stacked a line of rickshaws with a 200mm lens in (#8). Due to the compression, the distance from the front cart to the rear of the line-up seems to be less than it really was.


Shallow Depth Of Field
Shallow depth of field is sometimes your friend and sometimes your foe. It depends on the subject matter and what you want out of the picture. Sometimes telephotos are used specifically because the depth of field is so limited it makes the background completely out of focus. This is usually complimentary to the subject, and it forces all of our attention exactly where you want it—on the subject. The blue grosbeak in photo (#9) is an example. The completely blurred foliage behind the bird is a great way to isolate it and make it the center of attention. I did the same thing with the lioness stretching (#10). The background is soft because of the long lens I used.


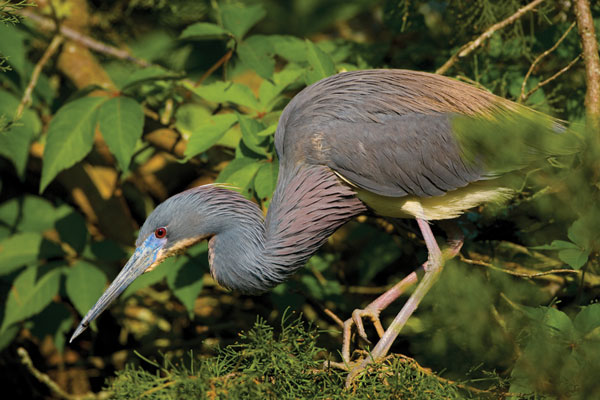
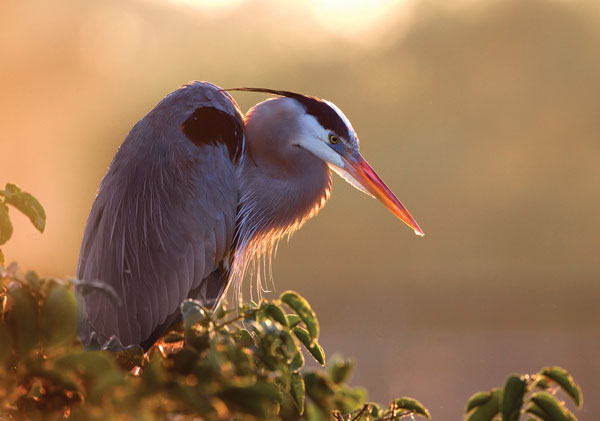
To make this point very clear, compare photos (#11 and #12). Both of these images are similar in that I filled the frame with a tack sharp heron and the lighting is attractive. It is true that the direction of light is different—one of them is backlit and the other front lit—but the main difference that makes one of these images successful and the other one annoying to look at is the background. Photo (#11) has a background that is out of focus, but it’s not out of focus enough. It’s too defined because the bird was so close to the leaves that even with a 500mm lens at f/4, I couldn’t blur it as much as I wanted. The background, therefore, is busy and distracting. Photo (#12) is exactly what I wanted. In this case, the heron was much further away from the trees in the background, and the shallow depth of field from the same 500mm lens and the same f/4 aperture made a much cleaner and graphically pleasing picture.
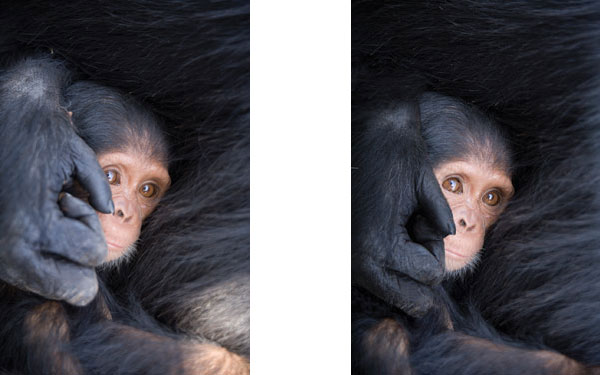
When the depth of field is so shallow that foreground elements are soft, the photograph usually doesn’t look good. There are always exceptions, but this is a general rule you should keep in mind. For example, in the photo of the chimpanzee baby (#13), I had a problem. I was shooting through an electrified fence into a compound in Kenya established by Jane Goodall. The chimps were just a few feet away and the depth of field was so shallow that I could focus on the eyes of the baby but the mother’s hand was out of focus. I think this is very unattractive and distracting. I had to shoot with the lens wide open (f/2.8) because the light level was low, so that left me with few options. I was using 320 ISO and didn’t want to go much higher, so I solved the problem by shooting two pictures. In the first image I focused on the eyes of the baby, and in the other I focused on the mother’s hand. A couple of weeks later at home I put the two shots together in Photoshop to produce (#14). Both the hand and the baby’s face are now correctly in focus.
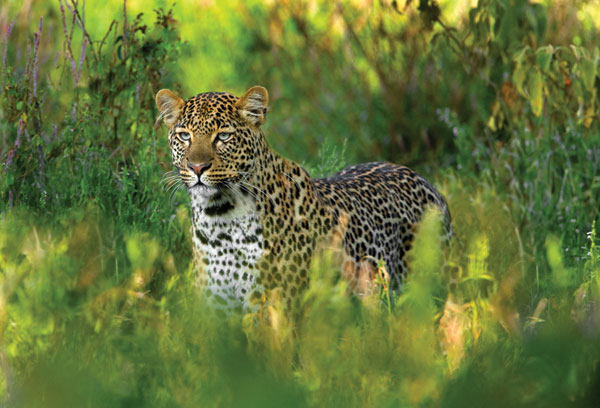
Out of focus foregrounds can, at times, work very well. When you shoot a person or animal through tall grass, it’s like we are getting an intimate look into their private lives. I felt that way when I was able to take a picture of a hunting leopard in the Maasai Mara in Kenya (#15). Note that the foreground grasses are completely out of focus such that they look like a soft green blur. The young Himba girl from Namibia (#16), was also photographed with a telephoto lens specifically to blur both the foreground and background.

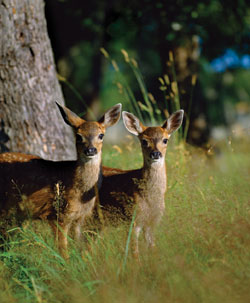
If you are constantly aware of this issue of shallow depth of field and telephoto lenses, you can prevent problems. In the picture of two black tailed deer fawns in British Columbia, Canada (#17), I knew that because of the long lens and the large aperture I was using, the depth of field would be extremely shallow. It might be just a few inches in depth. Therefore, if one of the animals were a foot or two closer to the camera than the other one, the picture would be a failure because only one of the deer would be sharp. Therefore, I waited until both animals were exactly equidistant to the lens before I took the picture. I got lucky in this instance because for one brief moment the two young animals posed for me abreast of each other.
Rear Mount Filters
Many of the long telephoto lenses that have large maximum lens apertures have front glass elements that are quite large. This means that if you wanted to put a filter on the front of the lens, it would have to be huge and, consequently, it would be very expensive. No one wants to pay hundreds of dollars for a filter, so manufacturers make drop-in filter slots in the rear of these lenses (figure A). This allows you to use a variety of filters at an affordable price.

Special Lens Supports
Large telephoto lenses are unwieldy and heavy. They don’t work well on normal tripod ball heads because as soon as you loosen the head to change the angle of the lens, a super telephoto typically flops over and for a moment you think the lens is going to fall off the tripod. In addition, you’ve missed the shot.
The specialized tripod head I use to solve this problem is the Wimberly Head (www.tripodhead.com/index.cfm). In (figure B) you can see that it is beautifully engineered, and it balances the lens such that it feels almost weightless. It gives you complete freedom of movement for panning and follow focusing as I did in (#18). It is essential for wildlife, bird, and sports photography, but even if you are shooting people, festivals, an air show, fireworks, landscapes, and many other subjects, you’ll need to use this kind of support. Otherwise, you won’t have the confidence that your normal ball head will be able to support your large lenses to give you sharp pictures. If you regularly use lenses 400mm and longer (or the 300mm f/2.8), you will love the ease with which you can swing the lens into any position and get the shot. Instead of fighting the weight and bulk of the lens, you’ll be able to handle it effortlessly.


The Wimberly Head replaces the ball head on the tripod. After removing the head, you screw the new piece of equipment onto the tripod screw and the lens fits into it. The controls for movement are convenient and easy to use.
Wimberly also makes the Sidekick. This is smaller, lighter, and less expensive, and it is tightened into your existing ball head but works in a similar fashion.


![]()
Get the Latest Photo Tips, News & Reviews from Shutterbug!
| Camera Reviews Other Reviews | Mobile Reviews Photography Reviews Columns | News | Features | How-To | Resources |
 © 2026 Shutterbug
AVTech Media Americas Inc., USA
All rights reserved