- REVIEWS
Camera Reviews 
More Reviews Mobile Reviews Photography Reviews - GALLERIES
- VIDEOS
- BUYER'S GUIDES
Seeing Pictures: “Soft” Foregrounds
Seeing Pictures: “Soft” Foregrounds
A High Tech Solution To A Visual Dilemma
by Jim Zuckerman
When foreground elements are soft, they are visually annoying. In nature, we want to see and appreciate all of the beautiful detail and texture in the subject. When the part of the composition that is closest to the camera, and therefore very prominent, is out of focus, our eye keeps going there in the hope of seeing sharp detail, but it can’t bring that part of the image into focus. The blurred portion of the image keeps tugging at our attention instead of allowing us to enjoy the rest of the frame. It is best in these circumstances to use more depth of field. Soft backgrounds are ideal in many cases, but soft foregrounds should usually be avoided. If you want to include out of focus foreground elements, they need to be so out of focus that they are no longer recognizable. Make them just a blur of color.
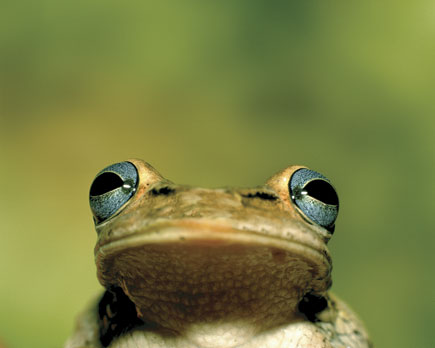
A good example is photo (#1). I took this shot many years ago, and I like everything about it except the front portion of the mouth is blurred. The soft background looks great because it is unobtrusive and complementary. However, I find the small blurred area of the mouth to be very annoying. Similarly, the lower middle portion of photo (#2) is soft. Here, too, I didn’t have enough depth of field to hold that important area of the orchid in focus.
 |
|
|
 |
|
|
There are always exceptions to every rule in art and photography, and this also applies to out of focus foregrounds. I feel that if the foreground is so soft that it makes a blur of color in front of the subject, it can work. An example of this is photo (#3). The fern in front of the Huli tribesman in Papua, New Guinea, isn’t distracting because it’s devoid of detail. It gives the feeling that my subject is an integral part of the jungle. Another situation where an out of focus foreground can work is if you are shooting a predator, like a lion, hiding in tall grass. Two different examples are shown in photos (#4) and (#5). The soft foregrounds give the impression that we are sneaking a peak into the private world of these cats. In general, however, I still like my foregrounds sharp.
 |
 |
||
|
|
 |
|
|
The solution to getting sharpness near to far, of course, is to use a small lens aperture. Sometimes, though, your may be using f/32 and you still can’t get very sharp. This may happen because you are extremely close to the subject (like the frog and the orchid) and/or your lens is a telephoto, which doesn’t provide enough depth of field. You then have two options: You can move further away from the subject. This increases depth of field (even 3-4” can be significant when doing macro work). Or you could try post exposure processing that combines a number of images made at various focusing distances, similar to HDR for exposure and contrast control.
A Software Solution
I have worked with a software known as Helicon Focus (www.heliconsoft.com) to get complete depth of field at virtually any lens aperture. Helicon Focus is a software program that is brilliant. The way it works is that you take several pictures of a subject—anything not moving—from a tripod. Each time you take a picture, you re-focus the lens in very small increments from the furthest point in the composition to the closest point near the camera. It doesn’t matter how many shots you take. I’ve done as many as 22, but usually you can get away with less. My average number of exposures is about 10-12.
The software then assembles all the pictures and uses only the sharpest plane of focus from each photo. The resulting composite is perfectly focused throughout. Since f/8 is usually the sharpest lens aperture on any lens, you can do this at f/8 and still have complete depth of field from the immediate foreground to the background. This can be used for macro photography as well as when using a telephoto. What is amazing is that if you use a long lens, you still get the telephoto compression but everything is tack sharp from front to back.
Compare photos (#6) and (#7). The former was taken at f/8 and it is a single exposure. Photo (#7) is a compilation of 14 images that Helicon Focus put together, and you can see how impressive this macro shot turned out to be, especially at f/8. I purposely allowed the background to remain soft, although I could have shown it to be sharp as well. Notice how distracting the out of focus background is in (#6), while in the comparison shot the photo is much more pleasing.
 |
 |
||
|
|
Cut & Paste
Sometimes you can use another approach to avoiding out of focus foregrounds. I photographed a sleeping leopard in a tree in Kenya with a 500mm f/4 telephoto, (#8), and it was impossible to get both the cat and the large branch in front of it sharp. You can see how annoying it is to have that prominent element out of focus. There was a distance between them of about 5-6 ft, and the limited depth of field on the long lens prevented the kind of image I wanted to take. I couldn’t close the lens down because my shutter speed would have been too slow. Therefore, I took two pictures. The first picture is the one you see here where I focused on the leopard, and for the second shot I focused on the foreground branch. Then, using Photoshop, I cut out the sharp branch and pasted it into the image where the leopard was sharp. The result is photo (#9). The picture is now ideal, where the two important planes of focus are critically sharp.
 |
|
|
 |
|
|


![]()
Get the Latest Photo Tips, News & Reviews from Shutterbug!
| Camera Reviews Other Reviews | Mobile Reviews Photography Reviews Columns | News | Features | How-To | Resources |
 © 2026 Shutterbug
AVTech Media Americas Inc., USA
All rights reserved