- REVIEWS
Camera Reviews 
More Reviews Mobile Reviews Photography Reviews - GALLERIES
- VIDEOS
- BUYER'S GUIDES
Raw Processing Local Tone Controls
Raw Processing Local Tone Controls
Enhance Your Images As You Convert Your Raw Files
by Jack Neubart
How many times have you looked at a Raw digital image on your computer screen and thought that there is more to this shot than meets the eye? You may want to restore tonal values, enhance contrast, and maybe boost saturation in selected parts of the picture, or otherwise modify those pixels in a way that best expresses how you visualized the scene—during Raw processing itself. This type of workflow is available with numerous Raw processors. In this article I’ll cover the use of Adjustment Brushes available in Adobe Camera Raw (CS4).
I worked with Adobe Camera Raw (ACR) v. 5.6—opening the image via Adobe Bridge CS4, on an iMac, under OS X 10.6.2. Windows users have the same tools at their disposal in current versions of ACR.
Adobe’s Adjustment Brushes
An Adjustment Brush works by painting a mask over the area to be restored, enhanced, or otherwise modified. You can add to this mask or remove parts of it at any time while the brush is active. Each Adjustment Brush is accompanied by two sets of slider settings that you set in advance but can fine-tune as you’re working with that brush. A pushpin (also called a brush pin) identifies an Adjustment Brush and its associated mask. When you click on a pushpin, its brush and mask become active, which means that you’re now free to work with them.
The control options for an Adjustment Brush include exposure, brightness, contrast, saturation, clarity, sharpness, and color. You also choose brush size, feathering, flow, and density.
To show you how this works I chose a photograph I made in Berlin last year. I photographed the Berliner Dom in the morning from across the river. The dappled light was a plus, but the sky washed out toward the left edge of the shot. I wanted to recapture that sky and perhaps even make it a little more dramatic, while bringing up the tones on the building without overwhelming the dappled lighting—an especially endearing characteristic in this viewpoint. And I wanted to punch up the main dome, so it would stand out.
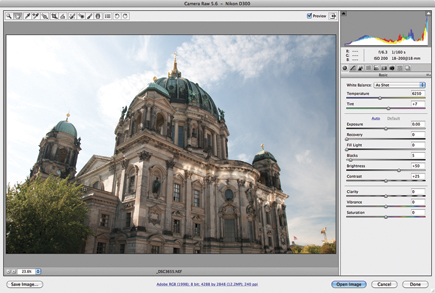
Step #1—Berliner Dom, Original Raw File: This is the opening screen in Adobe Camera Raw, when accessed via Adobe Bridge CS4.
 |
|
|
Step #2—Selecting The Adjustment Brush: At the top of the ACR workspace is a group of icons. When you select the Adjustment Brush, as with any other icon, it is highlighted. The Adjustment Brush lets you alter tonal and color values locally (selectively), instead of globally (to the entire image at once).
 |
|
|
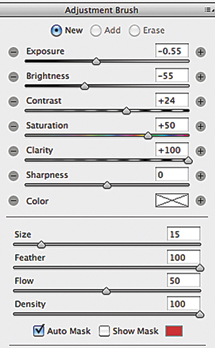
Step #3—The Adjustment Brush Panel: When you first select Adjustment Brush, a new panel opens to reveal that you’ve selected a “new” brush. You’ll see two sets of sliders. The upper set governs the effect this brush will have on the image (exposure, contrast, etc.). This set of values controls every brush stroke made with this Adjustment Brush, now or later. Change these values at any time and all brush strokes made with this brush will be modified. However, the lower set dictates how the brush will be applied (size, thickness, etc.) at the time it is being used. This second set of values can be changed on the fly without changing previous brush strokes.
 |
|
|
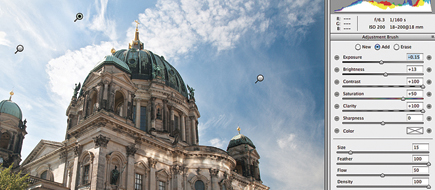
Step #4—First Brush: When you click with your mouse, that action anchors a pushpin in place to identify an Adjustment Brush. Note the concentric circles. The inner circle represents the brush size, whereas the outer circle indicates the feathering. If you simply click with the mouse, the brush dabs the mask onto the picture. If you use broad or sweeping brush strokes, the effect is harder and coarser. (The effect will of course vary when using a drawing tablet.) Each new pushpin is highlighted, as is any pushpin that you return to (now making that pushpin the active Adjustment Brush). This is the first Adjustment Brush used for this image, hence the first and only pushpin so far.
 |
|
|
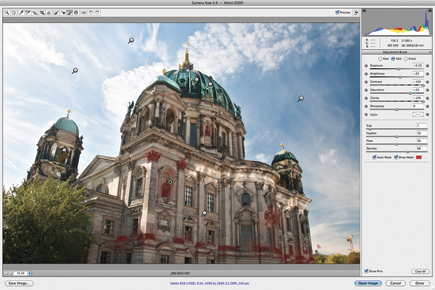
Step #5—Sky Mask: Now you see the mask associated with the first Adjustment Brush. Select Auto Mask to limit the brush to tones/colors most similar to those at the anchor point (although this is not foolproof, it’s still a prudent step). And select Show Mask so you can see the area covered by this brush. I chose a red mask color, as shown here, covering the sky. Note that the moment the pushpin is stuck into the image, the Adjustment Brush setting changes to Add. At this time, you can change the settings applicable to this brush, which is what I did in order to lessen the intensity of this Adjustment Brush (notably on the right side). Next, I had to address the sky on the left side of the frame.
 |
|
|
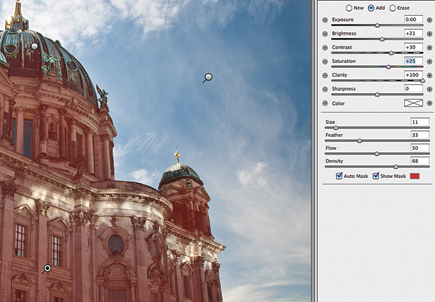
Step #6—The Erase Brush Corrects A Wrong: The second brush (denoted by the highlighted pushpin on the left) addressed the weaker portion of the sky in that area—but it went too far, giving the circled portion of sky an unnatural tone. So I had to correct that by stripping back a layer of the mask with the Erase Brush. Note that the dimensions in the second group of settings have been adjusted to meet the needs of this brush.
 |
|
|
Step #7—Sky Brush 3: Now I had to correct the sky density with a new Adjustment Brush and at the same time restore the wispy clouds in that area, to give the sky a more natural sense of continuity. This also meant adjusting the brush settings to suit my needs.
 |
|
|
Step #8—The Facade: The façade still needed some work (highlighted pushpin toward the bottom left). Of primary importance was brightening the façade without interfering with the dappled lighting.
 |
|
|
Step #9—The Final Touches: All the additional pushpins addressed various aspects on the building. In brief, the area under each domed structure was somewhat dingy and each dome needed to be punched up. And finally I wanted to bring up the tonal values in the areas shown masked, without going overboard (if they were lightened too much, they’d look unnaturally bright). For the most part, I’ve been using a delicate touch, dabbing the brush. I find that leads to more natural tonal gradations than using heavy brush strokes.
 |
|
|
Step #10—The Final Image.
This picture required eight Adjustment Brushes applied throughout. I chose to leave the area surrounding the lower edge of the tree in shadow for added depth. But I could always go back in to the Raw file, click on Adjustment Brush in Adobe Camera Raw, and lighten that area—or adjust any area, for that matter. I should mention that I applied my usual global enhancements to the final image (clarity, vibrance, saturation, sharpness) to give it a more polished look and feel. No other global changes were made.
 |
|
|


![]()
Get the Latest Photo Tips, News & Reviews from Shutterbug!
| Camera Reviews Other Reviews | Mobile Reviews Photography Reviews Columns | News | Features | How-To | Resources |
 © 2026 Shutterbug
AVTech Media Americas Inc., USA
All rights reserved