- REVIEWS
Camera Reviews 
More Reviews Mobile Reviews Photography Reviews - GALLERIES
- VIDEOS
- BUYER'S GUIDES
The Raw Facts About Infrared
The Raw Facts About Infrared
Processing Digital Infrared Raw Files Using Adobe Camera Raw
by Joe Farace
One of the best ways to squeeze the maximum image quality from your digital infrared files is to first capture them in your camera’s Raw format and process them in your favorite Raw software. In my case that’s Adobe Camera Raw (ACR) that’s part of every recent copy of Photoshop and Photoshop Elements, so even if you’re using Adobe’s inexpensive image-editor you’ll have access to the same tools. I use this product for a few simple reasons: As a Photoshop user it’s already part of the software that I use every day and doesn’t cost extra. When working on the first edition of “Raw Workflow: From Capture To Archive” (www.focalpress.com) I tried other Raw processing programs and found that ACR produced results consistent with the goals I am trying to achieve with my digital infrared photography. You may have different goals and may require different software, but for those of you who want to try the simple steps I use with Adobe Camera Raw to produce the digital infrared images you see in Shutterbug and my books, read on.
 RAW |
|
|
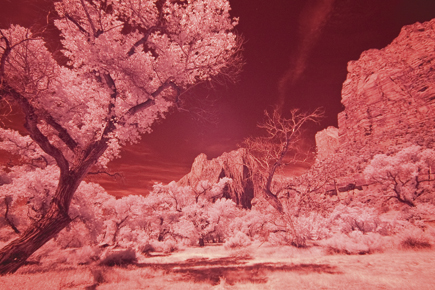
Tip: No matter if you shoot IR with filters or with a camera that’s been converted specifically for IR capture, the resultant image will have an overall magenta cast. If you want to see a more realistic preview of the final photograph on the camera’s LCD screen set your camera for Raw+JPEG capture and then set the Color mode to monochrome, or whatever your camera’s black and white setting is called. The camera will then display a monochrome JPEG on the screen but you will still have access to the unmolested (and magenta looking) Raw file for processing later.
Processing An Infrared File
The steps that follow are based on using Adobe Camera Raw 5.3 that’s part of Photoshop CS4 and Photoshop 6 and later versions. Many of the features that I’ll use to process infrared Raw files appear in earlier versions as well, but some don’t so I’ll try to make references to alternative features for users of these earlier versions.
 |
|
|
Tip: Before getting started, make sure you have the latest version of Adobe Camera Raw that’s appropriate for your particular version of Photoshop. You can download the latest version from www.adobe.com/downloads. Author’s note: Adobe updates this software from time to time usually to support new cameras and the occasional bug fix so by the time you read this the latest version may be different than the one I used.
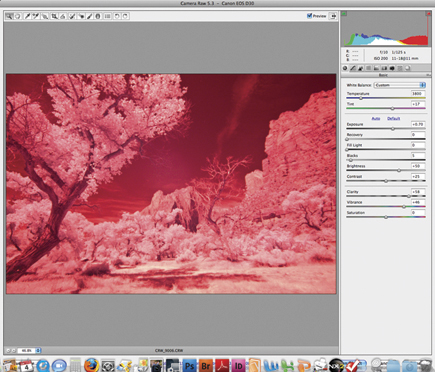
Step 1: The first thing I usually do after opening an infrared Raw file in Adobe Camera Raw is tweak the exposure slightly by moving the Exposure slider and then move the Clarity and Vibrance sliders in a positive direction. How much? It will vary by the file’s exposure and file size so let experience be your guide. Bigger files can handle bigger increases and underexposed files can handle less. Increasing Clarity increases local contrast and can add depth to an image. (If you’ve used Photoshop’s Unsharp Mask command, it’s similar to using large numbers on the Radius slider.) When moving the Clarity slider use the zoom controls in the lower left-hand corner of the ACR window to see the full effect of any changes you make. Adobe recommends that to maximize the effect you should increase the setting until you see halos near the edge details of the image and then slightly back off that setting.
 |
|
|
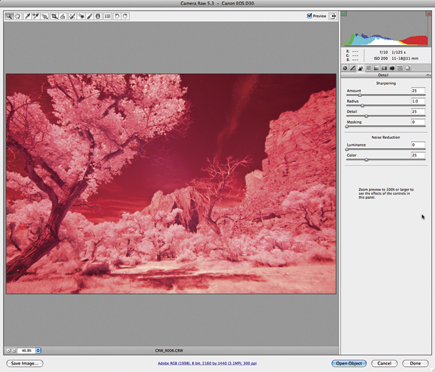
Step 2: (Optional) If you shoot with an on camera filter chances are it will produce a long exposure and there will also be some accumulative noise created by those long exposures. While you can always apply noise reduction after leaving ACR, more recent versions of the software let you apply it directly by using the Luminance and Color sliders found under the Detail tab. If your version lacks the Detail tab, you’ll need to apply noise reduction later using some of the products mentioned in “Noise Reduction Comes Of Age” in the March 2009 Shutterbug that’s also available at www.shutterbug.com.
 |
|
|
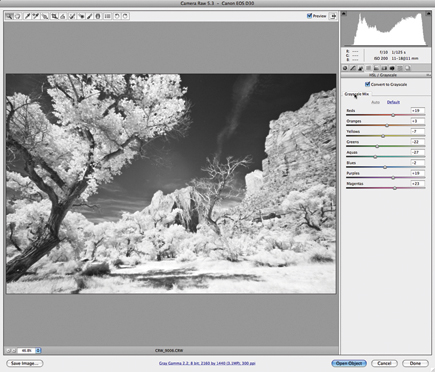
Step 3: To produce a monochrome image click the HSL/Grayscale tab and then check the “Convert to Grayscale” box. Tip: For earlier versions of ACR move the Saturation slider to zero to remove all color from the image. You can always convert to monochrome after leaving ACR through the seemingly infinite number of techniques, actions, or plug-ins available, but I prefer to do as much work with the file using Adobe Camera Raw to minimize time tweaking the image later.
 |
|
|
Step 4: If your image looks too flat, use the Tone Curve window found in ACR to adjust highlights and shadows as well as light and dark tones.
Tip: Users of earlier versions should adjust the Shadows slider until the left side of the histogram touches the edge of the graph. Similarly, adjust the Exposure slider until the right side of the histogram is near the right edge. At that point you are finished and can click the Open Image to save the file in a more portable format in Photoshop…or not.
 |
|
|
Step 5: (Optional) Lately I have taken to applying Nik Software’s (www.niksoftware.com) Tonal Contrast filter after the Raw image is opened in Photoshop. Tonal Contrast allows control over the contrast (only) of highlights, midtones, or shadows without affecting the rest of the image. You can use this filter for highly targeted control of a particular segment of an image’s tonal range. Tonal Contrast is part of the Nik Color Efex 3.0 Complete Edition.
 |
|
|
This is the way that I process Raw digital infrared files today. It is not the only way, it’s just they way I do it and that may change tomorrow as new tools are added to Photoshop and as I continue to learn new things. Yes friends, like you I am on a quest to continue to improve my photography and that means exploring new options for making images and in my case I try to learn one new thing each day.
 |
|
|
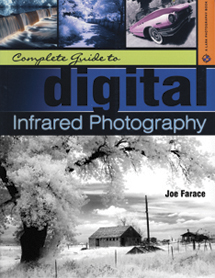
Joe Farace is the author of “The Complete Guide to Digital Infrared Photography” published by Lark Books and available at Barnes & Noble and Amazon.com.
 |


![]()
Get the Latest Photo Tips, News & Reviews from Shutterbug!
| Camera Reviews Other Reviews | Mobile Reviews Photography Reviews Columns | News | Features | How-To | Resources |
 © 2026 Shutterbug
AVTech Media Americas Inc., USA
All rights reserved