- REVIEWS
Camera Reviews 
More Reviews Mobile Reviews Photography Reviews - GALLERIES
- VIDEOS
- BUYER'S GUIDES
Photo Basics: Here’s How to Master Your Camera’s Aperture Priority Exposure Mode (VIDEO)

This is the latest tutorial in an ongoing series of photo primers we’re featuring, designed to give you a better understanding of how a camera works so that you can choose the best settings for the scene you are shooting. This episode explains the Aperture Priority exposure mode and when you should use it.
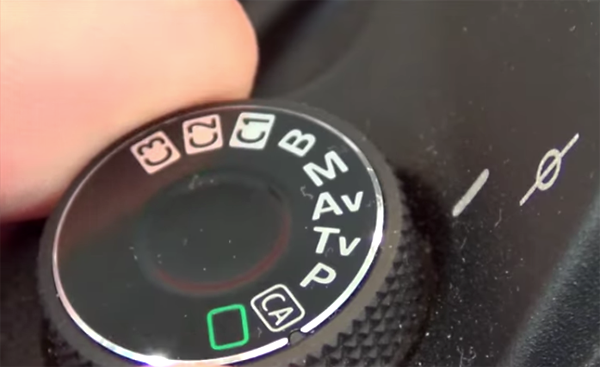
Photographer Christian Tudor is an instructor at the Academy of Photography, and he reviews the concept of aperture and how it contributes to both a proper exposure and the depth of field in an image. Like his earlier primer on Shutter Priority exposure mode, this simple tutorial will help you capture photos exactly as you want them to appear.

You select the f/stop when shooting in the Aperture Priority Mode, and based upon that choice and the ISO setting, the camera determines the appropriate shutter speed for a correct exposure. This all has to do with the so-called “Exposure Triangle” that we covered in an earlier article.

For this simple demonstration, Tudor lines up a row of water glasses on a table. He then photographs the scene using a sequence of aperture settings from f/2.8-f/22 to illustrate how depth of field increases as a lens is stopped down. You’ll see that the overall brightness of the images remains the same. That’s because in Aperture Priority mode, the camera automatically compensates with slower shutter speeds as the lens opening is decreased.

You can find more helpful videos on the Academy of Photography YouTube channel. And after watching this tutorial you may want to look at the previous episode, explaining Shutter Priority mode and when to use it.


![]()
Get the Latest Photo Tips, News & Reviews from Shutterbug!
| Camera Reviews Other Reviews | Mobile Reviews Photography Reviews Columns | News | Features | How-To | Resources |
 © 2026 Shutterbug
AVTech Media Americas Inc., USA
All rights reserved