- REVIEWS
Camera Reviews 
More Reviews Mobile Reviews Photography Reviews - GALLERIES
- VIDEOS
- BUYER'S GUIDES
Output Options; Selective Sharpening; An Ideal Choice For Portraits Or Blurry Backgrounds With An In-Focus Subject Page 2
 |
|
|
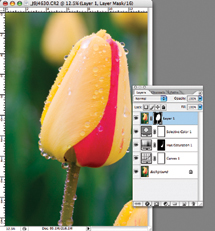
Paint over the area you want to have the sharpening visible and as you paint
you'll notice the Layer Mask icon is changing to reflect where you've
painted, and the sharpened image is starting to show.
If you find that you've gone too far with your painting, just switch to
black by clicking the black square (or simply press X to toggle between black
and white) and paint back over the areas you want to hide. Once you've
revealed all of the areas you want the sharpening applied to, you're done!
 |
|
|
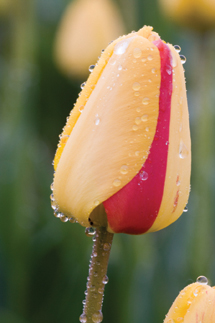
One of the biggest advantages to using selective sharpening, outside of the
obvious, is that you can sharpen each area of your image at the optimal settings.
This is done by adding multiple layers and sharpening each appropriately, and
then applying a layer mask to each layer.
Jon Canfield is a popular instructor and author of several books on digital
imaging, including "Print Like a Pro" and "RAW 101."
You can visit Canfield on the web at: www.joncanfield.com.
|
| |||||||||
- Log in or register to post comments


![]()
Get the Latest Photo Tips, News & Reviews from Shutterbug!
| Camera Reviews Other Reviews | Mobile Reviews Photography Reviews Columns | News | Features | How-To | Resources |
 © 2025 Shutterbug
AVTech Media Americas Inc., USA
All rights reserved