- REVIEWS
Camera Reviews 
More Reviews Mobile Reviews Photography Reviews - GALLERIES
- VIDEOS
- BUYER'S GUIDES
Olympus OM-D E-M10 Mark III Mirrorless Camera Review
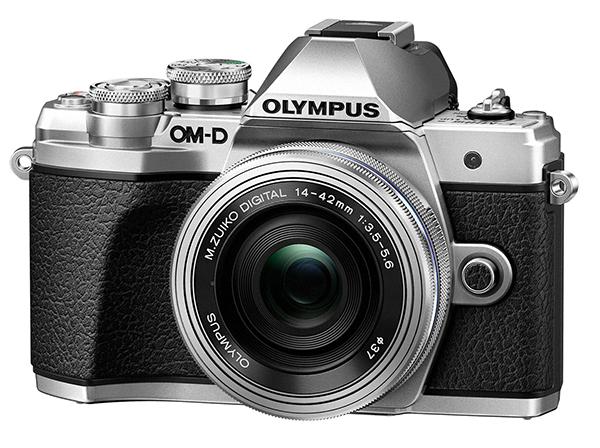
The Olympus OM-D E-M10 Mark III is the latest iteration of a long and storied lineage that began in the early 1970s with the introduction of the then-revolutionary OM-1 35mm SLR film camera. As is with the new digital Mark III, the analogue OM-1 was a lightweight and portable camera that posed a viable alternative to the comparatively bulky SLRs of the day.
Design & Features
The new Olympus E-M10 Mark III is styled in very similar fashion to the classic OM-1, given you allow for the usual digital camera buttons and dials. Indeed, the Olympus E-M10 Mark III and OM-1 have nearly identical dimensions and weight; the main difference in weight is that the metal body of the OM-1 is about four ounces more than the largely plastic Mark III.
There are some updates from the Olympus E-M10 Mark II model introduced in 2015. In sum, you now get 4K video in addition to Full HD, with improved slow motion to boot; a new image processor, the TruePic VIII found in the flagship of the line, the E-M1 Mark II; more AF points: 121 versus 81; faster AF performance; and, in the minus category, the inability to work with wireless flash.
In short, a few technical and cosmetic changes, but not any reason to rush out and replace your Olympus E-M10 Mark II. On its own, however, this is a thoroughly modern camera aimed at the photographer who wants an affordable and portable camera with a good range of imaging options.
Priced at $649 (body only), the Micro Four Thirds-format Olympus E-M10 Mark III sports a 16.1MP Live MOS sensor with a TruePic VIII processor that can deliver a shooting rate up to 8.6 frames per second (fps) (note: burst max is 22 Raw and 36 JPEG) plus has a built-in five-axis sensor-shift stabilizer. The ISO range is from 100 to 25,600, more than enough for 99% of captures, with +/-5 EV compensation capability.
Topping off some major specs it has, like many cameras these days, touchscreen controls, plus a tiny built-in fill flash, a three-inch tilting LCD, and a 2.36 million RGB dot electronic viewfinder. Given the price, specs, and numerous Art and Scene modes, you could rightly consider this an entry-level camera, but frankly, it’s getting more and more difficult to differentiate such a sophisticated and many-featured camera from a so-called enthusiast model. Yet, when talking about the camera with an Olympus spokesman prior to my testing he emphasized “simplicity” as the watchword, thus, I suppose, defining its primary target audience.
Handling & Layout
The Olympus E-M10 Mark III is decidedly small in hand, although a thumb rest on the right rear body helps. There’s a large mode dial on the top right with a host of imaging options to choose from: full Auto; Scene mode selection (SCN); AP (for “advanced” operation); ART, with numerous snazzy and fun filters; Movie, a stop and start video button; and the usual Exposure modes (M, S, A, and P).


There’s an AEL/AFL button on the Olympus E-M10 Mark III for holding chosen focus and exposure points, although it is tiny and I found using slight pressure on the shutter release just as easy. Two relatively large knurled rings on the top handle numerous tasks, including changing aperture or shutter speed when in their respective priority modes; setting exposure compensation; choosing and moving through menu items and options; changing aperture and shutter speed equivalent exposures in Program mode; and more. In short, these rings are multifunctional to the max.
All I can say is that practice makes perfect, as there are many paths and ways of making settings in the menu’s labyrinth. On the back of the Olympus E-M10 Mark III are the usual menu, display, and playback options, and a circular control dial for making menu selections and quick access to ISO, continuous shooting, flash, and more functions. There’s also a “shortcut” button on the top left that provides quick access to commonly (and some not so commonly) used menu items and selections.
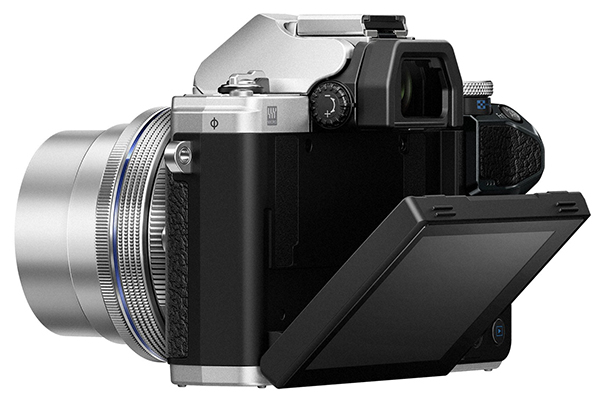
The touchscreen-capable three-inch LCD on the Olympus E-M10 Mark III articulates but neither tilts side to side nor flips: flipping is good as you can hide the glass against the body when packing or carrying. It is the gateway to the menu and many other function-setting elements of the camera. The LCD dominates the back and is probably why some of the function buttons are quite small. It is nice and bright but like most such screens is subject to the usual bright sunlight problems and, when shooting verticals with polarized sunglasses, simply blanks out (not the screen but the view of the photographer). The screen can get fairly busy as it is used for both viewing and making menu selections, either touchscreen or dial and button style, but the view can be changed using the INFO button to get you all or none of the setting displays.
Touchscreen is all the rage and here you activate it by finding and, well, touching a small icon of a button with a finger pointing at it on the left side of the LCD. This on/off is good as it prevents unwanted exposures. Touch control comes into play on the Olympus E-M10 Mark III mainly when you are making selections within the Scene, Advanced Settings, and Art Filter modes; touching the selection also gives you a preview on the LCD screen.
In some cases, you single touch a menu item on the Olympus E-M10 Mark III and then double touch it to get the options; in others you can swipe along Scene or Art Filter options, etc. In some cases, touch control works and in others, for reasons I could not fathom, it did not, but after working with it for a while I came to the conclusion that it all depended on what shooting mode you had chosen.

Touchscreen shooting technique has a motion and language all its own and some folks like it for everything and others use it selectively. For me it’s still kind of a novelty so I play along but usually find the dial and button menu selection route more efficient: guess it’s the old dog/new tricks syndrome. Touch shutter release on the Olympus E-M10 Mark III is pretty straightforward: touch the area on the screen you want to focus upon and the system focuses and snaps the shutter.
As to the Olympus E-M10 Mark III’s EVF, I have to admit my bias against this type of finder, so take that into account when I say that I have seen lots worse. The refresh rate is very good unless you are following a hockey fast break from rink side, in which case it resets fairly quickly; the low-light performance is impressive.

Like all EVFs it does not handle very high contrast particularly well, although again the response to changes in ambient light is quick and bright. In any case, it is the only real option when, as mentioned, you are shooting verticals with polarized sunglasses or lighting conditions around you, or your point of view, cause the LCD to become useless as a framing or settings finder.

Conclusion
I had the Olympus OM-D E-M10 Mark III for about 10 days during a trip to northern New Mexico. Olympus supplied me with only one lens, the M.Zuiko Digital 14-42mm f/3.5-5.6 (28-84mm equivalent focal length, about $299), a very compact, lightweight motorized zoom. I concentrated my tests on the handling procedures and imaging options in the field and working with the so-called “Advanced” and Art modes, as well as the usual Exposure modes and patterns. Please check the captions under the images for more information and comments. For the most part the dials, menu organization, and overall build is sufficient to most needs, although the battery/SD slot and Micro USB and HDMI connection covers are a bit flimsy.
While I didn’t get hung up on the “simplicity” mantra posed by the Olympus spokesman, I took the intended user into account when judging the functionality and operability of the Olympus E-M10 Mark III . When exploring the many options it is anything but “simple” and offers controls similar to those found in an enthusiast model. It takes some time and trial and error to find your way, and you really need to fully explore the (only) online 150+ page instruction book: there is a basic “Getting Started”-type manual packed with the camera.
There is not what I would call an intuitive path to some of the settings. There are small-size access points (like touchscreen activation) tucked away in parts of the screen whose function only becomes evident by consulting the online instruction book. There are six main menu options with many submenus, plus a kind of quick menu access (“shortcut”) button on the top left that displays many functional elements. After playing with the dials, buttons, and displays for a while I got it down, and was able to access all of the myriad functions and modes with some ease. Most of us find what we use most and learn to get there quickly, and after working with the camera during a number of shooting excursions I was pleased and often pleasantly surprised by just how much the Mark III affords.
All in all, the Olympus OM-D E-M10 Mark III proved itself to be an impressive and highly portable camera that could serve as an excellent traveling companion. It is an affordable option for those who want a compact camera with interchangeable lens capability.


![]()
Get the Latest Photo Tips, News & Reviews from Shutterbug!
| Camera Reviews Other Reviews | Mobile Reviews Photography Reviews Columns | News | Features | How-To | Resources |
 © 2025 Shutterbug
AVTech Media Americas Inc., USA
All rights reserved