- REVIEWS
Camera Reviews 
More Reviews Mobile Reviews Photography Reviews - GALLERIES
- VIDEOS
- BUYER'S GUIDES
Macro Light Painting: Macro Light Painting
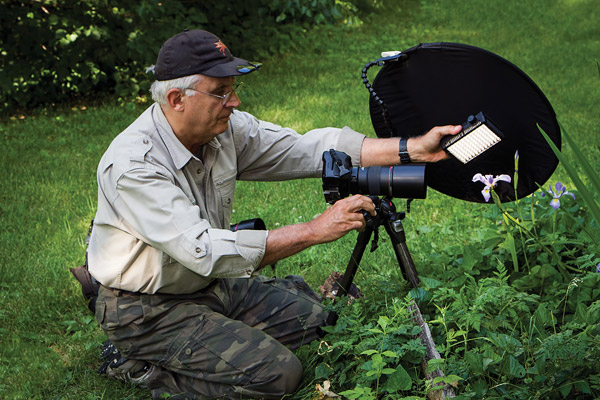
In order to get the maximum flexibility, I handhold the light and view the subject through the digital “Live View” (LV) screen on my Canon 5D Mark II. This makes it easy to see where the light should be placed for best results and identify where burnout might occur, even with water drops.
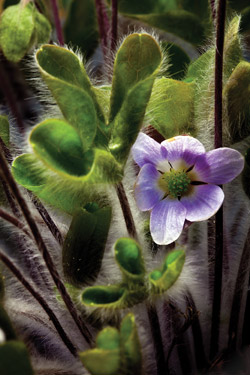
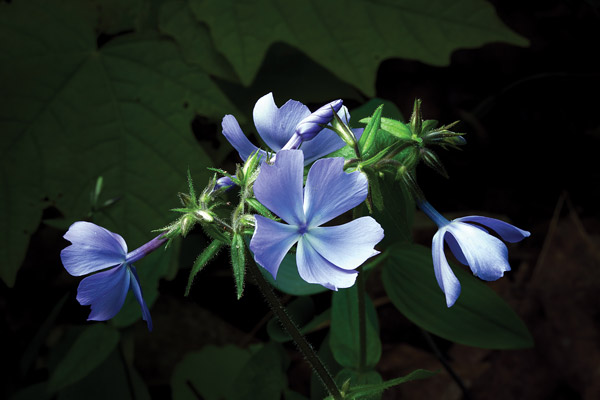
I paint the light carefully, and only brighten those areas that need added emphasis. I avoid lighting the background so it stays darker, my aim being to have the viewer focus on the brighter focused object and then stray to the darker areas.
Macro Setup
I rely on shutter speed for my main exposure variable, with aperture set to define depth-of-field. The only limiting factor to shutter speed is how long the object will remain still. My method is fairly simple.
1. I set the exposure mode to Manual.
2. I set the viewfinder system to LiveView, which places the mirror up.

3. I use the 5X or 10X LiveView magnifier for focusing accuracy.

4. I set the aperture at f/22 or even f/32 (if needed) to get deep depth-of-field.
5. I turn off the Image Stabilization on my lens, because the camera is set on a sturdy tripod.

6. I turn the Auto Focus off, because with macro work AF more often gets in the way than helps.

7. I use an IR shutter release to further minimize vibration.
I choose a narrow aperture because my main objective is to get a tack sharp subject. In terms of lighting, I prefer a background noticeably darker than my main subject.
Ideally, I want a shutter speed of ½ to 1½ sec, or longer, so I can use the time to paint with light. The use of a variable neutral density filter may be necessary to lengthen shutter speeds, although working in overcast or fairly dim light, keeping the ISO at a minimum and using very narrow apertures usually allows me to work with longer shutter speeds. If needed, I use a 2 to 8 stop Tiffen (www.tiffen.com) Variable Neutral Density (VND) filter for maximum flexibility.
Exposure Technique
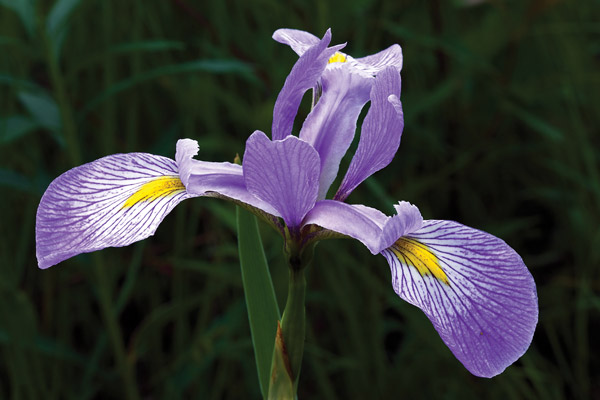
I adjust the Tiffen VND filter so the camera’s meter indicates that the shot is 1 to 1½ stops too dark—that’s why I use Manual Exposure mode. The next step is to release the shutter and at the same time paint the object with light. I find that a 1-second shot is plenty of time to backlight the leaves and then move the light to front-light the petals—this comes with experience, and you might need more time to get it right when beginning.
I move the light around during the exposure to get the best effect. If the shot comes out a little too dark I decrease the shutter speed slightly to add more light until I get where I want it to be. I shoot Raw so the White Balance can be adjusted later, as needed. One word of caution—avoid having the light shine directly into the lens as that will cause streaking, lens flare, ghosting and loss of image contrast.
Of course, testing is necessary. I have found that the output from the Litepanel MicroPro will raise the light on the subject up 1-stop in 1 second when placed close, but just outside the lens view. If the exposure needs adjustment there are a few things to try: shorten or lengthen the shutter speed or vary the Neutral Density filter to add or reduce light. White objects need less light. Dark purples or blues need more light. The Litepanel MicroPro has a variable intensity switch to give a little more control. The concept is much like shooting in Bulb mode, where the light is accumulated on the sensor over a fixed time and the finished shot is not visible until saved and observed on the camera’s viewer.
With this tool I can shoot in many lighting conditions, almost in direct sun. Could I emulate these exposures in Photoshop? Probably. But am I outdoors shooting all of the images that I have sought for years? That’s an emphatic yes! There is a slight learning curve here, but don’t get discouraged and you’ll find that controlling light for macro has never been easier and more rewarding.
Toolkit
A Canon 5D Mark II camera.
A Canon 100 Macro L II f/2.8 IS lens with a tripod collar.
A Manfrotto tripod and a 468MGRC2 ball head with quick release.
A Tiffen Variable Neutral Density lens filter (2–8 stops).
Remote Canon IR shutter control (RC-1) with a Canon cable release as a backup.
The Litepanel MicroPro.
2 Plamps that are used to hold a defuser and control obstructions.
A small oval light diffuser.
Litepanel Specs
Size: 5.5x3.75x1.5” (without shoe)
Weight: 10.5 ounces
Power Draw: 9 watts
Power: 6 AA batteries (internal)
Daylight Output: Cool white - 5600°K
Filters Include: 3200ºK Tungsten conversion (warm white) 1/4 warming, diffusion (integrated filter holder)
Comparative Luminance Output: Approximately 50W
Price: Kit, $350
Resources
Canon USA, Inc., www.canonusa.com
Manfrotto Distribution Inc., www.manfrotto.us
The Tiffen Company, www.tiffen.com
Litepanels, www.litepanels.com
Author Contact: khwilcox@sbcglobal.net


![]()
Get the Latest Photo Tips, News & Reviews from Shutterbug!
| Camera Reviews Other Reviews | Mobile Reviews Photography Reviews Columns | News | Features | How-To | Resources |
 © 2026 Shutterbug
AVTech Media Americas Inc., USA
All rights reserved