- REVIEWS
Camera Reviews 
More Reviews Mobile Reviews Photography Reviews - GALLERIES
- VIDEOS
- BUYER'S GUIDES
Home-Grown Special Effects
Edges And Borders

Vignette
One of the most widely used effects also happens to be one of the easiest to
create--the vignette. This is where your subject is in the center of the
frame and the edges softly melt into white. While you can use it with almost
any subject, it is most often seen with portraits. Choose an image where the
subject you want to vignette is centered, or at least surrounded by a background
that can be partially deleted. Open the photo you want to vignette, duplicate
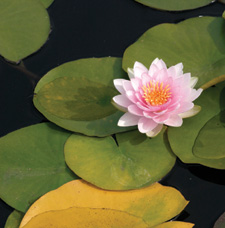
it, Image>Duplicate. Close the original and work on the copy. Here I selected
a water lily blossom and some lily pads, #1. Vignetting the flower will isolate
it graphically and create a distinctive look.
 |
|
|
Go to the toolbar and select the Elliptical Marquee tool--it's nested below the Rectangular Marquee tool, #2. Click and drag with this tool to draw a large selection around the area that you want to be the subject of your vignette. If you draw it slightly off-center, don't worry. Once the ellipse is drawn, you can move the cursor inside it and drag to reposition it. If you don't get it the first few times, simply Edit>Undo and try again.
 |
|
|
Now we want to delete the background, not the subject we've just selected.
Choose Select>Inverse to change the selection to the background. Next, for
the soft edge effect, we need to feather the selection. Choose Select>Feather
to bring up the Feather Selection dialog box. Set the Feather radius to about
25 pixels for a 12MB size image, less for a smaller image. Experiment with different
settings to get the look you like. The higher the radius, the softer the edges
will be.
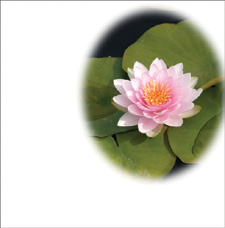
Once you've feathered the selection, simply hit the delete key on your
keyboard and the selected parts of the image will be deleted, allowing the white
background to show through, #3.
 |
|
|
Since the flower in this photo was off-center, I had to use the Crop tool to crop out the excess white background. Finally, using the Image>Canvas Size command, I added a little extra white to the right side of the picture in order to center the vignette, #4. You won't have to do this last step if you select a photo where the subject is more centered.
 |
|
|
Pattern Border
Another nifty trick to create an unusual border or frame is to select a texture,
object or pattern from within the photo and use that to create a border with.
Here, I began with a photo of a 19th century floral print copied from a book,
#5.
 |
|
|
Using the Rectangular Marquee tool, I selected the stamp image seen at the lower left corner of the photo, #6. Then I used this to create a new pattern: Edit>Define Pattern. This adds the area you select from your photo to the library of patterns that ship with Photoshop.
 |
|
|
Next, I needed to add space around my original photo to create a border which I would then fill with the pattern. I chose Image>Canvas Size, checked the Relative check box (it's important to do this step first), and added 1 inch to the width and height, #7.
 |
|
|
Once you click OK, a uniform 1" white border is added around the original photo, #8.
 |
|
|
The next step is to make a selection of this new white border and then fill
it with the pattern. To select the white border, use the Rectangular Marquee
tool to make a selection that just fits around the original photo, with the
white border outside. Then choose Select>Inverse to select only the white
border.
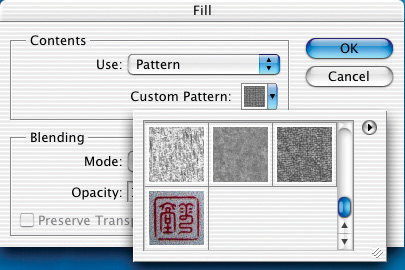
Finally, choose Edit>Fill. In the Fill dialog box, #9, under Contents, go
to the first area labeled Use: Click on the double arrows to activate the drop-down
menu and choose Pattern. In the next line down, the previously greyed out Custom
Pattern
drop-down menu is now available.
 |
|
|
Click on the downward arrow to the right of Custom Pattern and you'll see thumbnail size images of the patterns that are included with Photoshop, #10. Scroll down through these to find the new pattern that you created--it will be at the end of the thumbnails. Click on this pattern (the stamp) to select it, then click OK.
 |
|
|
In a few seconds, the white border will be filled with the pattern you created, #11. Your photo is now surrounded by a totally unique border or frame.
 |
|
|
So select a handful (mouseful?) of your images and decide how one of these techniques might enhance them. As soon as you try a few, you'll find you can generate a nearly infinite array of edge and border treatments that can be applied to a wide range of subjects to take them into a new dimension.
ContactAdobe Systems Inc.
(800) 833-6687
www.adobe.com