- REVIEWS
Camera Reviews 
More Reviews Mobile Reviews Photography Reviews - GALLERIES
- VIDEOS
- BUYER'S GUIDES
Get More Highlight And Shadow Detail
Get More Highlight And Shadow Detail
Using A D-SLR’s Dynamic Range Expansion Feature
by Peter K. Burian
In an ideal world, all digital photos would be technically perfect: well exposed and exhibiting detail in all areas including any bright segments, the mid-tones and in dark shadow areas. While that level of detail may be possible in photos taken in “flat” illumination, as on an overcast day, real world lighting often produces very high contrast results. Whether you’re shooting outdoors on a sunny day or indoors in a location with dark plus bright areas, the images may not be technically perfect. Overall, the effect is likely to be harsh with black shadows, excessively bright highlights, and underexposed mid-tones. Except in close-up photos, flash is not a practical solution to high contrast, so you’ll want to consider alternatives. There are several, including high-tech amenities available with some D-SLRs for generating images with greater highlight and shadow detail.
 |
 |
|
 |
 |
|
 |
||
|
||
The Traditional Techniques
In any high contrast situation, you might consider using exposure compensation. Plus compensation (or opening up in Manual mode) can ensure that important mid-tones and dark areas are well exposed but then the highlight areas will be too light in tone. The brightest highlights will be “clipped” or “blown-out”, without detail or texture. If you decide to expose for the highlights instead, the mid-tones may be too dark while shadow areas will be “blocked up”, revealing little or no detail.
Many photographers simply shoot a JPEG without compensation perhaps with a low setting for the in-camera contrast level. Later, they’ll “fix” the photos with imaging software, using Curves, Levels or a utility for modifying Highlight and Shadow brightness. While low contrast will reveal more detail, the editing process can be time-consuming; as well, extensive modifications can degrade JPEG quality. More importantly, this tactic can produce an artificial-looking effect unless it’s done with some expertise.
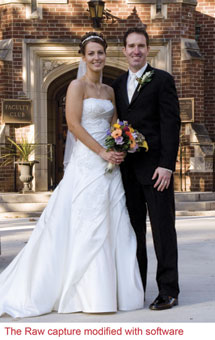
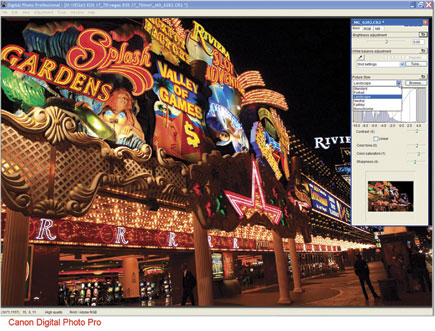
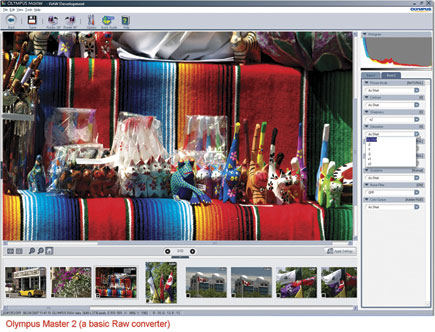
Raw Capture mode is definitely preferable to JPEG because the raw data files have greater latitude for modifications re: exposure, contrast, and other aspects. Use the advanced tools in a Raw Converter program to maximize detail in desired areas of your photos and then fine-tune them in a conventional image-editing program. With some skill you can certainly produce very good results, but the process can be very time-consuming when you have numerous images to correct.
There’s a really cool technique too, called HDR (High Dynamic Range) which can produce dramatically more detail in both highlight and shadow areas. This usually requires shooting three (or more) identical photos with the camera on a tripod, at different exposure levels and then merging them into a single image with HDR software. This strategy works well, especially for dramatic images, but it’s definitely not an all-purpose technique for everyone.
 |
 |
|
 |
 |
|
 |
 |
|
 |
 |
|
|
||
The Primary In-Camera Solution
Because high contrast is a common problem, an increasing number of D-SLRs include a feature—in Capture mode—for modifying the gamma curve to provide a wider tonal range. All of the recent Canon, Nikon, Pentax/Samsung, Olympus, and Sony D-SLRs include a function of this type; it’s easy to use and is intended for everyday JPEG picture-taking. Each company’s technology differs but typically, extra processing improves images made in high contrast lighting by lightening shadows and some mid-tones; some systems can also tone down very bright highlight areas.
Not every situation calls for expanding the tonal range, but this feature can be useful as a problem-solver in high contrast lighting. It’s particularly helpful in backlighting when a distant subject is beyond the range of electronic flash; the high-tech option can lighten the underexposed area without making a bright background any brighter. There’s no real need for tonal range expansion when shooting raw format photos. In fact, most cameras disable this feature in Raw Capture mode.
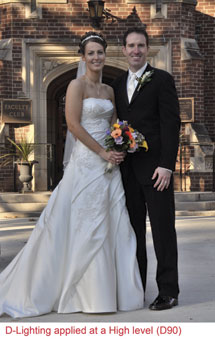
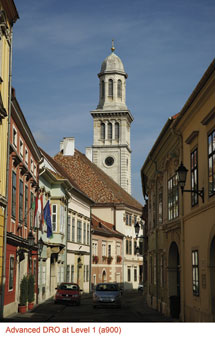
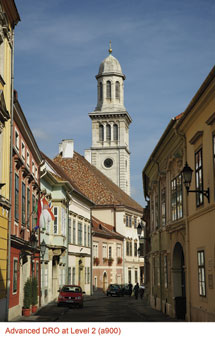
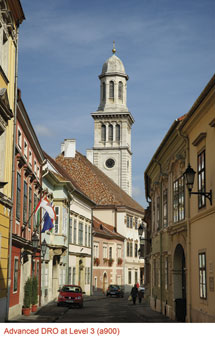
The Canon EOS cameras produce a subtle effect (with Auto Lighting Optimizer and/or Highlight Tone Priority) although the EOS 50D and EOS 5D Mark II offer higher level options too. The Olympus Shadow Adjustment feature provides two levels plus a high key and a low key setting. Nikon’s Active D-Lighting provides three levels (five with the newer D90 and D3x) for great versatility. Most of the Pentax and Samsung D-SLRs provide a mild effect with their Expanded D-Range 200 percent feature but the new K2000 can provide stronger effects with a Shadow Compensation function. Sony’s Alpha D-SLRs provide a Dynamic Range Optimizer with a Standard mode (very subtle) and an Advanced mode (more useful). The Sony a700 and a900 are more versatile, with a full five user selectable DRO (Dynamic Range Optimizer) levels from low right up to very high for more dramatic results.
 |
|
 |
|
 |
|
|
In-Camera “Retouching”
Another type of shadow lightening feature (called D-Lighting, HDR, Auto Gradation, or Shadow Adjustment) is available with recent Nikon, Pentax, Samsung, and Olympus D-SLRs. This type of “retouching” option can be accessed in Playback mode and applied to specific images requiring technical improvement. Also available with many compact digicams of most brands, it’s primarily intended for fixing underexposure in a backlit shot. Some camera’s retouching features include a wide range of other enhancing options too, including exposure modification and special
effects filters.
While viewing a JPEG you can activate the tonal range expansion feature; extra processing will modify the image. The retouched JPEG will be saved to the memory card; the original photo will also be retained. Some cameras (though not Olympus D-SLRs) provide several intensity levels; you can try each one and later delete all but the “best” of the photos. A low setting will produce minimal improvement while a high setting will provide a more obvious lightening. Based on my experience with all brands of cameras however, even the highest level was not adequate to solve more than a 0.67EV (2⁄3 stop) underexposure problem.
In-camera retouching can lighten dark photos for some improvement but the extra manipulation is applied to a fully processed image. It’s preferable to use a dynamic range expansion feature in Capture mode, particularly at high ISO levels. When the tonal manipulation is applied to high-bit raw data before a JPEG is actually created, image quality is better. Also, a high level for dynamic range expansion in Capture mode—versus a high level in Playback mode—is more effective in correcting underexposure. In any event, the post-processing feature is worth using when you plan to make prints direct from JPEGs on a memory card.
The Bottom Line
After extensive testing of many camera’s high-tech features, I concluded that raw capture—and the tools in a converter program—are still the best bet for correcting underexposure or the problems caused by high contrast lighting. But sometimes you want to shoot JPEGs. That’s when you might want to try the tonal range expansion feature, preferably in Capture mode. Check out some of my sample photos for an indication as to when you might use this amenity and the types of effects that are possible. If your D-SLR includes such technology, experiment to determine the exact effects it will provide with every available level. Based on my experience that testing will pay dividends, with more technically and visually pleasing JPEGs that will require less work in a computer.
Tip:
Digital noise is always a concern whenever you lighten shadow and mid-tone areas—in the camera or with imaging software—because the “speckles” (noise pattern) also become more visible. Hence, this feature is best for images made at ISO 50 to ISO 400 where “graininess” is rarely an issue. To minimize the need for any type of image lightening, try to avoid serious underexposure; use flash and/or exposure compensation when practical and appropriate.


![]()
Get the Latest Photo Tips, News & Reviews from Shutterbug!
| Camera Reviews Other Reviews | Mobile Reviews Photography Reviews Columns | News | Features | How-To | Resources |
 © 2026 Shutterbug
AVTech Media Americas Inc., USA
All rights reserved