- REVIEWS
Camera Reviews 
More Reviews Mobile Reviews Photography Reviews - GALLERIES
- VIDEOS
- BUYER'S GUIDES
Flash Basics: Power And Position
Guide Number
The power and reach of an electronic flash is defined by Guide Numbers. Just like lenses are defined by their maximum lens aperture and focal length, flash units are rated according to the amount of power they emit. This number is an agreed upon standard used by flash makers to tell you the potential, and the limits, of the flash built into your camera or the accessory flash you mount on your camera’s hot shoe. The Guide Number (GN) should be rated using a scale that sets the base line at ISO 100 and feet (or meters). This means that using the GN you can figure out the relative power of different flash units in terms of how far away a subject can be and still be illuminated by the flash when the camera is set to ISO 100. (Be sure to read the specs carefully, as some flashes actually “cheat” a bit and give you a GN based on ISO 400!)
I know many people are instantly out of their comfort zone when dealing with math, and I apologize for beginning this discussion of flash photography with a formula. However, it’s a very simple one and I promise it’s the only math in this issue. Here’s how it works:
GN = distance x f-stop, thus:
GN/distance = f-stop, or
GN/f-stop = distance
For example, if the Guide Number of a flash is 80, you will get a proper exposure at 10 feet with a lens aperture of f/8. The formula would look like this when the numbers are plugged in:
80 = 10 x f8
80/10 = f8
80/7 = 10
When you are shopping for a flash and looking at the specifications, the Guide Number will probably look like this: 24/80 (m/ft) at ISO 100, the “m/ft” obviously being meters and feet. Therefore, if you are thinking in feet, the GN is 80. If you use the metric system, the GN is 24.
To give you a sense of scale, the Guide Number on a pocket-sized point and shoot that sells for about $300 may have a GN of 31; your built-in flash might have a bit more power. By comparison, a top of the line portable flash unit that fits in your camera’s hot shoe may have a GN as high as 190. Plug these numbers into the formulas above and you’ll get a sense of what you can do with an accessory flash unit. If you need the power (and the coverage) then an accessory unit makes sense. If you only occasionally use flash and even then only for fairly close fill flash work, then your built in will do fine. All told, Guide Numbers give you a sense of comparison with respect to power.
The advantages of a more powerful flash are significant. You can reach into the distance more effectively to illuminate a subject farther away. For example, to properly expose the Balinese dancers performing on stage (#1), you would have to sit in the first few rows in the audience if you were using a point and shoot camera. However, with an accessory flash, you could sit 42 ft away and still get a good exposure. How do I know this? Using the above equations, it’s easy to figure out.

All Photos © Jim Zuckerman
For example, 190/42 = (f) 4.75, so an aperture between f/4 and f/5.6 would yield a good exposure.
If the GN is 31, you have no chance of getting any exposure unless you really raise the ISO high, which always compromises image quality. How close would you have to get for a good exposure with a built-in with a GN of 31 at ISO 100?
Even if the maximum aperture on your lens is f/2.8, the distance you would need to be from the dancers to get a good exposure is:
31/2.8 = 11 ft
There’s no underestimating the benefit to image quality using a lower ISO affords. In addition, with a higher GN you can also opt to use a smaller f/stop for increased depth of field. And finally, additional power gives you the ability to bounce the flash off the ceiling or the wall to soften the light on a subject, a technique we will cover later.
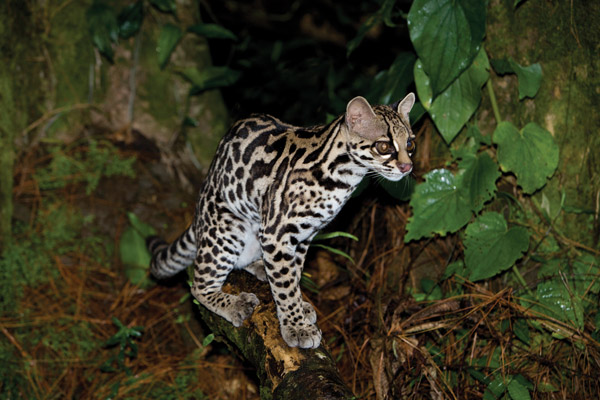
It is true that in the past, when we all shot film, knowing the Guide Number of the flash was much more important than it is today. Photographers used the GN to calculate the correct f/stop because once the flash-subject distance was measured the lens aperture was a simple calculation. A case in point is a picture I took of a baby ocelot (#2). The small jungle cat was orphaned and being raised at the lodge where I was staying in order to be released into the wild. I was able to get close and I had time to make the mental calculation to determine exposure. This was taken with film in the 1980s, and the flash I carried at the time had a Guide Number of 120. I took this picture from about 6 ft away, so the lens aperture could be calculated to be 120/8, or f/15. Back then we didn’t have digital precision in lens apertures, so I used f/16.

Today, Guide Numbers are used primarily in deciding which flash to buy. Photographers are interested in knowing how powerful they are, and after that the math is not needed because of the accuracy of Automatic Exposure modes.
Inverse Square Law
It’s important to know about a law in physics that most people never think about, but when it comes to using flash it is quite relevant. It is called the Inverse Square Law, and it describes how quickly light loses its strength as it travels outward from a light source. We would normally expect that as light travels from a flash, for example, it should be reduced in power by two times as it travels twice the distance. The difference between illuminating a subject 10 ft from the flash and 20 ft should be half the light. That seems reasonable. The truth, however, is that light is diminished by four times instead of twice.
What this means in practical terms is that if you move back away from the subject just a few feet, the amount of light needed to properly expose the image increases quite a bit. The example of the Balinese dancers makes this point clearly. A more powerful flash was needed to shoot from 42 ft away. Knowing this, you shouldn’t be disappointed when you are trying to shoot subjects relatively far away and the flash has little or no effect. In other words, the images turn out too dark. Blame the underexposure on the laws of the universe, and then take steps to get better exposures by doing one or more of the following:
1. Move closer. This will help you get properly exposed pictures especially if you have a small, built-in flash with a relatively low Guide Number.
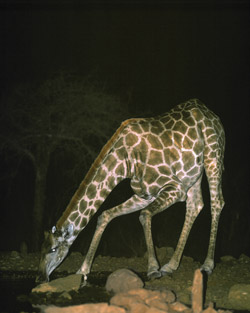
2. Use a more powerful flash with a higher GN. If the kind of flash photography you do is of subjects that are fairly far away, such as athletes at indoor sporting events, students in stage plays at school, or night photos of wildlife (like the giraffe at a waterhole (#3), then a more powerful flash will be invaluable.
3. Raise the ISO. This is an option, though it has its price. High ISO settings increase digital noise and degrade picture quality, particularly in the shadows. If there is no other choice besides ending up with images that are too dark, then it’s a no-brainer. The ISO has to be increased.
4. Use a larger lens aperture. This gathers more light into the camera so you can get away with a less powerful flash and you can shoot at great distances. It also means a lower ISO can be used.
5. Move the shutter speed off the “sync speed”. The sync speed is typically a relatively fast shutter speed—typically 1⁄125 to 1⁄250 of a second. This is the fastest speed that camera can use so that the shutter is fully open when the flash fires (if the shutter is faster than this, the shutter will open and close, or open and partially close, when the flash is triggered, giving you a picture that is partially black). By using a slower shutter speed, you can let in more ambient light. However, this will most likely require a tripod to prevent your pictures from being blurred. I recommend that if you use any shutter speed slower than 1⁄60th of a second, you should be using a tripod to guarantee sharp images.
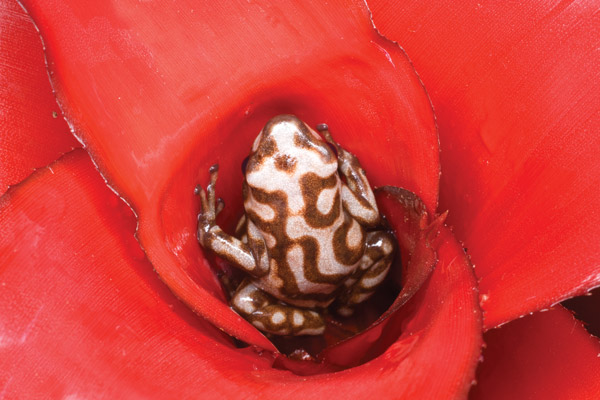
If you are shooting a subject like the poison dart frog (#4) where the background is virtually on the same plane as the subject you will have little trouble with even lighting. But sometimes flash falls off from the foreground subject to the point where it looks like the subject sits in a dark tunnel, something the eye does not see as “real”. The picture of an oncilla (#5) is a good example. The background did not look this dark to me when I was photographing this rare jungle cat in Costa Rica. It had the same level of illumination as the foreground. Due to the Inverse Square Law, however, it became very dark because the light fall-off happened so fast.
Some of this effect has to do with the way flash falls off from the point of exposure, and some has to do with the metering system and how it reads flash exposures. In some cases you can check this in the LCD and make corrections using exposure compensation techniques, which we cover later.
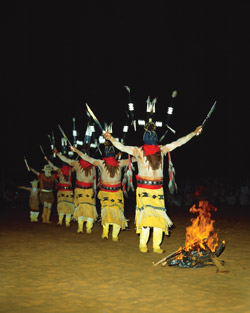
Look at the photo I took at night of an Apache ceremony in Oklahoma, (#6). Notice how the light fall-off occurs right down the line of dancers. When shooting at night, it seems like the light from the flash is absorbed like a sponge. In just a few feet you’ll see how it is diminished. Even in the low light of dawn or dusk like this photo in Venice, Italy during Carnival (#7), you can see how the light fall off occurs along the wall of the medieval architecture. In both of these examples, I could have gotten more light in the background if the shutter speed were slower because the ambient light—the firelight in the case of the Apache performers and the dawn light at Carnival—would be exposed better. However, if there is movement in your subject(s) or if you are not using a tripod, you can expect a certain amount of blur that would occur because of the slower shutter speed.


![]()
Get the Latest Photo Tips, News & Reviews from Shutterbug!
| Camera Reviews Other Reviews | Mobile Reviews Photography Reviews Columns | News | Features | How-To | Resources |
 © 2026 Shutterbug
AVTech Media Americas Inc., USA
All rights reserved