- REVIEWS
Camera Reviews 
More Reviews Mobile Reviews Photography Reviews - GALLERIES
- VIDEOS
- BUYER'S GUIDES
Faith in the Shadows
This photograph is overall too dark
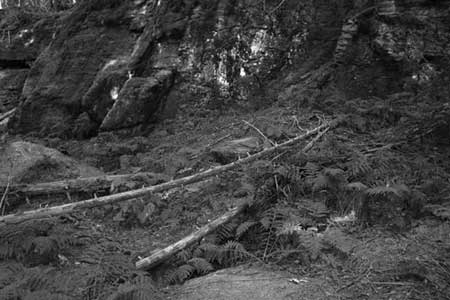
It was made with a digital camera handheld and was underexposed about a stop and a half. But keep in mind that digital images are bits of information which can be shuffled, rearranged and supplied with other information that can change their nature. The tool we are going to sue here is called Levels in Photoshop, and works with sliders and a histogram, a graphic representation of the tonal distribution--from light to dark--in the scene.
There are a number of ways to affect the tonal values in the scene. You can expand them or compress them as you wish. The Levels dialog box contains a Histogram, a graphic representation of the tonal values in the image. Every image you work on can use some adjustment of contrast and the histogram and the Levels controls allows you to make adjustments easily. In some cases you can just look at the histogram, make an adjustment and that's all you need do to "fix" the image.

What if you want to just refine an image and not change the overall (black and white) contrast? That's where the middle gray slider comes in. Once you get a handle on working with the Levels controls you have gone a long way toward enhancing your images. Play with these controls until you get a good feeling for how they work.
While the first image here matches the lighting conditions in the original scene much of the information I want to show is hidden in the shadows. Let's open the entire image up, adding brightness through added contrast. In Photoshop you can do this work on a Layer, an Adjustment Layer or, for practice, by just going to Image>Adjust>Levels. The Levels dialog box
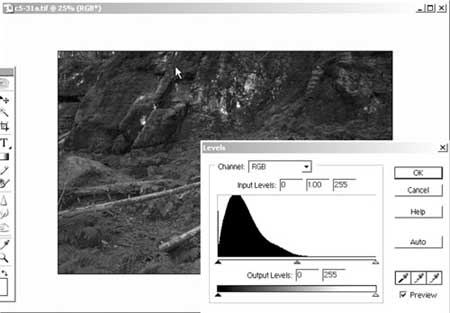
shows how the values were skewed towards the shadow areas. Note how the graph
is skewed with information towards the left hand side. Learn to read a histogram
and you can learn a lot about what's going on in the image.
The idea is to now "fill the gamut", thus open up the tonal information to a brighter interpretation. All we need do here is move the slider from the highlight (white triangle) side until it just touches the beginning of the tonal information.
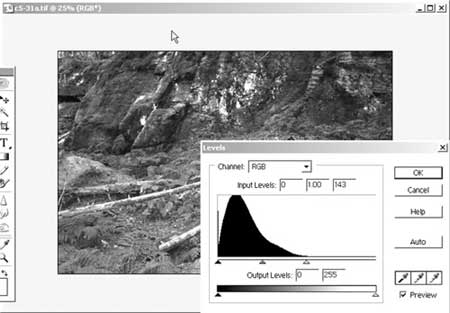
This "opens up" the image and adds more contrast. The result is a contrast adjustment that maintains the feeling of the image but opens up so many more tonal values.
While this example is in black and white this technique works just as well in color. You can nuance shade and tonality, as well as color contrast with just about every image. You can also move the middle gray slider for even more control.
So, just look at the histogram, have faith in the shadows and "fill that gamut" for a quick fix on your image files.


![]()
Get the Latest Photo Tips, News & Reviews from Shutterbug!
| Camera Reviews Other Reviews | Mobile Reviews Photography Reviews Columns | News | Features | How-To | Resources |
 © 2025 Shutterbug
AVTech Media Americas Inc., USA
All rights reserved