- REVIEWS
Camera Reviews 
More Reviews Mobile Reviews Photography Reviews - GALLERIES
- VIDEOS
- BUYER'S GUIDES
Easy Color Callout: Mix Color And Black & White In The Same Frame
In the photo with the flag bunting (#1) I’ll apply some of the tools that are built into Photoshop—even older versions of the Creative Suite should work. In the second image (#6) I’ll take it in slightly different direction and use compatible plug-ins. Read on and you’ll see that mixing black and white with color on the same image is easy, here’s how I do it.
All Photos © Joe Farace
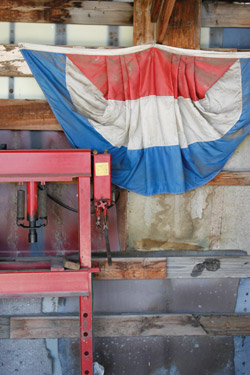
Flag Bunting
Image (#2), step 1: The original image was shot in the shade of an old shed so the lighting is a bit flat. My first step in manipulating any image is to first make it look as good as possible. I used the sliders in the Hue/Saturation (Image>Adjustments>Hue/Saturation) control panel to make the colors snap and the whites a little brighter.
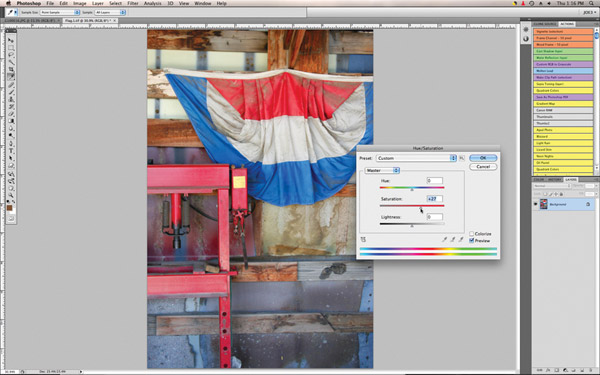
Image (#3), step 2: When I work on an image that is going to get subjective treatment I create a duplicate layer, (Layer>Duplicate Layer). Then selecting Black & White (Image>Adjustments>Black & White) and using its default setting, I create a monochrome layer that will sit atop the duped color layer. In this case, Black & White produced a flat-looking image so I used Curves (Image>Adjustments>Curves) to add some contrast.

Image (#4), step 3: Using the Eraser tool and selecting a small (the size will depend on your specific image) soft-edged brush, I erased the area around the edges of the part of the image I wished to appear in color. As you erase, you’ll see the colors show through. I used a mouse but if you have a stylus and graphics tablet the process should go faster and easier. Tip: Use the Magnifier tool to make the portions of the erased image larger so you can easily see the edges of where you’re erasing. If you don’t and erase too much, some color will bleed through and spoil the overall effect. After finishing the edges, go to the Layer’s palette and turn off (click on the eyeball icon) the background layer. This lets you only see the area within the edges, so you can use a larger brush size to clear out the entire space along with any spots you might have missed when doing the edges.

Image (#5), step 4: Turn the monochrome layer on (click the eyeball icon again) and you’re done. The finished image had a bit of burning and dodging, but that’s it.

In The Snow
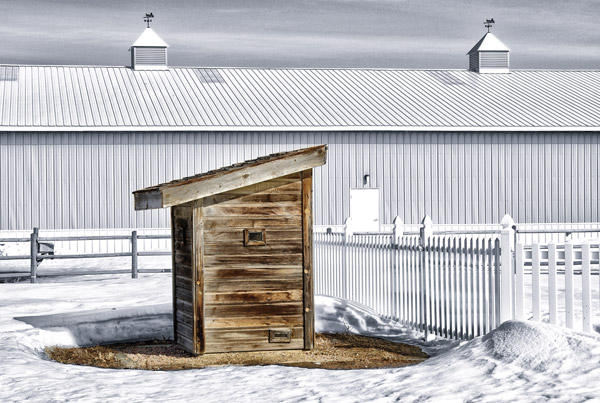
Image (#6), step 1: Open the image. The original shot was made using a Samsung GX10 with a Schneider D-XENON 18-55mm F3.5-5.6 (at 55mm) lens and an exposure of 1/60 sec at f/16 and ISO 100 with a plus 1-stop exposure to make the snow really white.

Image (#7), step 2: You don’t have to do this next part if you don’t want to but I used Photoshop’s Ruler tool and Rotate (Image>Image Rotation>Arbitrary) command to make the roof of the barn line up with the edge of the frame and then cropped it while maintaining the image’s original aspect ratio. Next, I tweaked the image using Nik Software’s Vivenza 2 plug-in to make the original image look as good as it could as well as bring out some of the wood’s texture by using its Structure slider.

Image (#8), step 3: While I could have created a duplicate black and white layer using many methods, in this case I used Nik Software’s Silver Efex Pro monochrome conversion plug-in to create one that had a blue tint—for the cold, you know. But you could use it to create a conventional grayscale layer if that’s what you prefer.
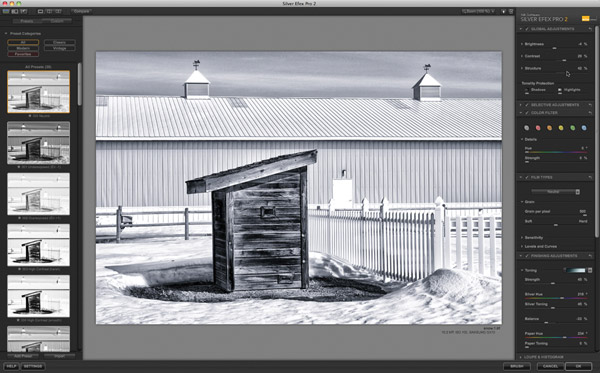
Image (#9), step 4: Now we have 2 layers: A color background layer and a blue-toned monochrome top layer so the technique here is the same as for the last image. Use the Eraser tool and select a small soft-edged brush at 100 percent opacity and erase the area at the edges of the section of the image you wish to appear in color. Tip: For sharper edges, such as the outline of this building, I switched to a smaller hard-edged brush to keep those edges clean. When doing this, it’s more than a good idea to use small strokes because if you make a mistake you don’t have to go back and re-do much of your work. After finishing the edges, go to the Layer’s palette and turn off (click on the eyeball icon) the background area. This lets you see the area within you edges, so you can use a larger brush size to clear the entire space and you won’t miss any important areas that might pop up and surprise you later.

Image (#10), step 5: To finish up, save any work you do with Layers as a .PSD (Photoshop, if that’s what you are working with) or as a TIFF file. (If you need a JPEG convert from the TIFF file later.) Both of these file formats preserve the Layers (JPEG will flatten them) just in case you want to go back and make corrections and adjustments later.


![]()
Get the Latest Photo Tips, News & Reviews from Shutterbug!
| Camera Reviews Other Reviews | Mobile Reviews Photography Reviews Columns | News | Features | How-To | Resources |
 © 2026 Shutterbug
AVTech Media Americas Inc., USA
All rights reserved