- REVIEWS
Camera Reviews 
More Reviews Mobile Reviews Photography Reviews - GALLERIES
- VIDEOS
- BUYER'S GUIDES
Diffusion Techniques: Softening Accessories
Paper: Believe it or not, placing various kinds of paper over the flash head softens the light quite a bit. I prefer white facial tissue or toilet paper because of the translucency of the material. This does cut down the light output, but not by much. One-ply softens the light nicely, and two ply softens it more, although there is more light loss as the paper becomes thicker. If neither of these types of paper is available, any kind of computer paper works as well. The paper can be taped onto the front of the flash head so your hands are free to operate the camera.
It is very easy to tape the paper against the flash head, but if you can tape it as you see in (#1), the light will be diffused and softened more than if the paper were flat against the flash head. The difference is subtle, but there is nevertheless a difference.

All Photos © Jim Zuckerman
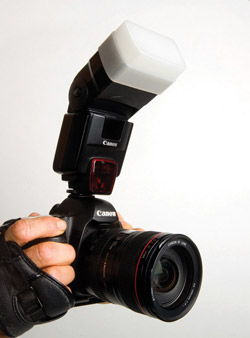
White Packing Material: An advantage of using this kind of plastic as the diffusing material is that it can be packed into a camera bag and it takes up no room, it’s weightless, and it can be used again and again. You can attach it to the flash head with a rubber band or a hook and loop fastener strip (#2) and use it as I’ve show here—where the flash head is pointing up into the plastic to bounce the light at the subject. Admittedly, if you are a professional wedding or portrait photographer, this may not impress your clients. However, it works just as well as commercially available diffusion products.

80-20 Bounce Card: A unique product from Lumiquest (www.lumiquest.com) is a card that affixes to the head of your flash with a hook and loop fastener strip (#3) and it allows 80 percent of the light to bounce and at the same time it sends 20 percent of the light directly at the subject. The result is an effective way of having a subtle front light along with a softer light that comprises most of the illumination.

Manufactured Diffusers: You can purchase commercially available plastic diffusers that fit over the flash head and soften the light. These look professional (if that’s important to you), and they do an excellent job. One of my favorites is the Omni-Bounce (www.stofen.com) (#4) because it’s small, compact, and it does an excellent job at softening the light.
There are numerous other “flash diffusers” you can use. They all do basically the same thing—the frosted plastic spreads the light across your subject in a way that makes on-camera flash more appealing than if the diffusers had not been used.
Mini Softbox: Similar to studio softboxes which are placed in front of powerful strobe heads in the studio to soften the light. The mini softbox (#5) made by the Dotline Corporation (www.dotlinecorp.com) fits over a portable flash and spreads the light over the subject. It does a great job at simulating a studio. Another Dotline product is the pocket flash diffuser (#6). As with all these diffusion devices, it is more effective the closer it is used to the subject. The further away it is, the more it becomes a point source of light and the diffusion effect is lessened. The mini softbox and the pocket flash diffuser are very useful for head and shoulder portraits and close-ups of flowers and other macro subjects. There is a small amount of light loss. Both products are made of soft fabric that folds down into virtually nothing, and they can pack easily into any photo bag or backpack.


![]()
Get the Latest Photo Tips, News & Reviews from Shutterbug!
| Camera Reviews Other Reviews | Mobile Reviews Photography Reviews Columns | News | Features | How-To | Resources |
 © 2026 Shutterbug
AVTech Media Americas Inc., USA
All rights reserved