Custom Color Balance For Portraits: Match The Light, Enhance The Mood
With all of the portraits I shoot, there are a few constants: low ISO (200–400), mid range f/stop for more lens clarity (f/5.6–f/9), telephoto lens for narrow depth of field (70–120mm) and the sharpest part of the image being the subjects’s eyes. The last “given” when I shoot is to always capture the image in Raw—knowing I can easily manipulate it in editing if needed.
Whether indoors or out, the first step in obtaining a correct color balance is letting your camera know what “white” is. Place a white card under the lighting conditions you intend on using and that falls on the subject and take a custom white balance reading. With my Nikon D700 that means setting the white balance to “Pre” and pressing the shutter once. This records that white balance and keeps it stored under the Custom setting in the White Balance menu, so whenever you set Custom you get that white balance. Naturally, when you change sets or work under other lighting conditions, you make the reading all over again. Other cameras and brands have similar ways of doing this, all using the Custom setting in the White Balance menu.
You might think that setting a “tungsten” preset when shooting indoors will give you just the reading you need, but as you’ll see when you work with Custom it might be one side or the other of the preset. Using Custom will give you an exact color temperature in degrees Kelvin. Indoors with tungsten lighting is normally 3200ºK, but when taking a Custom color balance it could be above or below that. You can use the Custom reading as your final setting, or, as described in some shots here, you can modify that temperature in cameras that allow you to shift the color temps manually, or do so later in image processing to refine the shot to your needs.
Flash
Processing Refinements: In this photo of Kenishia (#1) I set up two studio strobes as my key and fill lights. Normally, setting the camera on “Flash” sets the color balance to 5500°K. I had Kenishia hold an 18 percent gray card in front of her face and I took a reading of 5400°K—very close to “Flash”. This served as a very good foundation for the image, but later in processing I lowered the color temperature to 5125°K—quite a bit warmer than daylight, but adding a golden tone to her dark skin. Darker skin tones always benefit from warmer color temperatures and shooting in Raw allows these adjustments in color temperature to help you achieve your goal.
Nikon D700, 24–120mm Nikkor lens, f/9, 1/80th, ISO 250, 5125ºK.

All Photos © Chuck Gloman, All Rights Reserved
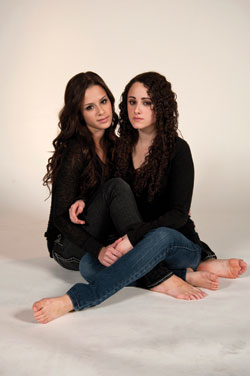
Slight Color Cast Card: Having more than one person in the shot doesn’t pose much of a problem unless their skin tones are different. Cat and her sister Leigha each have slightly different skin tones (#2). Cat’s (camera left) skin tone is more olive than her sister Leigha, who is paler. The color temperature setting with a white card was too blue at 5500°K. Balancing to a pale blue card instead of a white card shifted the image warmer to 5100°K, making Leigha’s skin warmer and further enhancing Cat’s for a nice balance. “Seeing” the blue card as white, the camera balanced at a lower temperature, adding the desired warmth.
Nikon D700, 24–120mm Nikkor lens, f/9, 1/80th, ISO 250, 5100ºK.
Mixed Light: This shot was taken indoors with tungsten lighting (#3). Jessica held an 8x10” white card in front of her face. The reading was 3600°K, which is slightly cooler than the standard 3200°K of tungsten. Wanting a slightly cooler portrait, the 750 watt Mole-Richardson Fresnel (www.mole.com) key light was gelled with quarter color temperature blue (CTO) giving her face a slightly bluish cast. The tungsten Fresnel backlight was not gelled, resulting in a mixed light effect. Just setting the camera on tungsten would not have given me this effect, so setting a foundation white balance and then putting different color temperature light sources into the mix can yield interesting effects. Here, her light skin has a natural color to it because of the soft blue gel.
Nikon D700, 24–120mm Nikkor lens, f/6.3, 1/60th, ISO 400, 3600ºK.
The Great Outdoors
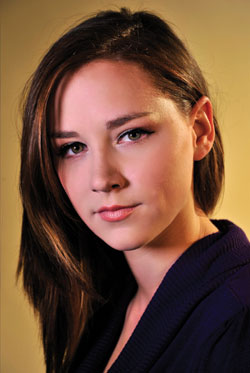
Shooting In Shade: Megan’s tight close-up portrait was made in the shade(#4). Wanting an accurate color temperature, I placed an 18 percent gray card in front of her face and got a reading of 6100°K. This coolness helps accentuate her pale skin and blue eyes. Because her blue eyes are the most striking feature, a little more blue helps.
Nikon D700, 24–120mm Nikkor lens, f/8, 1/400th, ISO 320, 6100ºK.

Tinted Card Reading: Another example of white balancing on a blue card, similar to the technique described in the flash section, is with Leo (#5). Balancing on the blue card returned a color temperature of 6600°K, slightly higher than the overcast day would have normally read. The warmth darkens his skin tone and makes his facial hair much more prominent. A touch of fill flash made his eyes light up without lowering the temperature too much.
Nikon D700, 24–120mm Nikkor lens, f/5, 1/80th, ISO 200, 6600ºK.

Color And Shade: I usually prefer skin tones to be warmer than the natural surroundings. Warmth accentuates the skin tones, making the subject’s eyes stand out even more. With Sharon, her golden skin made her green eyes the focal point of the image (#6). Clothing adds to the portrait and, in Sharon’s case, it helps bring out the green in her eyes even more. Although outside in the shade, I white balanced using white foam core board while Sharon was sitting in full sun (5600°K). I then used the board to shade her—raising the color temperature to around 6800°K. Leaving the full sunlight color balance reading gave Sharon the warm, healthy glow I was after.
D700, 24–120mm Nikkor lens, f/5.6, 1/320th, ISO 250, 6800ºK.

Cloudy Days: Cloudy days are my favorite in that the light is the most even, but the color temperature is bluer (#7). Even though the color balance was 9000°K for Cait, balancing on a medium blue card warmed her sufficiently and lowered the temperature almost 2000°K.
Nikon D700, 24–120mm Nikkor lens, f/6.3, 1/250th, ISO 250, 7200ºK.

Using “Color Tinted” Cards For White Balance Readings
In this article I bring in a technique that involves using slightly color tinted cards for making white balance readings. When taking manual color balance readings with your camera, a white card will give you an accurate representation of the color temperature that helps you get a neutral color under various lighting conditions. If you use a tinted card you skew the readings in the opposite direction. For example, balancing on a blue or pink card will lower or raise the temperature respectively. So, if I want a “warmer” or yellow color cast I use the tinted blue card—for a “cooler” cast use a pink or slightly yellow card. Think complements on the color wheel and you’ll see how it works (for example, a greenish card would shift colors to the magenta side).
I enjoy finessing color balance this way because I rarely want to use the exact balance my camera suggests, that is, strictly neutral colors. And keep in mind that you can also change your mind in editing, though I prefer going into the session with a clear color temperature in mind.
Chuck Gloman is the Chair of the TV/Film Department as well as an Associate Professor at DeSales University. He may be reached chuck.gloman@desales.edu.
- Log in or register to post comments


