- REVIEWS
Camera Reviews 
More Reviews Mobile Reviews Photography Reviews - GALLERIES
- VIDEOS
- BUYER'S GUIDES
Composite Project
The Hair Challenge
I was privileged to be able to photograph a champion Gypsy Vanner horse, Romeo, with a beautiful model in period costume. I chose late afternoon about an hour before sunset to take advantage of the spectacular backlighting on the blond mane, the tail, and the feathering around the feet. For this particular photo session, I wasn’t able to shoot Romeo in an open field, and the corral fence behind him (#1) bothered me at the time but there were no other options. I knew I wanted to separate my subjects from the background at a later point in time during post-processing, but what makes this breed of horse so beautiful—the long, flowing hair—is a nightmare to deal with in composite work.
 |
|
|
Cutting out a subject with hair, even with the best available software, can make a grown man cry! To make the final composite look natural and correct, as if the subject was really in the scene, is sometimes simply impossible. There are two reasons for this. First, because all digital images are comprised of pixels, when the edge of a subject meets the background there isn’t a sharp-edged line that separates the two elements. Instead, there is a transition zone as you can see in photo (#2). This is an area made up of one or two pixels that goes from the color and tone of the subject to the color and tone of the background. Simply cutting along an edge and then pasting the subject into a new environment won’t make a realistic blend at the edge.
 |
|
|
Second, hair is partially translucent at the edge. In other words, it allows color tone and light from the background to be seen at the edge of the hair. This compounds the complexity of separating hair from its original background.
I normally don’t even try to seriously separate a subject with hair because it rarely looks real. It looks almost real, which isn’t good enough for me. In fact, before embarking on this project I did try a number of selection software programs and while they worked quite well, and can do amazing things with less picky subjects, I knew that this one needed my personal hand work and a commitment of time and patience. The backlit blond hair of the horse provided me with a ray of hope, and I was very determined to turn this into a stunning image no matter how long it took.
Choosing A Background
When you put images together, the most important consideration is the light. The light on the subject must match the light coming from the background. Since the horse and rider were backlit from a low angled sun, I had to choose a scene where the sun was very close to the horizon. This is the only way the composite would be believable.
In addition, the focal length of the lens should be similar in both shots. It would look strange if you combined a subject taken with a wide angle lens with a background taken using a telephoto. The background image (#3) I chose for this composite is a sunrise picture that I took with a 200mm lens. I used a 300mm focal length for the horse and rider, and as you can see both images exhibit a similar type of compression typical of telephoto lenses. That helps make the final combination of images look correct.
 |
|
|
Cutting And Pasting
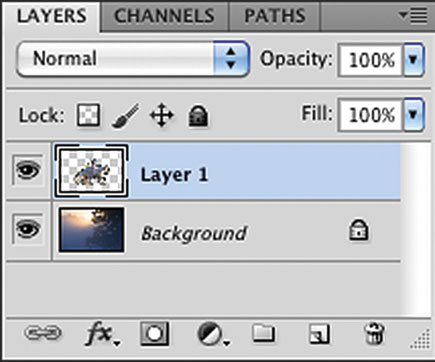
The first action I took was to make a rough selection around the horse and rider using the Lasso tool in Photoshop. I then copied that to the clipboard, Select>All and then Edit>Copy. The clipboard is an invisible temporary holding place for one photo, or one portion of a photo, at a time. I then opened up the sunrise shot and used Edit>Paste, which placed the horse and rider on a layer over the landscape, (#4). You can see in the layers palette, figure A, that the layer is floating above the background.
 |
|
|
I wanted the subjects facing the opposite direction, so I used Edit>Transform >Flip Horizontal. And then, to change the size of the horse and rider so the proportion and perspective looked better, I used Edit>Transform>Scale. This put a box around the layer, and I simply grabbed a corner handle on the box, holding the Shift key down to maintain the correct proportions, I reduced the subject’s size until I thought it looked good.
Applying A Layer Mask
To eliminate the original background from the horse and rider, I created a Layer Mask with Layer>Layer Mask>Reveal All (you can also use a shortcut: click the icon to the immediate right of the fx symbol at the bottom of the layers palette). This allowed me to paint away the background using the Brush tool. When the foreground/background color boxes at the bottom of the Tools palette are black/white respectively (figure B), the Brush tool becomes, in effect, an Eraser tool, and I could brush away the unwanted fence and green foliage.
 |
|
|
 |
|
|
Now comes the hard part. In brushing away the unwanted background, I had to be extremely careful when I came to the hair of the horse. If I didn’t come close enough to each hair, the picture would have an unattractive and undesirable dark line around the entire periphery. If I was too aggressive and tried to brush away the transition zone between the hair and the background, I would lose much of the fine detail that would make this composite look real.
The painstaking solution I came up with, after much deliberation and some trial and error, was to work at 600 percent magnification and brush up to the transition zone of each hair. I was working at pixel level, and it took me about three hours to brush away the background. However, when I was done and I looked at the picture in its entirety, there was still a very thin dark line around the brilliantly backlit hairs of the horse. I was as meticulous as possible, but this line persisted. This wasn’t acceptable. The image would never pass a reality test.
I solved the problem by going back to a basic darkroom technique (does anyone remember what a darkroom is?). The Burn and Dodge tools in Photoshop are so named because they duplicate what we used to do in the darkroom. The Burn tool darkens an area (as if you are “burning in” density with additional exposure from an enlarger) and the Dodge tool lightens an area of the image (as if you are holding back the light from an enlarger during an exposure of several seconds).
With the composite of the horse and rider still enlarged to 600 percent, I clicked on the Dodge tool and then made the size of the tool very small by repeatedly clicking the left bracket key on the keyboard (next to the “P”). I then dodged the periphery of each hair to lighten that telltale dark line. This took another chunk of time—perhaps 45 minutes—but this was the final touch. The undesirable dark line was gone and the picture, miraculously, looked real to my critical eye.
The reason the Dodge tool worked was because the individual hairs of the horse were blond and backlit, which meant they were virtually solid white. The Dodge tool simply lightened the dark periphery and it was as if I had brilliant edge lighting all along.
The Reflection
The final touch was to add the reflection. I used my favorite Photoshop plug-in, Flood (made by Flaming Pear Software, www.flamingpear.com), to do this. This plug-in creates the most realistic reflections. Doing this served two purposes. First, the reflection added a magical quality to a magical subject. And second, it’s very difficult to make the feet of animals and people look correct as they meet the ground of a new background. The digital reflection blended the horse’s hooves with the ground perfectly.
 |
|
|
I consider this picture to be in the top ten of my all time favorite photographs I’ve taken in my career (#5).


![]()
Get the Latest Photo Tips, News & Reviews from Shutterbug!
| Camera Reviews Other Reviews | Mobile Reviews Photography Reviews Columns | News | Features | How-To | Resources |
 © 2026 Shutterbug
AVTech Media Americas Inc., USA
All rights reserved