- REVIEWS
Camera Reviews 
More Reviews Mobile Reviews Photography Reviews - GALLERIES
- VIDEOS
- BUYER'S GUIDES
Choosing the Correct Printer Settings
For the purposes of this article, I'll focus on Photoshop. Although the screen shots here are from Photoshop CS2, the options are similar for Photoshop 7 and CS. Photoshop Elements gives you fewer options than its big brother, but the concepts are the same.
Once you have your image edited and ready for printing, select File > Print with Preview (Figure 1). If you don't see the Options area when selecting Print with Preview, click the button labeled "More Options". With Color Management selected from the drop down list, the area we need to focus on is Options.
 |
|
|
Color Handling will determine whether Photoshop, the printer,
or nothing handles all color management. You'll get the best results by
selecting "Let Photoshop Determine Colors", particularly if you
have profiles for your printer and paper. With this setting, it's important
to turn off color management in the printer driver to avoid problems. I'll
get to that in just a bit.
Printer Profile contains a list of all profiles installed on
your computer. Look for the one that matches your printer and the paper you
are using. In this example, I'm printing to a Canon Pixma iP8500 with
Canon Pro Gloss paper. If you don't have a profile for your printer and
paper combination, which is likely if you use third party papers, check the
website for available profiles. Paper vendors often create profiles for their
products and make them available free of charge.
Rendering Intent has four options, but for photographs only
two of them matter. Perceptual and Relative Colorimetric will give you the best
results with photos. Perceptual is my usual choice and attempts to preserve
visual relationships between colors when making adjustments. Relative Colorimetric
preserves more of the original colors in the image at the expense of accuracy.
It shifts colors based on the white value of the source and destinations, making
adjustments only when a color is unable to be displayed by the printer (known
as out of gamut).
 |
|
|
Now you need to verify that printer color management is turned off. Click Page Setup and navigate to your printer driver (Figure 2). Canon and Epson handle this differently, so I'll show examples of both. First up, in the Canon driver set the paper type to the correct value for your chosen paper. Select Manual for Color Adjustment and click Set. Be sure "Enable ICM "is unchecked, and select "None" for Print Type (Figure 3).
 |
|
|
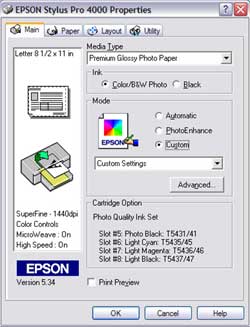
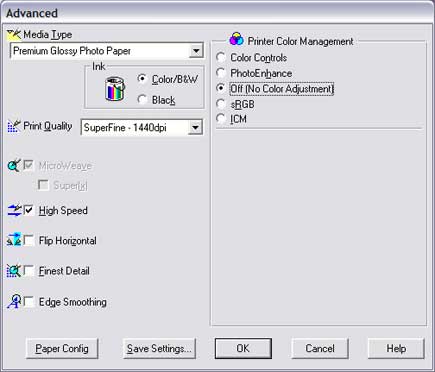
Epson users will open the print driver in the same way, and select the correct paper type (Figure 4). Under Mode select "Custom" and click the Advanced button. Under Printer Color Management, select "Off (No Color Adjustment)" (Figure 5).
 |
|
|
Going the Other Way
If you don't use Photoshop and your application doesn't allow you
to manage color settings, you'll want the printer driver to handle the
work for you. In this case, Canon users will select "Enable ICM"
after navigating to the Manual Color Adjustment dialog box. Epson users will
select "ICM" from the Printer Color Management options in the Advanced
dialog. Using ICM insures your printer will do its best to match the colors
seen on screen when printing.
 |
|
|


![]()
Get the Latest Photo Tips, News & Reviews from Shutterbug!
| Camera Reviews Other Reviews | Mobile Reviews Photography Reviews Columns | News | Features | How-To | Resources |
 © 2025 Shutterbug
AVTech Media Americas Inc., USA
All rights reserved