- REVIEWS
Camera Reviews 
More Reviews Mobile Reviews Photography Reviews - GALLERIES
- VIDEOS
- BUYER'S GUIDES
The Case for Center Weighted Metering
![]()
The Case for Center Weighted Metering
by George Schaub
While today's multi-pattern metering system found in most DSLRs are marvels of technology, you'll notice that almost every DSLR also has other metering pattern options. The two main options, with variants available on some cameras, are center-weighted averaging and spot metering. Multi-pattern meters work with "zones" of light sampled from the viewfinder framing, with the brightness patterns compared to a look-up-table of exposure "solutions" to the "problem" the relationship of brightness values states. It's quite sophisticated and works with microprocessors and sophisticated metering predictors, and works amazingly well much of the time. However, there are times when the other two patterns come into play, and while they hark back to metering systems used in the past (in pre-microprocessor days) they are still are effective for a number of lighting situations. In this quick tip I'll focus on center-weighted averaging.
When you use center-weighted averaging (CWA) you are defining the area in which the metering system reads the light from the scene. That area is, as the name suggests, in the center of the finder, an oval or egg shaped pattern that covers almost the entire finder, except for the edges, and concentrates the exposure reading at about 70% in the center and 30% at the edges of the pattern.
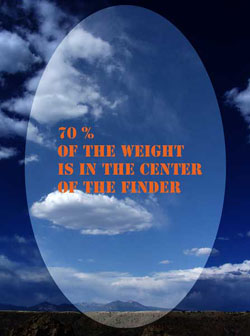
Here's a simulation of the area of coverage of the center-weighted metering pattern. Though all the area is covered, most of the "weight" of the reading is from the center area of the viewfinder.
In fact CWA is a good pattern to use with digital SLRs because one of the key elements in digital exposure is making sure highlights are not overexposed. There's nothing worse than a harsh digital exposure where highlights are burnt up--it's one of those exposure "conditions" that even the mighty Photoshop cannot properly fix.
When highlights are overexposed they create harsh, overly bright areas in the image that are very difficult to properly fix even in Photoshop. While burnt up highlights can be suppressed or filled with tone, they never quite make it compared to what could be achieved with a proper exposure. Here's a classic exposure that was read off the darker ground area, with consequent harsh, burnt up clouds.
When you are confronted with a high contrast scene one of the best ways to expose is to switch to CWA and point the camera so the viewfinder encompasses the brighter are in the scene. This does not mean you should approach or zoom the lens so only the bright area is read. It means to encompass the bright area by placing it in the center of the finder, then using exposure lock to keep that exposure and then recomposing to make the picture.
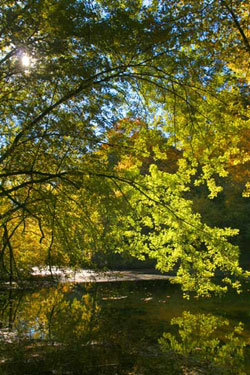
Here is a typical high contrast scene where CWA and exposure lock delivers the best exposure (one that controls the bright highlight.) The camera was aimed at the bright light coming through the trees, the exposure was locked and then the camera was lowered and the exposure made.
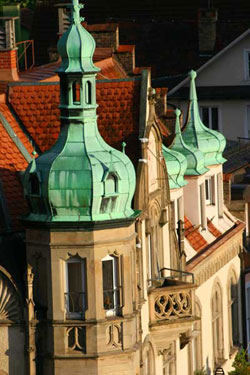
In this scene the camera CWA was also used. The finder was "lowered" so the bright portion of the buildings became the source of the brightness value information, the exposure was locked and then the camera was tilted up for this composition.
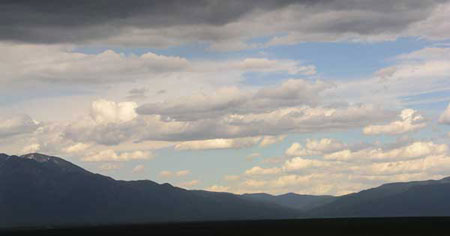
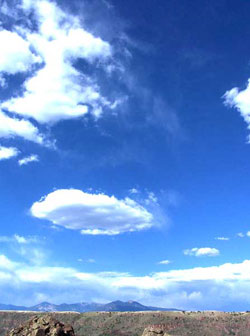
Bright sky/dark ground is a classic exposure problem, but one that's easily
solved with CWA techniques. Here you read the exposure from the sky and then
recompose to include the ground. This insures that the bright clouds in this
high contrast scene will not "burn up", or become too overexposed
to make a good print.


![]()
Get the Latest Photo Tips, News & Reviews from Shutterbug!
| Camera Reviews Other Reviews | Mobile Reviews Photography Reviews Columns | News | Features | How-To | Resources |
 © 2026 Shutterbug
AVTech Media Americas Inc., USA
All rights reserved