- REVIEWS
Camera Reviews 
More Reviews Mobile Reviews Photography Reviews - GALLERIES
- VIDEOS
- BUYER'S GUIDES
Alien Skin Snap Art 3: Gives Your Photos The Look Of Handmade Art
Since Snap Art 3 is a plug-in, in order to use it you must have Photoshop, Lightroom, or Elements to run it (see the list at the end of this article). Whether you work on Windows or Mac, SA3 couldn’t be more straightforward. In Photoshop, open a photo and choose Filter>Alien Skin>Snap Art 3. You’ll be presented with 11 art media styles to choose from: Color Pencil, Comics, Crayon (new), Impasto (thick textured paint), Oil Paint, Pastel, Pen and Ink, Pencil Sketch, Pointillism (inspired by Impressionist painting), Stylize (this creates a posterized or silkscreen look) and Watercolor. Chose one of these and a large preview opens as SA3 applies the effect. If you like it, click OK. If not, delve into the tabs and submenus to tweak and vary the look until you have completed your masterpiece.
New In Version 3
Snap Art version 3 adds a number of enhancements to the first two iterations of the program including more refined stroke placement, making the resulting art more natural and accurate. The most important new feature, in my view, is the ability to selectively mask portions of the photo to preserve detail. Version 2 had focus regions, but with version 3, you simply add a detail mask from within SA3 and brush in the broad outlines of the areas where you want to show more realistic detail, such as a face. With substantially more control than in version 2, you decide where detail is retained, and vary the extent of the realism. SA3 can render most of a painting abstractly while maintaining detail in critical areas. The hard work of finding edges and drawing thousands of brush strokes is handled automatically by SA3’s rendering engine.
Real world art techniques are carefully emulated by SA3, such as multiple layers of varying stroke size and enhancement of important edges from the original photo. SA3 simulates details down to individual bristles on curved strokes and interaction between the brush and canvas texture. There are hundreds of presets in version 3 and users can create and save even more. Finally, SA3 takes advantage of multi-processors and multi-core CPU’s, improving processing speed on computers with these chips.
Auto Art With Thick Paint Impasto
I opened my shot of a brass lion’s head door knocker (#2) in Photoshop CS5, and selected Filter>Alien Skin>Snap Art 3 to bring up the window (#3). There’s a large preview of your image with the effect applied in the center. At the upper left, below a thumbnail of your original photo, is the Factory Settings list of the styles and variations available to you, (#4). The second item, Favorites, is a selection of one or two top effects in each style, a great place to start exploring the program’s possibilities.

All Photos © Howard Millard
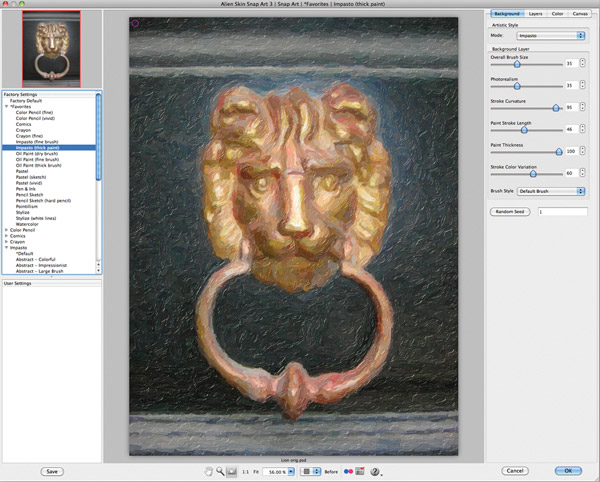

From the Favorites menu, I chose Impasto (thick paint). For the examples here, I began with 300 ppi native Photoshop .psd files, about 9 MB, 5x7” or so. Rendering the preview usually took less than 2 seconds. Once I tweaked each effect and clicked OK at the lower right, rendering the final .psd file usually took less than 5 seconds. Of course this time will depend on the type of original (how detailed it is), file size, your computer’s horsepower and the effect you’ve chosen.
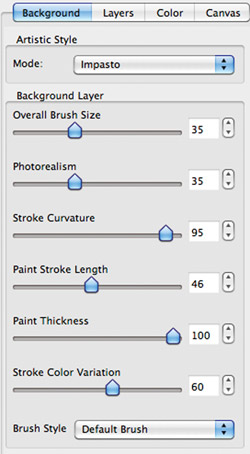
I strongly suggest that you preview your art effect at the size you plan to print it or display it onscreen, as size really matters here. Brush strokes and textures that are scarcely visible at 5x7” can be dramatic and pronounced at 8x10”. Alien Skin makes it easy to fine tune the effects to suit your final output size, with the tabs and their associated controls seen at the top right of the Snap Art 3 window (#3). Note that for Impasto (thick paint), the Background tab (#5) gives you the opportunity to vary overall brush size, the degree of photorealism (how real or abstract your final artwork looks), brush stroke curvature, stroke length, paint thickness, color variation and brush style. Very flexible, very impressive.
While the default preview shows the entire photo—which I prefer initially—you can change the preview size by clicking on the magnifying glass icon in the menu bar at the bottom of the window, then click within your photo’s preview to enlarge it, or alt/option click to shrink it. Once you have a look you like, it is a good idea to check the filter effect at 100 percent.
Also handy is the Preview Split feature, available in a drop down menu in the center below the preview, which allows you to split the image to show half of the original and half with the filter effect in a number of different ways, side by side, or top and bottom. Or, you can choose to see the filter effect on the full image in the preview and toggle between it and the original by using the space bar on your keyboard.
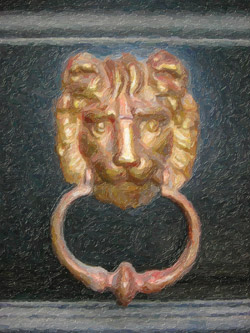
SA3 thoughtfully places the artistic effect on a new layer in Photoshop above your original background layer. That makes it easy to compare the original and the effect, and to perhaps later modify the effect with masks and/or Blend modes in Photoshop’s layers panel. You can also run SA3 as a Smart Filter in Photoshop. After playing with the Background tab sliders, I decided that the default settings looked best. In the final rendered image (#6) highlights help define the thick impasto paint application, adding pronounced texture and depth, while the colors are rich and varied. The image now packs a punch.
Abstraction With Oil
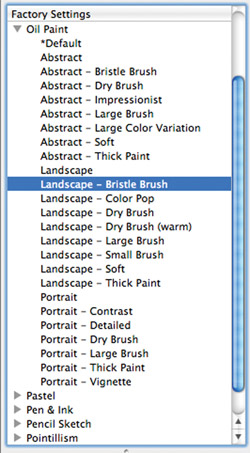
Among the Factory Settings, your choices for an Oil Paint look (#7) number no less than 25 including Abstract-Large Brush, Landscape-Soft and Portrait-Dry Brush. To test drive them, use the arrow keys to scroll down through the choices while previewing each effect full size in the preview window. Starting with my spring shot of a fruit tree dripping with white blossoms behind bright tulips in the foreground (#8) I chose Landscape-Bristle Brush.
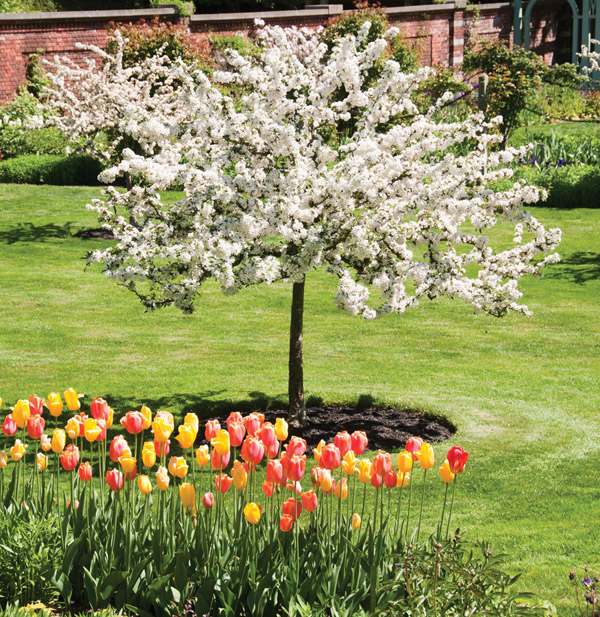
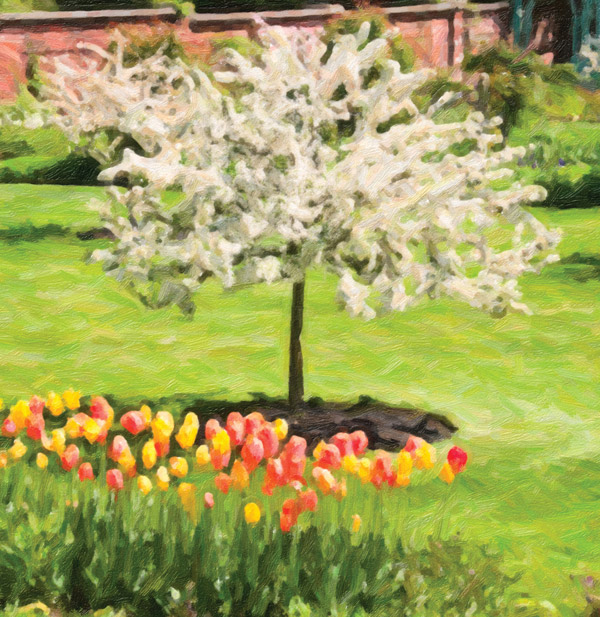
Next, I went to the Canvas tab at the upper right of the SA3 window (#9). Clicking on the drop down menu presents you with a choice of 17 textures for your “Canvas” including Rough Paper, Cloth, Leather and Wood. I stayed with the default Hot Press Paper, which has a smooth surface. In the Bristle Brush rendering I applied the strong abstraction of broad-brush strokes and dabs of vibrant color that should be visible even in a small size magazine reproduction (#10).

Fashion Sketch In Pencil
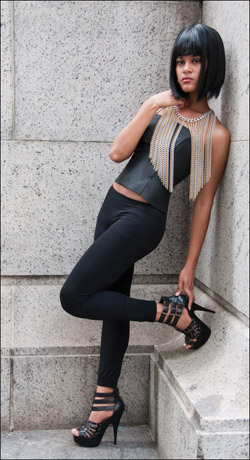
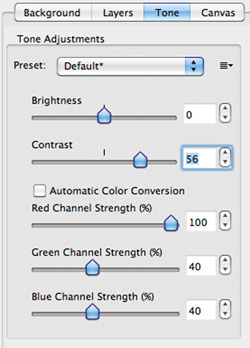
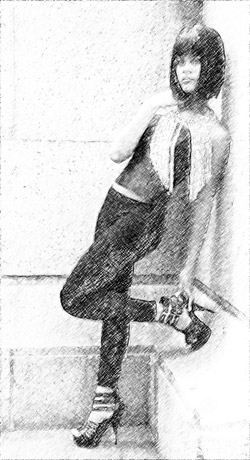
To transform my shot of model Tijashn Nichols (#11) into a black and white fashion sketch, I headed for the Pencil Sketch category and selected Portrait-Hard Pencil. Because the initial result was too low in contrast, too gray, I clicked on the Tone tab (#12) (upper right of the SA3 window), and bumped up the Contrast slider to 56. While this improved things, the overall feel was still too flat for my taste. So, after running the SA3 Pencil Sketch filter and saving the result, I added a Levels layer in Photoshop where I increased the contrast further and adjusted the midtone detail. Result: Image (#13) is a striking monochrome fashion drawing with strong blacks, midtone grays and bright highlights.
Masking Control
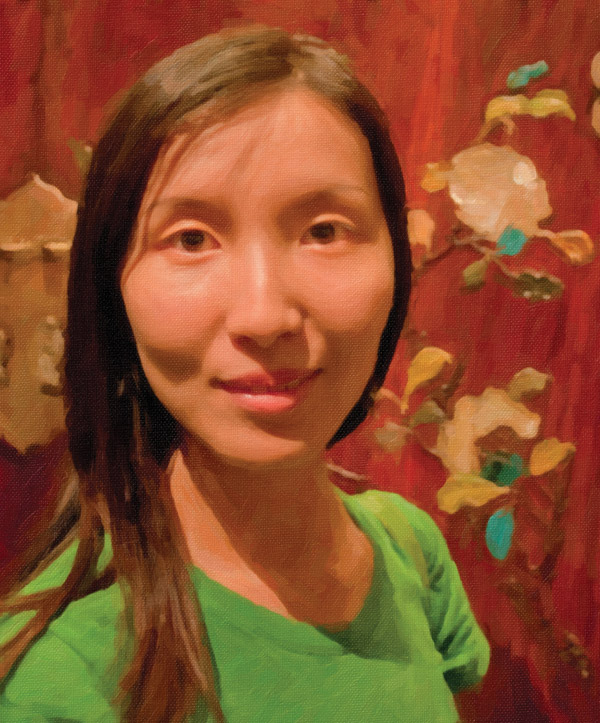
One of the outstanding new features in SA3 is the ability to easily mask within the plug-in itself—no need to exit to Photoshop. SA3’s Oil Paint options may be among the most popular with portrait and wedding photographers. So to demonstrate an oil portrait with selective masking, I chose a close head shot of Mei (#14). The effect I selected is the Factory Default setting, the first in the Factory Settings list. This setting (#15) creates broad brush strokes laid down on canvas texture, with colors very similar to those in your original photo.


If you prefer the face to look more realistic, less abstract, simply add a mask. Click on the Layer Mask icon at the bottom center of the SA3 window—it’s similar to the icon used in Photoshop, a gray rectangle with a white circle inside. A brush will appear, and the tab at the upper right will change to the Layers tab. Brush loosely over the areas you want to mask—you don’t have to be too precise. A bright magenta stroke will appear where you have brushed on the mask (#16). You can vary the size of the brush with a slider in the Layers tab (#17). You’ll also find controls here to add to or erase the mask.

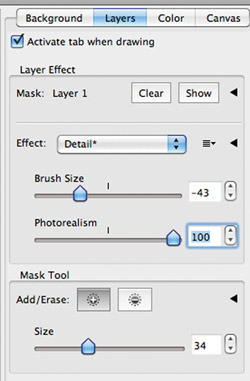
After brushing on my mask, I wanted even more realism, so I pushed the Photorealism slider in the Layers tab up to 100. There are still some brush strokes and broad highlights visible in the face (#18) so it still looks like an oil painting. But the face is much more realistic, while the unmasked background remains very abstract with broad-brush strokes.
Pop Back To The 60’s
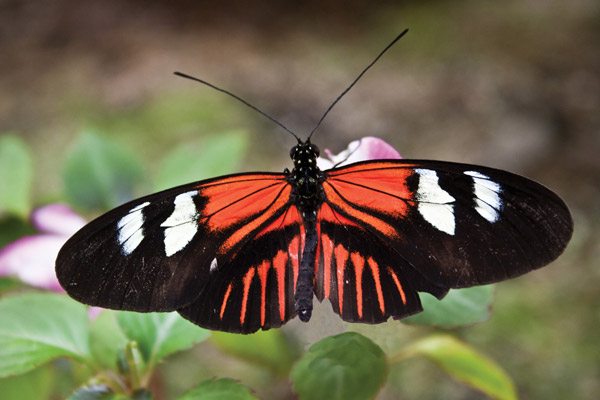
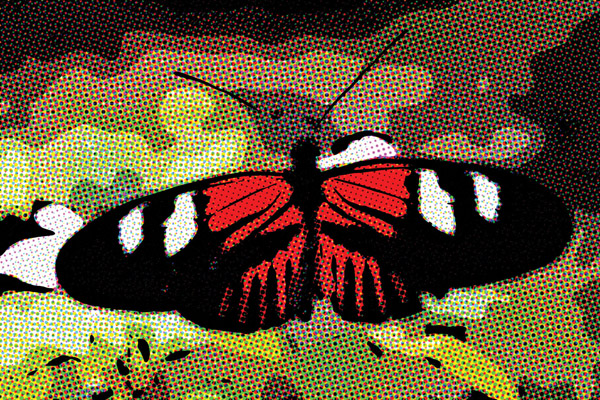
To apply a Pop Art effect, I opened this shot of an exotically colored butterfly (#19). From the Factory Settings I choose Comics and used the arrow keys to scroll down through the effects. Both the Default and the Color-Color Boost settings looked good with this image. I increased the size of the dots to make the effect more visible at the repro dimensions. To do it, I pumped up the Feature Size slider in the Background tab to the max at 100. I also advise you to experiment with the Edge Strength and Posterization adjustments here. After applying the tweaked effect (#20) the butterfly is now totally screened with color half-tone dots, while the background has been Posterized into multiple zones creating a striking, bright, colorful graphic.
Customization Options
Space precludes covering all of the Snap Art effects, tabs, and sliders, but it is important to note that version 3 offers significant controls to fine-tune each effect to your individual taste. Tabs for Background, Layers, Color, Tone and Canvas offer the ability to adjust these variables. Under Color, you’ll find sliders for brightness, contrast, saturation and temperature (cool/warm). In the Canvas tab, you can select the texture type (canvas, wood, art papers, even brick), zoom (size of texture) and color. For Lighting, you can adjust the highlight brightness, highlight size, direction and angle, as well as highlight color. Finally, you can add a Vignette effect with controls for amount, size, softness (feather) and distortion. And you can save any settings to create your own custom library of effects.
Transforming your photos to emulate traditional art media has never been easier or faster than with Snap Art 3. Be sure to try printing your creations on canvas as well as fine art inkjet papers, textured and smooth. For portrait, wedding and fine art studios, these artistic effects can open up new avenues of creativity and new markets.
Specs
System requirements: Pentium 4 processor with Windows XP SP3 or later, 64-bit Intel processor Mac with OSX 10.5 or later.
Host requirements: Adobe Photoshop CS4 or later, Elements 8 or later, Lightroom 2 or later (supports batch processing in LR and does not require Photoshop if you have LR).
Sources: Alien Skin Snap Art 3 sells for $199 with an upgrade price of $99 for registered users of Snap Art 1 or 2. Online or physical delivery as well as many helpful free examples and videos can be found on the website at www.alienskin.com.


![]()
Get the Latest Photo Tips, News & Reviews from Shutterbug!
| Camera Reviews Other Reviews | Mobile Reviews Photography Reviews Columns | News | Features | How-To | Resources |
 © 2025 Shutterbug
AVTech Media Americas Inc., USA
All rights reserved